1. Getting Started
1. Getting Started
What is Time Tracker?
Time Tracker extends the built-in Jira time tracking through configurable reports for users and groups. Save time and gain valuable insights to see trends and plan future projects more efficiently.
Key Features & Benefits
Tempo’s entry-level time reporting app that extends Jira, capturing time spent on every project flow. Features include the ability to subscribe to reports by email, and the possibility to get worklogs in json format, through a REST endpoint plugin.
Time Tracker vs. Time Tracker Lite
Time Tracker is our full-featured app for time logging, reporting, and analysis in Jira.
In the past, a limited edition called Time Tracker Lite was available. However, Time Tracker Lite is now deprecated and no longer supported.
To avoid conflicts or missing features, we recommend all customers use the full version of Time Tracker.
Time Tracker Lite (Deprecated)
-
Deprecated: no longer maintained or updated.
-
Basic time logging only.
-
No advanced reporting (Flexible Report, Scheduled Reports).
-
Limited configuration and integration options.
-
Known conflict: If Lite is installed alongside Time Tracker, it prevents the full app from working correctly.
-
Migration required → uninstall Lite before installing Time Tracker.
Time Tracker (Full Version)
-
Actively maintained with ongoing updates and bug fixes.
-
Includes Flexible Report and Scheduled Reports.
-
Supports exporting data (CSV, XLSX, PDF).
-
Role-based access (org-admin vs. user).
-
Works with Jira APIs and integrates with other marketplace apps.
-
Recommended for all teams moving forward.
Key Differences
|
Feature/Aspect |
Time Tracker Lite (Deprecated) |
Time Tracker (Full) |
|---|---|---|
|
Status |
Deprecated |
Actively supported |
|
Cost |
Free (limited) |
Paid (full features) |
|
Worklog entry |
Basic |
Full logging, bulk edit |
|
Reports |
None / very limited |
Flexible Report, Scheduled Reports, exports |
|
Permissions |
Basic Jira only |
Role-based access control |
|
Integrations |
Basic Jira time tracking |
API endpoints, Tempo, etc. |
|
Support |
None |
Full vendor support & roadmap |
Migration Path
If your Jira instance previously used Time Tracker Lite, follow these steps to move to the supported version:
-
Go to Manage Apps in Jira.
-
Uninstall Time Tracker Lite.
-
Install Time Tracker (full version) from the Atlassian Marketplace.
-
Verify your license activation.
-
Configure settings (time format, default units, permissions).
-
Run a test report to confirm successful setup.
Common Questions
-
Can I still use Time Tracker Lite?
No — Lite is deprecated and unsupported. You should uninstall it and use the full version. -
Why can’t my team access Time Tracker after installation?
In most cases, Lite was still installed. Uninstall it before setting up the full app. -
Will my existing worklogs be lost when migrating?
No — worklogs are stored in Jira, not in the app. Migrating only affects the UI and reporting features.
Supported Platforms & Requirements
Jira Editions
-
Jira Cloud → Fully supported.
-
Jira Data Center / Server → Fully supported, with additional DB table for scheduled jobs.
Jira Versions
-
Cloud: always compatible with the latest Jira Cloud release (Atlassian handles hosting & updates).
-
Data Center / Server: check Marketplace listing for minimum supported version (e.g., Jira 8.x and above).
Browsers
-
Supported: Chrome, Firefox, Safari, Edge (latest versions).
-
Known issue: older Microsoft Edge versions had rendering problems with the timesheet visualization (fixed in recent updates, but worth noting).
Permissions
-
App requires that users have the “Work on Issues” permission in Jira to log time.
-
Some features (e.g., scheduling reports, managing settings) require Jira Admin or Org Admin role.
Database (Server/DC only)
-
Relies on Jira’s existing issue & worklog database tables.
-
Adds one additional table for storing scheduled job configurations.
Hardware/Performance
-
Lightweight plugin — no significant performance overhead.
-
For large instances (>1,000 worklogs per query), admins may need to:
-
Adjust Jira indexing.
-
Use Flexible Report for optimized queries.
-
Compatibility with Other Apps
-
Designed to work with Jira’s native time tracking.
-
Compatible with other time tracking/reporting apps (e.g., Tempo).
-
No substitution of Jira’s built-in features.
Support Lifecycle
-
Time Tracker Lite → Deprecated, no longer supported.
-
Time Tracker (Full) → Actively supported with regular updates and bug fixes.
2. Installation & Upgrade
2. Installation & Upgrade
Installing on Jira Cloud
-
Navigate to the Atlassian Marketplace.
-
Search for Time Tracker for Jira.
-
Click Try it free or Buy now.
-
Select your Jira Cloud site from the dropdown.
-
Click Start free trial (or confirm purchase if buying directly).
-
The app will be installed automatically on your selected Jira Cloud instance.
or
-
Log in to Jira as an administrator.
-
Go to Settings ⚙️ → Apps.
-
In the sidebar, select Find new apps (or Find apps).
-
Use the search bar to look for Time Tracker.
-
Click on the app, then select Try it free or Buy now.
-
Follow the prompts to install.
Verifying the Installation:
-
Go to Apps → Manage apps in Jira.
-
Confirm that Time Tracker is listed as installed.
-
Open any Jira issue → you should see the Time Tracker panel available for logging work.
Is Time Tracker intrusive?
No. Time Tracker is non-intrusive. It does not alter Jira’s native functionality or replace Jira’s time tracking.
Where is the data stored?
-
Jira Cloud: Time Tracker only reads existing issue and time tracking data from Jira’s database. It does not create its own storage tables.
-
Jira Server/Data Center: Time Tracker also creates one small additional table in the Jira database. This table is used only for storing scheduled job configurations (e.g., report subscriptions).
Worklogs, issues, and native Jira fields always remain stored in Jira itself.
Does functionality differ for issues created before/after installation?
No. Time Tracker works with all existing issues and worklogs.
-
Issues created before installing Time Tracker behave the same as new ones.
-
No Jira functionality is modified, substituted, or blocked by the app.
Key Takeaway
Time Tracker is designed to be lightweight and safe:
-
Reads existing Jira data.
-
Adds minimal storage (only for scheduling configs on Server/DC).
-
No changes to Jira issue behavior before or after installation.
Installing on Jira Data Center / Server
Supported Jira Versions
-
Jira Data Center: Versions 9.0.0 to 11.0.1. Atlassian Marketplace
Installation Methods
Option 1: Install via Atlassian Marketplace
-
Log in to your Jira instance as an administrator.
-
Navigate to Jira Administration ⚙️ → Manage apps.
-
Click on Find new apps in the sidebar.
-
Search for Time Tracker for Jira.
-
Click Try it free or Buy now.
-
Follow the prompts to complete the installation.
Option 2: Manual Installation
-
Download the
.jarfile for Time Tracker for Jira from the Atlassian Marketplace. -
Log in to your Jira instance as an administrator.
-
Navigate to Jira Administration ⚙️ → Manage apps.
-
Click on Manage apps in the sidebar.
-
Click on Upload app.
-
Select the downloaded
.jarfile and upload it. -
Follow the prompts to complete the installation.
Post-Installation Configuration
-
Permissions: Ensure that users have the appropriate permissions to log work and access Time Tracker features.
-
Scheduled Jobs: Configure any scheduled jobs, such as report generation, as needed.
-
Integrations: Set up integrations with other Jira apps or external tools if required.
Notes
-
Time Tracker for Jira is a commercial app and requires a valid license.
-
Ensure that your Jira instance meets the system requirements for the app.
-
For detailed documentation and support, refer to the official documentation.
-
Migrating from Time Tracker Lite
-
Uninstalling & Reinstalling
-
Licensing & Validation
3. Configuration
3. Configuration
Global Settings
-
Time Tracker is non-intrusive: it does not modify Jira’s core behavior.
-
It primarily reads Jira’s native time tracking and issue data.
-
On Data Center/Server, an additional table is created only for storing scheduled job configurations.
-
Global settings can be accessed by Jira administrators under:
Administration → Manage apps → Time Tracker.
🔍 Note: Issues created before or after installing the app behave the same way.
Time Tracking Format (Hours, Minutes, Days)
-
Time Tracker supports the same input format as Jira native time tracking:
-
Hours (h) – e.g.,
1h,2h 30m-
Minutes (m) – e.g.,
45m,90m -
Days (d) – if your Jira global settings use “days” as a working unit
-
-
Examples:
-
1h 15m→ 1 hour 15 minutes -
2d→ 2 working days
-
📝 Time Tracker aligns with your Jira system’s time tracking configuration (Administration → Work Items → Time Tracking).
Default Units for Time Tracking
-
If no unit is specified (e.g., entering
2), Jira and Time Tracker will interpret the value based on Jira’s global time tracking configuration. -
By default, Jira assumes hours if no unit is added.
-
There is no separate “default unit” setting inside Time Tracker — it inherits Jira’s behavior.
Custom Fields & Mapping
Some Time Tracker reports and exports may use Jira custom fields such as:
-
customfield_10060– often linked to “Planned Time” -
customfield_10016– sometimes used for “Original Estimate”
Key points:
-
Time Tracker reads values from Jira custom fields, it does not create its own.
-
Custom field IDs can vary per instance → administrators can check them in Jira Admin → Issues → Custom Fields.
-
If a custom field is renamed, the ID remains the same, so mappings continue to work.
-
For reporting, ensure the relevant fields are included in your Jira context and visible to users.
Permission Schemes & Roles
Time Tracker respects Jira’s project permission schemes.
-
Who can log time?
Users must have the Work on Issues permission in a project. -
Who can view logged time?
Controlled by the Browse Projects and View All Worklogs permissions. -
Who can configure global settings?
Only Jira Administrators. -
Scheduled reports
Only users with sufficient project access can schedule or view reports.
Integration with Jira Native Time Tracking
-
Time Tracker is fully integrated with Jira’s native worklogs.
-
All time logged via Time Tracker is stored in Jira’s standard worklog database.
-
Reports use Jira’s worklog entries, so any time logged in Jira natively also appears in Time Tracker.
-
No differences exist between issues created before or after installation.
5. Reports
5. Reports
-
Overview of Reports
-
12 Report Types: Time entry, Timesheet, Calendar, Timespent, Pivot by User, Pivot by Status, Pivot by Label, Time in Status, Time Tracking, Pie Chart, Resolution Time, Time Balance, and Cost Report.
-
Time Entry Issue Panel Usage
-
Visibility: To see the Time Entry Issue Panel on an issue, the user must belong to a group configured in “Time Entry Issue Panel Groups” or the project must be in the “Time Entry Issue Panel Projects” (configured in Jira Settings > Apps > Timesheet Configuration > Access).
-
Automatic Start: If the “In Progress Issues jql” field in “User Default Settings menu” is left empty, the time tracker won't start automatically; the user must click “Start Time” on the panel.
-
Starting/Stopping:
-
Clicking “Start Time” begins the time tracker.
-
It continues until you click “Start/Pause Work” (left button) or “Log Work” (right button).
-
“Start/Pause Work”: Stops the tracker and displays the started time and duration, but the worklog is not registered until you click “Save”.
-
“Log Work”: Opens the “Log Work Done” page to finalize the worklog, allowing changes to time spent, adding a description, setting a “Date Started”, and adjusting “Remaining Estimate” before clicking “Save”.
-
-
Saving Worklogs: Once saved, the worklog appears on the Time Entry panel with “Edit Worklog” and “Delete Worklog” buttons.
-
Simultaneous Tracking: Starting a new tracker while one is ongoing will pause the previous one (but not save the worklog) and begin a new one.
Time Entry Report & Suggestions
-
Report Page Access: The “Open report page for other options and excel export” button redirects to the Time Entry report for advanced configuration and Excel export.
-
Worklog Suggestions: This report displays unsaved worklogs in grey (called "suggestions"). They have only “Save” and “Log Work” buttons.
-
Disabling Suggestions: Use the JQL
project=nullin the “In Progress Issues jql” tab to stop suggestions from showing on the Time Entry report.
Timesheet Report Usage
-
Filtering: Reports can be filtered by labels, filter, or project.
-
User/Group Selection: You can select specific users or select/exclude Jira groups. If only your user is selected, you can log time directly from the report.
-
Date Range: Specify the number of months or a custom start date and end date.
-
Empty Issues: Option to show empty issues (those without worklogs) in the report.
-
Organization: Use 'categorize by field' to group the report using a Jira field and 'Aditional Fields' to include other Jira fields for better visualization.
Other Report Summaries
Calendar
-
A Calendar-based report with options for months, start/end dates, group selection/exclusion, and logging time if only your user is selected. You can also specify the reporting day of the week.
Timespent
-
Used to view the total hours spent on an issue or a set of issues. Group selection/exclusion is available.
Time Tracking Metrics
-
Original Estimate: Initial estimated time (not available in Next Gen projects).
-
Est. Time Remaining: Current estimate, which reduces when work is logged.
-
Time Spent: Sum of worklogs for an issue during the report period.
-
Key Formulas:
-
Estimate=Time Spent+Est. Time Remaining
-
Variance=Original Estimate−Estimate
-
Original Estimate Remaining=Original Estimate−Time Spent
-
Progress=Time Spent/(Est. Time Remaining+Time Spent)
-
Pie Chart
-
Creates the same report as Timesheet, but with a Pie Chart visualization.
Time in Status / Resolution Time / Time Balance
-
Time in Status: Tracks time spent in a given status.
-
Resolution Time: Tracks time passed until an issue is resolved.
-
Time Balance: Shows changes in time tracking fields over time.
Cost Report Usage
-
Purpose: View cost data and export as an Invoice.
-
Access: Only accessible to users in Accountants Groups (or Auditors Group if the Accountants group setting is empty). If both are empty, no one has access.
-
Rate Setup: The Hourly Rates item is added to the Gear Icon dropdown when the Cost Report is selected.
-
You must select a user/group, start date, project, and rate, then press '+'.
-
Default Rate: Can be set for all users by leaving the user field empty.
-
Rate Priority: The rate is determined in this order: user → group → default. Caution: If a user rate is defined, it is used, regardless of project or date specified for a group or default rate.
-
-
Security/Permissions:
-
The Currency field symbol is prepended to the cost value.
-
If Restricted Groups is configured, users can only see or set rates for users who are also members of those restricted groups.
-
A -1 Hourly Rate may show if a rate is set for a group and the current user lacks the Browse Users Jira Global Permission.
-
Data Export and Email Features
Data Export (Excel)
-
To export data, click the Excel icon below the blue navigation bar.
-
The system provides two main export types:
-
exportData: Exports pure worklogs in appropriate formats. -
exportView.xls: A What You See Is What You Get (WYSIWYG) exporter.
-
-
File Format Note: The exported
*.xlsfiles use HTML format. If your viewer alerts you before opening, simply confirm ("Yes") to proceed. -
Customizing Columns: You can configure the columns included in the export under User Preferences or App Configuration - Default User Settings using the "Columns For Export" option.
Email Reports
-
To send a report via email, click the envelope icon below the blue navigation bar.
-
You can send the report immediately or schedule it, and manage existing subscriptions (update or unsubscribe).
-
Availability: The email feature only works for Timesheet Reports and Gadgets.
-
Permissions: You can only send a report if the timesheet is not completed (related to the Email Reminder feature).
-
CSV Option: It is possible to add a CSV attachment to the email (related to the CSV attachment feature for Timesheet Reports and Gadgets).
-
Email Privacy: The app can access your email address to send the report, even if the address is not publicly shared in your Atlassian user Account settings, provided you have subscribed to the report.
6. Integrations
6. Integrations
-
You can use REST API integrations in Time Tracker for Jira Cloud.
REST Endpoint
In addition to Jira native support for loading worklogs via REST, you can get worklogs in json format, including issue data, by using the REST endpoint add-on, available at https://timesheet-reports-gadgets.tempo.io/atlassian-connect.json with your Apikey, as described below.
timesheet-reports-gadgets.tempo.io has to be unchanged, but you will need to provide your Apikey (which is your Jira url and encoded user). You can get your key from the General Configuration Settings.
Supported parameters:
-
start (or startDate): Required start date in YYYY-MM-DD format.
-
end (or endDate): Required end date in YYYY-MM-DD format.
-
user: Optional user account id.
-
groups: Optional group names.
-
filterOrProjectId: Optional, e.g.
filterOrProjectId=project_TIMES&filterOrProjectId=filter_10010 -
moreFields: Optional list of fields to include in issue details.
-
In REST, it may also be possible to use the url from a report page after the hash-bang( #!) delimiter.
In the case of a long polling request, the response will contain status 202 and content-type omitted. Also, several empty lines will be added before the first relevant row. Please parse it accordingly; e.g., skip empty lines for csv parsing. Request and response example:
$ curl -H "Authorization: Apikey T/6r47/KrnOPGqrtyI3aP/KAxnUsJBj7PzdkAqpvl6ijegFscT3pPqWf2pVRWSmL" \
https://timesheet-reports-gadgets.tempo.io/api/1/worklog\?start=2017-08-21\&end=2017-08-31\&groups=administrators\&filterOrProjectId=project_DEMO

[
  {
    "expand": "operations,versionedRepresentations,editmeta,changelog,renderedFields",
    "id": "10000",
    "self": "https://primetimesheet.atlassian.net/rest/api/2/issue/10000",
    "key": "DEMO-1",
    "fields": {
      "summary": "As an Agile team, I'd like to learn about Scrum >> Click the \"DEMO-1\" link at the left of this row to see detail in the Description tab on the right",
      "issuetype": {
        "self": "https://primetimesheet.atlassian.net/rest/api/2/issuetype/10000",
        "id": "10000",
        "description": "Created by Jira Agile - do not edit or delete. Issue type for a user story.",
        "iconUrl": "https://primetimesheet.atlassian.net/images/icons/issuetypes/story.svg",
        "name": "Story",
        "subtask": false
      },
      "customfield_10007": null,
      "project": {
        "self": "https://primetimesheet.atlassian.net/rest/api/2/project/10000",
        "id": "10000",
        "key": "DEMO",
        "name": "Demonstration Project",
        "avatarUrls": {
          "48x48": "https://primetimesheet.atlassian.net/secure/projectavatar?avatarId=10324",
          "24x24": "https://primetimesheet.atlassian.net/secure/projectavatar?size=small&avatarId=10324",
          "16x16": "https://primetimesheet.atlassian.net/secure/projectavatar?size=xsmall&avatarId=10324",
          "32x32": "https://primetimesheet.atlassian.net/secure/projectavatar?size=medium&avatarId=10324"
        },
        "projectCategory": {
          "self": "https://primetimesheet.atlassian.net/rest/api/2/projectCategory/10000",
          "id": "10000",
          "description": "",
          "name": "Test Category"
        }
      },
      "issuelinks": [],
      "priority": {
        "self": "https://primetimesheet.atlassian.net/rest/api/2/priority/3",
        "iconUrl": "https://primetimesheet.atlassian.net/images/icons/priorities/medium.svg",
        "name": "Medium",
        "id": "3"
      },
      "resolution": null,
      "status": {
        "self": "https://primetimesheet.atlassian.net/rest/api/2/status/10000",
        "description": "",
        "iconUrl": "https://primetimesheet.atlassian.net/",
        "name": "To Do",
        "id": "10000",
        "statusCategory": {
          "self": "https://primetimesheet.atlassian.net/rest/api/2/statuscategory/2",
          "id": 2,
          "key": "new",
          "colorName": "blue-gray",
          "name": "To Do"
        }
      },
      "worklog": {
        "worklogs": [
          {
            "author": "admin",
            "comment": "test",
            "created": "2017-08-21T22:02:27.140+0200",
            "updated": "2017-08-21T22:02:27.140+0200",
            "visibility": {
              "type": "group",
              "value": "administrators"
            },
            "started": "2017-08-21T20:02:00.000Z",
            "timeSpent": "1h",
            "timeSpentSeconds": 3600,
            "id": "21609",
            "issueId": "10000"
          }
        ]
      }
    }
  }
]
Running REST API Standalone
It is also possible to run the REST service as a standalone, or embed an underlying worklog extraction script into other services, without installing the add-on.
Export to CSV
You can pull reports in XLS format or raw data in CSV format with:
-
a link, such as
https://timesheet-reports-gadgets.tempo.io/atlassian-connect.json/exportView.xls?start=2018-10-01orhttps://timesheet-reports-gadgets.tempo.io/atlassian-connect.json/exportData.csv?start=2018-10-01with HTTP header "Authorization: Apikey KEY" or with the query parameter "Apikey=KEY" -
basic authentication, such as Apikey:KEY for username:password.
The KEY is obtained from the https://help.tempo.io/timetracker/latest/general-settings .
Examples:
Apikey query parameter in URL:
https://timesheet-reports-gadgets.tempo.io/atlassian-connect.json/exportData.csv?start=2018-10-01&Apikey=T%2F6r47%2FKrnOPGqrtyI3aP%2FKAxnUsJBj7PzdkAqpvl6ijegFscT3pPqWf2pVRWSmL. The Apikey needs to be urlencoded (/, + and = replaced with %2F, %2B a %3D).
Basic authentication (with curl):
$ curl -u Apikey:T/6r47/KrnOPGqrtyI3aP/KAxnUsJBj7PzdkAqpvl6ijegFscT3pPqWf2pVRWSmL \
    https://timesheet-reports-gadgets.tempo.io/atlassian-connect.json/exportData.csv\?start=2018-10-01
Apikey Authorization header (with curl):
$ curl -H "Authorization: Apikey T/6r47/KrnOPGqrtyI3aP/KAxnUsJBj7PzdkAqpvl6ijegFscT3pPqWf2pVRWSmL"  \
    https://timesheet-reports-gadgets.tempo.io/atlassian-connect.json/exportData.csv\?start=2018-10-01
7. Administration
7. Administration
-
Set The Permissions:
-
There is
Edit All WorklogsJira permission, to restrict who can edit time logs of others, and other related permissions, please see Jira documentation for more details.As for viewing other users Timesheet, it is possible to restrict report visibility using
Auditors GroupsandRestricted Groupssetting in app Configuration accessible using Gear icon in header part of the report page.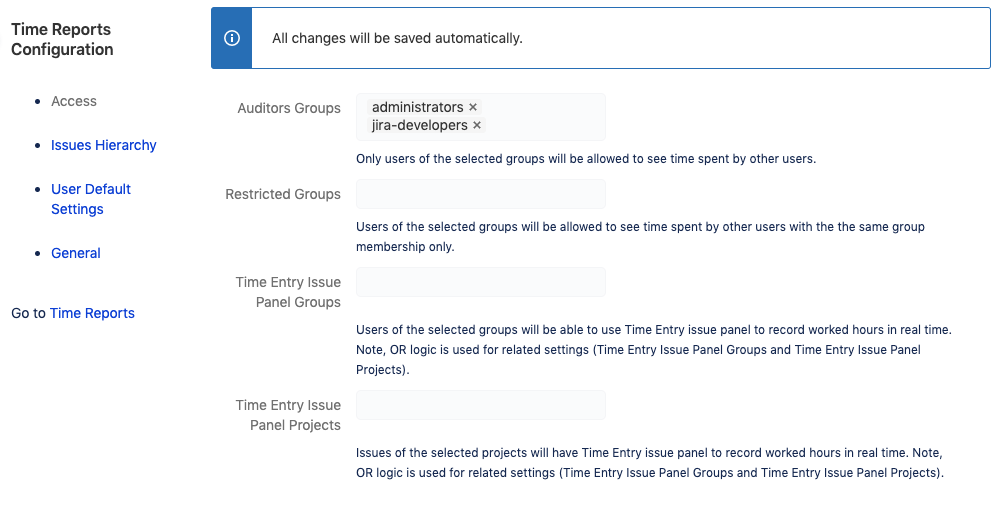
Timesheet Auditors Groupsapp configuration allows to specify user groups, who can see other users work logs.Timesheet Restricted Groupsapp configuration allows to specify user groups, so that currently logged in user can see worklogs of the selected user groups.Thus Restricted Groups option allows to make it possible to see only “team members” timesheet, where team is defined by user group membership.
I.e, if anything is selected in Restricted Groups, report shows worklogs of users that are members of groups of the intersection of currently logged in user groups and worklog author groups (and groups selected in report options).
In case of restriction applied, there is warning displayed in the bottom of the report, listing groups that are visible in result for currently logged in user. E.g.
Because of the Restricted Groups configured, data is limited to worklogs of users from the following group(s): NONE. In this case no worklogs is shown or only own worklogs are shown, if currently logged in user is member of the groups selected in the Groups report option.You may see https://docs.google.com/spreadsheet/ccc?key=0Ai6BFV79vBqqdFpNbGs2cHlvVlF0bVFYXzJDOWI2LVE for detailed information for how it works also.
In case of
Timesheet Reports and Gadgetsthere isAuditors Rolessetting additionally.If Auditors Roles is configured, and user is not member of any of the roles selected, a warning will be displayed in the bottom of the report: Because of Auditors Roles configured data is limited to own worklogs for the following projects: KEY1, KEY2.
CAUTION, check carefully whether Classic Project roles and/or Next Gen project roles are selected, e.g. Administrators and Administrator. Because Next Gen projects use their own project roles, that may be named similarly to Classic project roles, you may need to select all roles with the similar names.
CAUTION, check carefully group name. It is not allowed to use names with space(s) in the end or start e.g. "Group " or ";" symbol at any position.
-
-
Audit Logs
-
Audit log stores and displays last 30 changes since 2020-02-04 and shows when change was made, who has made the change and new value of the changed configuration option.
Also Refresh button is added for reloading configuration without need for page reload.
-
-
Data Security & Privacy
-
How intrusive is Prime Timesheet plugin in JIRA?
-
Is it mainly using already stored data in database, or is it building/creating a lot of tables on it own to store this data?
Does the functionality differs for issues created before/after the plugin is installed? -
It’s NOT intrusive at all.
It mainly just reads Time Tracking and Issues data stored in Jira database. In case of Jira Server it creates additional table to store scheduled job configurations only.
No functionality differs for issues created before/after the plugin is installed, i.e, no Jira functionality is modified or substituted.
-
-
8. Troubleshooting & FAQs
8. Troubleshooting & FAQs
Common Issues & Fixes
-
Installation conflicts (Lite vs. full)
|
Feature |
Time Tracker Lite |
Time Tracker |
Notes |
|
Reports |
|
|
Time Tracker and Time Tracker Lite offer the same 13 reports and 1 gadget that supports all 13 reports |
|
X |
X |
Provide a convenient way to record working time for any Jira issue assigned to a team member in a single day view |
|
|
X |
X |
Analyze users' workloads with the classic sheet view by day or days, but with numerous filters and options, you can display many variations of the report |
|
|
X |
X |
Use the Start Date and End Date filters to display any time period to get a summary of worked hours per day in a calendar view. |
|
|
X |
X |
Show a classic sheet view displaying a time spent column wiith numerous filters and options |
|
|
X |
X |
Display a summary of worked hours for a project, where columns are project users (resources) and rows are project issues (tasks) to show time spent on issues by users |
|
|
X |
X |
Spread worked hours across all statuses for the issue, starting from the work started time to show time spent on issues by status |
|
|
X |
X |
Display a summary of worked hours spread over columns from worklog comments |
|
|
X |
X |
Provide various time-related information, so you can quickly see the estimated versus actual time spent per issue, as well as the overall progress |
|
|
X |
X |
Display a visual summary of worked time for a project in a certain period |
|
|
X |
X |
Show the elapsed time for particular issues - calculated between status changes based on issue change history |
|
|
X |
X |
Provide the time spent per issue in unresolved and resolved statuses |
|
|
X |
X |
Display all time tracking changes for issues in a set period |
|
|
X |
X |
Show costs for a period, based on hourly rates and create invoices |
|
|
|
X |
Select specific groups to be able to log time for other users |
|
|
|
X |
Send an email or create a email subscription for the reports that you wish |
|
|
|
X |
Suggested Work can be logged automatically by the end of the day |
Browser rendering issues (Edge, Chrome)
-
The issue is most likely related to AdBlock extension for your browser. Please add 'atlassian.net' to AdBlock filter.
API endpoint errors (410, incorrect endpoint)
-
We are officially deprecating the Time Tracker API. This decision is driven by a required update to our database to comply with new Atlassian directives. The existing Time Tracker API is unfortunately not compatible with this updated database.
Your Next Steps: Migrate to the Jira Worklog API
We've found that nearly all processes previously managed by the Time Tracker API can be handled directly by the standard Jira Worklog API. This is the recommended path forward.
-
Migration Guide: Please consult our detailed guide for migrating your processes: [https://help.tempo.io/timetracker/latest/jira-worklog-api-migration ](https://help.tempo.io/timetracker/latest/jira-worklog-api-migration )
-
Licensing validation problems
-
Since Atlassian handles all Time tracker licensing, please reach out to Atlassian Support http://atlassian.com/company/contact/purchasing-licensing to resolve any licensing issue that you may have;
How to Capture a HAR File (step-by-step)
-
In order to best assist the customer, kindly provide a .har and .log files when reproducing the issue and, if possible, give us feedback on which of those steps you did, or you couldn’t do for further investigation.
-
Open your instance in a Chrome Browser
-
Open the Browser Console (press F12 or go to Settings > More Tools > Developer Tools)
-
Navigate to the Network tab, and check the box next to "preserve log"
-
Perform the steps to reproduce the problem
-
Save the results as a .har file (click “Export HAR…” arrow-down icon)
-
Navigate to the Console tab, and save the results as a .log file (right-click and choose Save as) Creating Har and Log files for support
-
FAQ (recurring customer questions)
-
How To Sum hours by Epic
It's necessary to select Epic issues in Sum Subtasks report (or dashboard item)Add-on configuration is accessible from the report by Administrators only. See Configure link in header part of the report page.
Note, this behaviour is different than in Timesheet Reports and Gadgets add-on for Jira Server.
Please note, parent may be calculated up to 3 or even 4 levels, parent of a sub-task, Epic of a Story, if Parent Issue Field is configured in add-on configuration, Linked Issue, if Composition Issue LInk is configured in add-on configuration, and finally Jira Portfolio issue type, if Parent Issue Type configured in add-on configuration.
Additionally, it is possible to include only issues from active Sprint, with JQL like "sprint in openSprints()" + "or parentSprint in openSprint()" if Sum SubTasks.
Note, it may be convenient to use Filter with JQL like "parentEpic in (issueKey,...)" in case you'd like to have report for certain epic(s).
9. Best Practices
9. Best Practices
Unauthorized Error
-
Make sure you have configured properly the Auditors Group before start using the Time tracker, otherwise you would receive Unauthorized Error:
-
Here’s how to reconfigure them:
-
Go to the Jira Settings (gear icon in the top right corner).
-
Navigate to Apps → Time Tracker (you’ll find it under the Tempo section).
-
Under Configuration, check the following sections:
-
Auditor Groups
-
Time Entry Issue Panel Groups
-
-
Add the relevant user group(s) to either or both sections, depending on the level of access required:
-
Use Auditor Groups if users need to view worklogs from other users (for example, to access reports via the main navigation bar or project menu).
-
Use Time Entry Issue Panel Groups if users should only view their own worklogs (for example, access the time entry panel on issues).
-
-
Save your changes.
-
10. Reference
10. Reference
Glossary (Issue, Worklog, Timesheet, Flexible Report, etc.)
-
Time Entry—single day view.
-
Timesheet—time spent on issues by days.
-
Calendar—summary of worked hours per day in a calendar view.
-
Timespent—single column table.
-
Pivot by User—time spent on issues by users.
-
Pivot by Status—time spent on issues by status.
-
Pivot by Label—summary of worked hours spread over columns from worklog comments.
-
Time Tracking—estimated vs actual.
-
Pie Chart—time spent chart.
-
Time In Status—time passed in status.
-
Resolution Time—time passed until resolution.
-
Time Balance—changes in time tracking fields over time.
-
Cost Report—the cost for a certain period, based on hourly rates.