This feature is only available to Collaborators, User Managers, and Account Administrators.
General Setup Requirements
For users looking to authenticate their integration with Jira, certain methods are available by default - such as authentication via API Token or Username & Password; however, certain authentication methods require some administrative intervention to set up.
To ensure that users have access to the correct authentication methods and that you’re not blocked during setup, you may require administrative access on both Strategic Roadmaps and Jira (as will be indicated below) in order to complete the steps listed below.
As certain versions of Jira may vary, please free to reach out to Tempo Support if you are unable to locate the appropriate pages in your Jira server.
Authentication Methods for Jira Cloud Users
Authentication using API Token
In June 2019, Atlassian began the deprecation of all standard authentication methods when working through integrated applications. This means that in order to connect to Strategic Roadmaps from a Jira Cloud server, you would need to generate an API token in Atlassian.
The following guide from Atlassian can walk you through this process: API Tokens
Once generated, you can enter your Email and API Token into the credentials page of your Jira Integration setup menu to validate your credentials and begin synchronizing your data with Strategic Roadmaps.
Authentication via OAuth 2.0 3L0 (Professional & Enterprise Only)
For users working on Professional or Enterprise plans, Strategic Roadmaps supports authentication using OAuth 2.0. To enable this feature for users on your account, an administrator must toggle on the OAuth 2.0 support option during the setup of a new integration.
To enable OAuth 2.0 authentication for existing Cloud deployments, an administrator must:
-
Navigate to the Integrations tab in your Account Settings
-
From the list of Existing Integrations, locate the integration you would like to enable this feature for and select Edit
-
In the integration settings page, toggle on the OAuth 2.0 support option
-
If you can’t see this option on the screen, please confirm that the OAuth support option is toggled off. This option is not available when OAuth 1.0a is enabled for users.
-
Once the setup has been completed, users on your account will be able to select “OAuth” from the credentials page of your Jira Integration setup menu. After clicking this option, they will see a small permissions summary page that will let them validate their credentials and begin synchronizing their data with Strategic Roadmaps. Please ensure that pop-up blockers are disabled or whitelisted in Strategic Roadmaps, as this can prevent this window from appearing properly.
Authentication via OAuth 1.0a (Professional & Enterprise Only)
Please note that while this method of authentication is available, it has been deprecated by Atlassian as of 2024. We encourage users to migrate to Authentication via OAuth 2.0 3LO using the steps listed above.
For users working on Professional or Enterprise plans, Strategic Roadmaps supports authentication using OAuth 1.0a. To enable this feature for users on your account, an administrator must toggle on the OAuth support option during the setup of a new integration.
To enable OAuth authentication for existing cloud deployments, an administrator must:
-
Navigate to the Integrations tab in your Account Settings
-
From the list of Existing Integrations, locate the integration you would like to enable this feature for and select Edit
-
In the integration settings page, toggle on the OAuth support option
-
If you can’t see this option on the screen, please confirm that the OAuth 2.0 support option is toggled off. This option is not available when OAuth 2.0 is enabled for users.
-
-
Once toggled on, a Consumer Key and Public Key will appear below the integration settings. Please note these for later, as they will be required for setting up your Application Link to Jira.
The integration can be saved in Strategic Roadmaps at this point. These can also be accessed at any time by navigating to your Existing Integrations list and selecting Edit for this integration. In order to set up the application link, you will require administrative privileges on Jira.
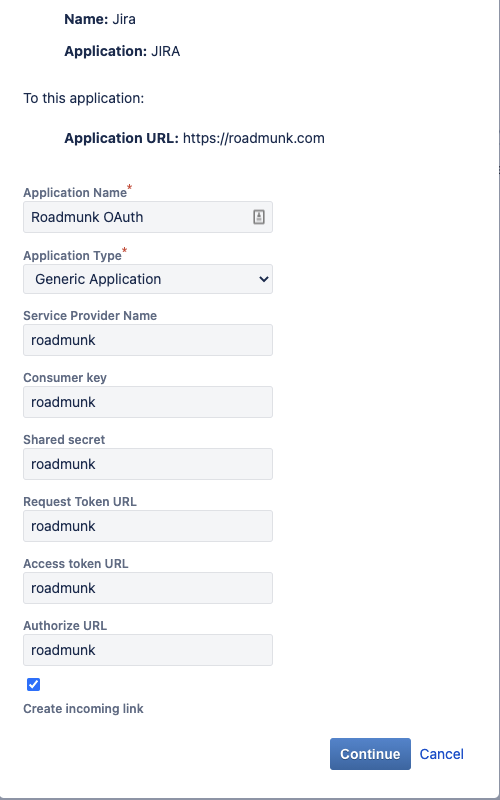
To create an application link:
-
Click into Settings and select Products.
-
From the menu on the left-hand side, choose the Application Links option (under the Integrations section).
-
On the Application links page, select Create link.
-
Ensure Direct Application Link is selected and enter https://roadmunk.com in the Application URL field before clicking Create new link.
-
Ignore the warning that No response was received from the URL you entered and click Continue
On the Link Applications modal that appears:
-
Set the Application Name to “Strategic Roadmaps” (or a name of your choice)
-
Ensure that Application Type is set to “Generic Application”
-
Fill in all other fields with the Consumer Key provided
-
Before continuing in the setup process, ensure that the Create Incoming Link option is checked
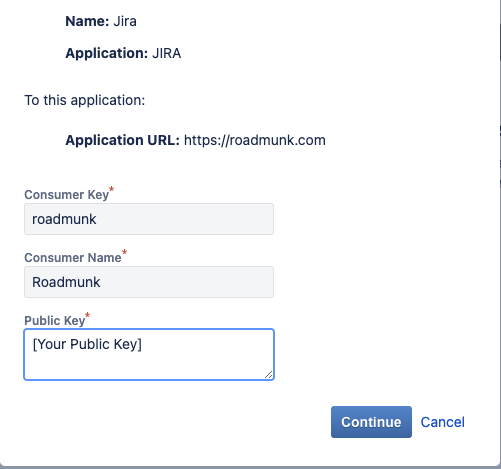
After clicking Continue, you will need to enter the following details:
-
In the Consumer Key and the Public Key fields, enter the values provided by Strategic Roadmaps into their respective boxes.
-
Set the Consumer Name as “Strategic Roadmaps”
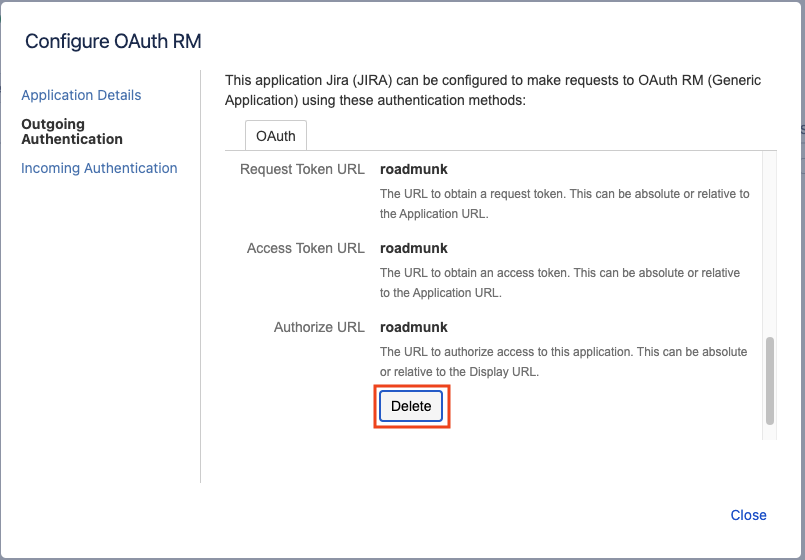
After completing these steps, Strategic Roadmaps should appear under your list of Application Links. To finalize the setup,
-
Select the Edit icon for Strategic Roadmaps on the right side of the Application Links list.
-
In the modal that appears, select the Outgoing Authentication from the menu.
-
At the bottom of the section, click the Delete button
-
Select Delete once more in the popup that appears.
Once all of the setup steps have been completed, users on your account will be able to select “OAuth” from the credentials page of your Jira Integration setup menu. After clicking this option, they will see a small permissions summary page that will let them validate their credentials and begin synchronizing their data with Strategic Roadmaps. Please ensure that popup blockers are disabled or whitelisted in Strategic Roadmaps, as this can prevent this window from appearing properly.
Authentication Methods for Jira DC Users
Authentication with Username & Password
Users working in an on-premise server are able to use their username and password for Jira credentials, so long as the users are not being managed by a third-party tool. If you’re looking to set up an integration with Strategic Roadmaps while using an SSO provider to log into Jira, you would either need to request that your Jira admin provide you with a local username & password or check out the OAuth 2.0 Authentication for Strategic Roadmaps section of this article.
Authentication via OAuth 2.0 3L0 (Professional & Enterprise Only)
For users working on Professional or Enterprise plans, Strategic Roadmaps supports authentication using OAuth 2.0. To enable this feature for users on your account, an administrator must toggle on the OAuth 2.0 support option during the setup of a new integration.
To enable OAuth 2.0 authentication for existing DC deployments, an administrator must:
-
Navigate to the Integrations tab in your Account Settings
-
From the list of Existing Integrations, locate the integration you would like to enable this feature for and select Edit
-
In the integration settings page, toggle on the OAuth 2.0 support option
-
If you can’t see this option on the screen, please confirm that the OAuth support option is toggled off. This option is not available when OAuth 1.0a is enabled for users.
-
Users working on Jira DC instances may notice some additional required fields - Client ID and Client Secret. To generate these fields, users with administrative access to Jira will need to setup an incoming link for Strategic Roadmaps.
To create an incoming link:
-
Click into the Administration menu and select Applications.
-
From the panel on the left-hand side, choose the Application links option (under the Integrations section).
-
On the Application links page, select the Create link.
-
Select External application from the provided options, and ensure that Incoming is set as the direction.
On the next page, please enter the following details in the respective fields:
-
Name: Strategic Roadmaps (Roadmunk)
-
Redirect URL: https://{{deployment}}-rm.roadmunk.com/rm-api/integrations/oauth2/authorizationCode
-
{{deployment}} is a placeholder for your deployment. To determine which deployment your team uses, simply look at the URL after you’ve logged into Strategic Roadmaps. Often, these will be
app,eu, orapac; however, some teams may have custom deployment names.
-
-
Permission: Please set this option as required; however, selecting “Admin” will ensure that users can both read and write project and work item data from Jira.
Once these options have been set, you can save the link and will be provided with the Client ID and Client Secret on the next page. These can be copied in the integration setup window in Strategic Roadmaps.
Once the setup has been completed, users on your account will be able to select “OAuth” from the credentials page of your Jira Integration setup menu. After clicking this option, they will see a small permissions summary page that will let them validate their credentials and begin synchronizing their data with Strategic Roadmaps. Please ensure that popup blockers are disabled or whitelisted in Strategic Roadmaps, as this can prevent this window from appearing properly.
Authentication via OAuth 1.0a (Professional & Enterprise Only)
Please note that while this method of authentication is available, it has been deprecated by Atlassian as of 2024. We encourage users to migrate to Authentication via OAuth 2.0 3LO using the steps listed above.
For users working on Professional or Enterprise plans, Strategic Roadmaps supports authentication using OAuth 1.0a. To enable this feature for users on your account, an administrator must toggle on the OAuth support option during the setup of a new integration.
To enable OAuth authentication for existing DC deployments, an administrator must:
-
Navigate to the Integrations tab in your Account Settings
-
From the list of Existing Integrations, locate the integration you would like to enable this feature for and select Edit
-
In the integration settings page, toggle on the OAuth support option
-
If you can’t see this option on the screen, please confirm that the OAuth 2.0 support option is toggled off. This option is not available when OAuth 2.0 is enabled for users.
-
-
Once toggled on, a Consumer Key and Public Key will appear below the integration settings. Please note these for later, as they will be required for setting up your Application Link to Jira.
The integration can be saved in Strategic Roadmaps at this point. These can also be accessed at any time by navigating to your Existing Integrations list and selecting Edit for this integration. In order to set up the application link, you will require administrative privileges on Jira.
To create an application link:
-
Click into the Administration menu and select Applications.
-
From the panel on the left-hand side, choose the Application links option (under the Integrations section).
-
On the Application links page, select Create link.
-
Select Atlassian product via OAuth 1.0 from the provided options, and enter https://roadmunk.com in the Application URL field before clicking Create new link.
-
Ignore the warning that No response was received from the URL you entered and click Continue
On the Link Applications modal that appears:
-
Set the Application Name to “Strategic Roadmaps” (or a name of your choice)
-
Ensure that Application Type is set to “Generic Application”
-
Fill in all other fields with the Consumer Key provided
-
Before continuing in the setup process, ensure that the Create Incoming Link option is checked
After clicking Continue, you will need to enter the following details:
-
In the Consumer Key and the Public Key fields, enter the values provided by Strategic Roadmaps into their respective boxes.
-
Set the Consumer Name as “Strategic Roadmaps”
After completing these steps, Strategic Roadmaps should appear under your list of Application Links. To finalize the setup,
-
Select the Edit icon for Strategic Roadmaps on the right side of the Application Links list.
-
In the modal that appears, select the Outgoing Authentication from the menu.
-
At the bottom of the section, click the Delete button
-
Select Delete once more in the popup that appears.
Once all of the setup steps have been completed, users on your account will be able to select “OAuth” from the credentials page of your Jira Integration setup menu. After clicking this option, they will see a small permissions summary page that will let them validate their credentials and begin synchronizing their data with Strategic Roadmaps. Please ensure that popup blockers are disabled or whitelisted in Strategic Roadmaps, as this can prevent this window from appearing properly.