Skip table of contents

Tracking billable and non-billable time using billable functionality in Tempo for Server

This tutorial is created using Timesheets Version 9.

In this tutorial, you will track time related to a customer, both billable and non-billable hours, to support invoicing. You will create a customer and accounts. Then you will link billable and non-billable issues to the accounts and log time to those issues. Finally, you will view all billable hours vs. the non-billable hours. 

In this tutorial:

Make sure that the Account field is available on the Issue page and the Billable field is enabled in Global Tempo Configuration.

Step 1: Creating a new customer


The first step in tracking customer accounts is to create the customer. Create a new customer called Zaibatsu. Enter ZHI as the unique key for this customer.
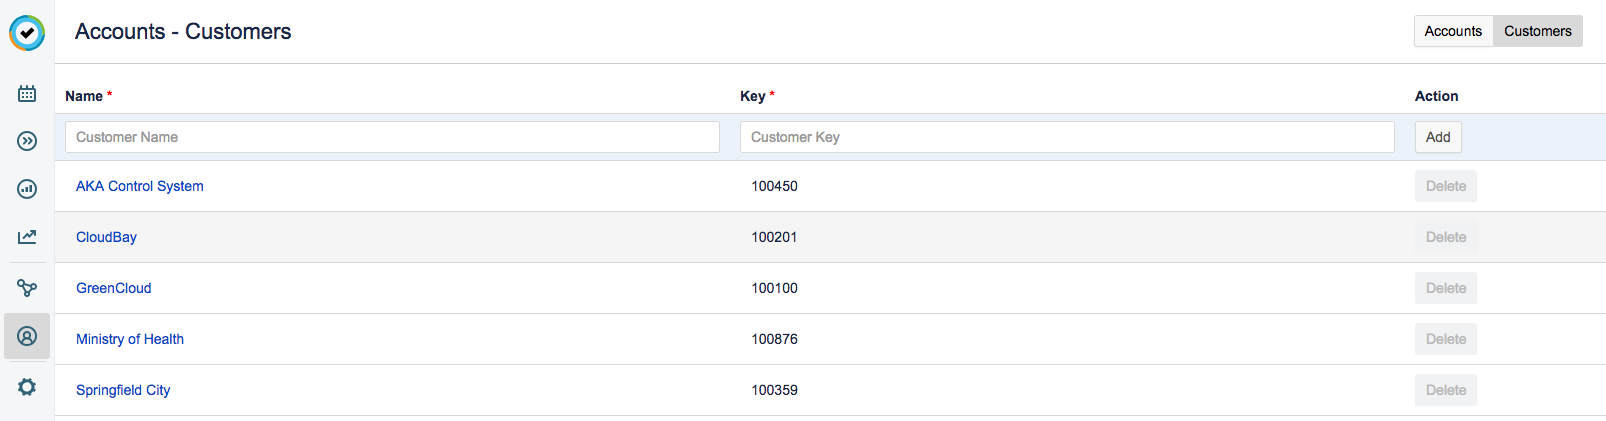
To create a customer...

Creating and editing customers requires the Tempo Account Administrator permission.

Customers are an important partner to Tempo accounts. By creating customers in Tempo, you can associate customers with your accounts. This in turn allows you to filter by customers within Tempo reports – and to consolidate customer-specific data across many different accounts when reporting on logged or planned time.

Creating Customers

Customers with Tempo Timesheets versions prior to 10.18.4 can create customers as follows:

  1. Select Accounts :accounts_dc:  in the Tempo sidebar.

  2. Click Customers at the top-right.

  3. In the Customers view, enter a name for the customer and a unique key in the fields at the top of the customers list. (You can edit the customer name and the key later.)

  4. Click Add to create the new customer.

Customers with Tempo Timesheets 10.18.4 and up should do the following to create customers:

  1. Select Accounts :accounts_dc:  in the Tempo sidebar.

  2. Select Customers at the top-right.

  3. In the Customers view, click + Create customer and enter a name and a unique key. (You can edit the customer name and key later.)

  4. Click Create to create the new customer.

Linking Customers to Accounts

Once you have created customers, you can link them to one or more accounts, depending on your needs. 

  1. Navigate to the Accounts main page and click on the name of the account you would like to link.

  2. Click on the field next to Customer and select the customer name from the drop-down list.


Customers can be linked to multiple accounts - but each account can only have one customer.

Viewing Customer Information

If you are an Account Lead, you can view customer information for the accounts you lead. Simply navigate to the Customers page and click on the name of the customer whose details you want to view. The Customer Overview is then displayed.

  • Accounts associated with the customer are organized by category (if applicable). You can click the account name to go to the Accounts Overview. Similarly, in the Accounts Overview you can click the customer name to return to the Customer Overview.

  • Only open accounts are shown in the Customer Overview.

Deleting Customers

You can delete customers that are not linked to accounts. In the Customers view, click Delete in the Action column for the relevant customer.

Step 2: Creating a new account


Now create a new account and connect it to your new customer. Name the account Tango Capex, assign it the key TCAP, and assign Taylor as the Team Lead. Select the customer and category you created.
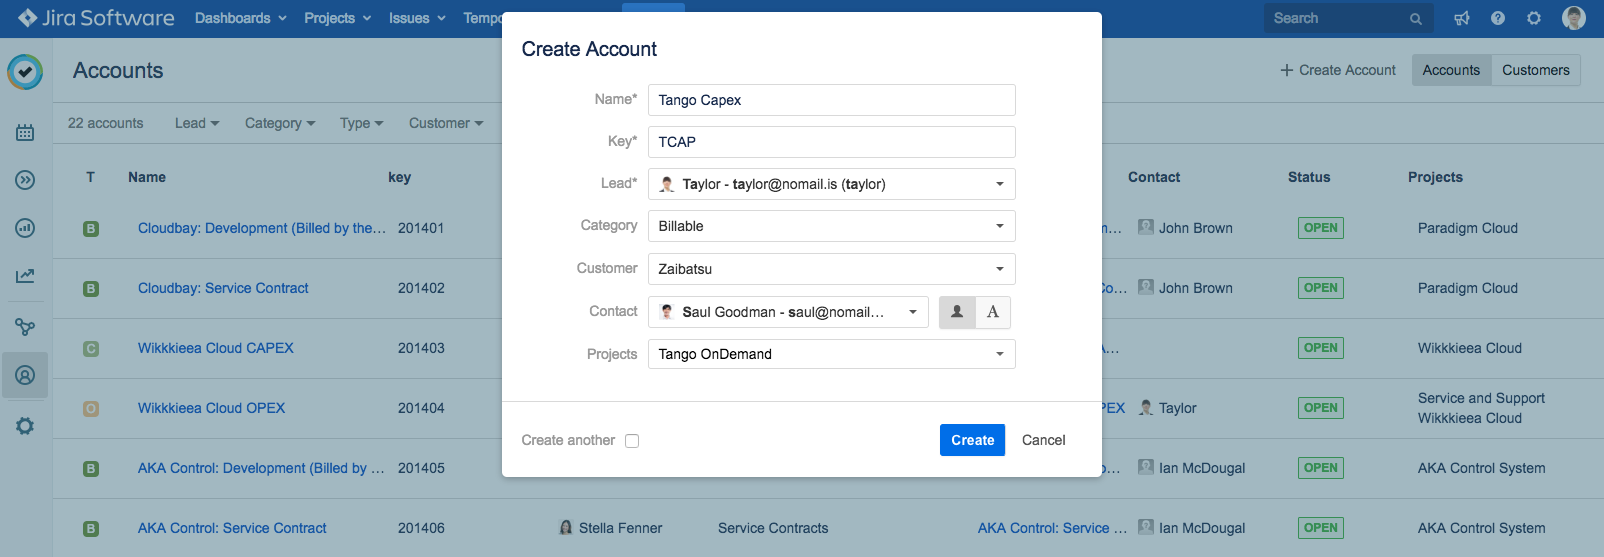
To create an account...

Creating and editing accounts requires the Tempo Account Administrator permission.

You can create accounts to organize the logged time data in your organization. There are different reasons you may want to do this, such as for the purpose of invoicing customers or tracking your capitalized expenses (Capex). You can associate a customer to an account, but it's not required.

A powerful feature with Tempo accounts is that you can connect the accounts to the Jira projects that you and your organization will be working on, which lets employees then log their time to a specific account. Doing this will help you organize your data easily later on in reports; for example, you can filter a Logged Time report by the accounts and get a clear view of how much time has been spent on each one.

Note

  • You can also import accounts from *.csv or *.xml files.

  • The Account Custom Field is installed automatically with Tempo Accounts, but may need to be configured further, depending on how you want to associate the account information to time records.

To create an account:

  1. Select Accounts :accounts_dc: in the Tempo sidebar.

  2. Click the +Create Account button at the top-right.

  3. Fill in the Create Account form:

    1. Name - A descriptive name for the account. The combination of the account name and key is used to display the account in Jira issues or in the Log Time form in Tempo Timesheets, depending on configuration.

    2. Key - The account key needs to be unique for the account. A suggested key based on the account name is auto-generated, but you can enter any value you like. The key can use letters (a-z, A-Z), digits (0-9), underscore ("_"), dash ("-") or a dot ("."). You cannot change the key after the account is created.

    3. Lead - The account lead is responsible for the account. You can either select an existing Jira user's name or simply enter a name.

    4. Category - Optional. Select a category to associate with the account from the dropdown. The account category is a way to group different cost centers and work activities, such as Development or Marketing. There are four types of categories you can use: Billable, Capitalized, Operational, and Internal. 
      To create or edit categories, click the settings icon :settings_dc:  at the top-right, and select Categories

    5. Customer - Optional. Select a customer to associate with the account from the drop-down menu. The customer does not need to be an outside customer, it may simply be a way to group together a common entity (Jira projects or cost centers) of your definition for the projects linked to the account. 

    6. Contact - Optional. Depending on the purpose of the account, for internal or external use, the contact may or may not be a Jira user.

    7. Projects - Select the projects that include issues you will be logging time on for this account. You can link more than one project to an account.

  4. If you want to create another account, check the Create another box.

  5. When you are finished, click Create

Note

It is not mandatory to add a customer, a contact, or category when creating accounts. You edit the account later - see below.

Global Accounts

You can create a global account that is linked to all projects. To do so, first create an account as described above, then:

  1. Click the Account name in the list to access the Account Overview.

  2. Under Links to Projects, select the Make this account global checkbox.

Editing Account Information

You can edit the following information about an account: account name, customercategorystatus, monthly budget, lead, and contact. 

  1. In the Accounts view, click the name of the account you want to edit.

  2. You can edit the account Name, Customer, Category, Monthly Budget, Lead, and Contact. The account Key cannot be changed after the account is created.

Adding a Monthly Budget

Monthly Budget is used to display a status of hours worked vs the budget for the selected month. This is displayed in the Account Monthly Budget Burn-up Chart gadget available in Tempo Timesheets. In the Accounts view, enter the hours that can be spent on the account during the period in the Monthly Budget field.

Tempo Account Monthly Budget Burn-up Chart

Step 3: Linking the project to the account


With billable and non-billable accounts connected to your customer, you can now link the accounts to the Jira projects that you will be working in for this customer. Link both your Tango Capex and Tango Opex accounts to the Tango OnDemand project.
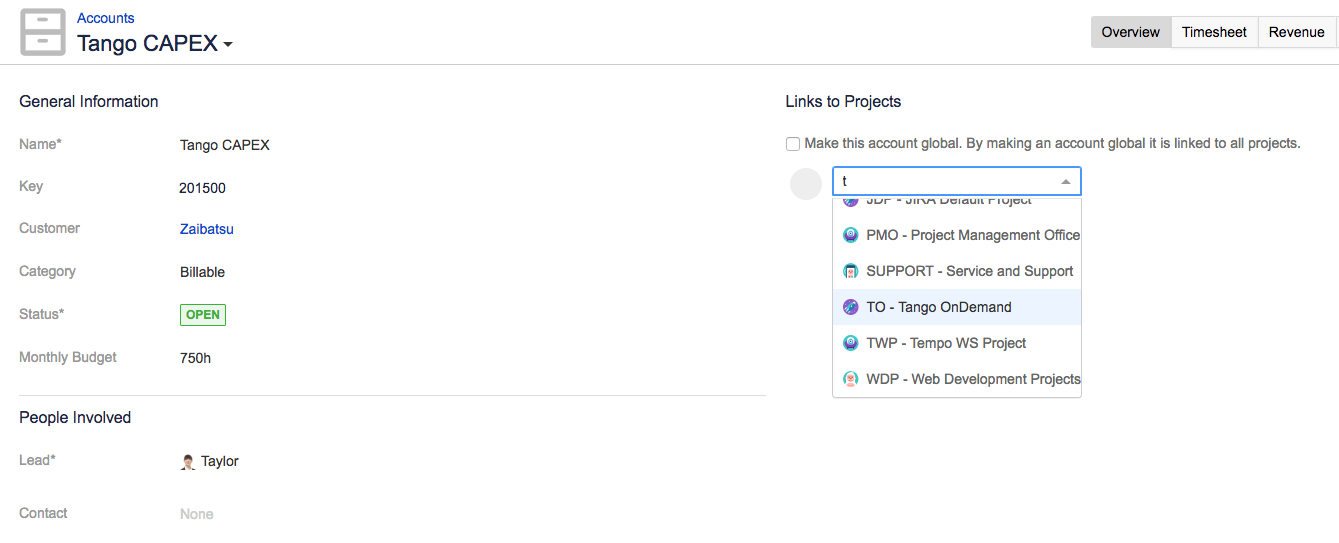
To link an account to a project...

Linking accounts to Jira projects requires the Tempo Account Administrator permission.

Tempo accounts can be linked to one or more Jira projects so that an account can be selected from the ​Account​​ dropdown when you log your time. The Account Custom field must be added first so that there is the ​Account​​ dropdown available in Jira issues or in the Log Time form. Only accounts that have been linked to Jira projects will be available from this ​Account​​ dropdown.


There are several ways in which you can link an account to one or more Jira projects:

  • When you create an account​, you can select the projects to which you want that account to be linked. The projects can also be included in the imported file if the accounts are created with any of the Accounts Import features.

  • In a Jira project's ​Account​ settings. From here, you can also set the default account to be used for all issues in a Jira project.

  • From an account's Overview - see below.

Linking to Projects from the Account's Overview

You can link existing accounts to one or more projects in the Accounts overview. 

  1. Select Accounts :accounts_dc:  in the Tempo sidebar.

  2. In the Accounts view, select the account to which you want to link Jira projects.

  3. On the account's Overview, click ​​+ Add Project Link​​ at the right and search for the project to which you want to link the account. You can link one account to multiple projects.

  4. You can also select the ​​Make this account global​​ checkbox if you want to link the account to all Jira projects. Clearing the checkbox will unlink a global account from all Jira projects.

Keep the number of global accounts to a minimum because linking accounts to many Jira projects can have a negative impact on Tempo's performance.
Global Accounts are not listed in JIRA Project settings - Accounts, and can not be selected as default Account for a project


Step 4: Linking the accounts to Jira issues


Once the account is linked to the project, you must link the issues to the account. This is required if you want to generate reports using this information. 

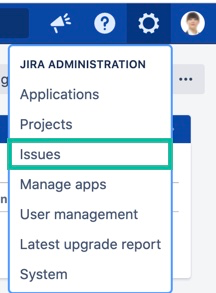
To add the Tempo Account custom field to the issue view:

  1. Go to JIRA Administration and select Issues.

  2. Select Custom Fields from the left side bar and the Account Team Custom field. will be at the top of the list of Custom fields.
  3. Click the
    button to the right and select Screens from the drop-down.
  4. Choose the screen you would like to associate the field to (e.g. the Edit Issue screen).

  5. Click Update to save.

After completing these steps, you can link the issue to the account.

For example, if you associated the field with the Edit or Default screen:

  1. Go to the issue you want to link the account to.

  2. Click Edit and in the edit screen scroll down to where the account field is.

  3. Select the account you want to link to the issue.

  4. Click Update in the bottom of the edit screen to save the changes.

Step 5: Logging work and specifying both worked and billable hours


Having set up your project and connected it to your customer's account, you are ready to log time to the project issues. Enter the the total hours in the Worked field and the number of billed hours in the Billed field.

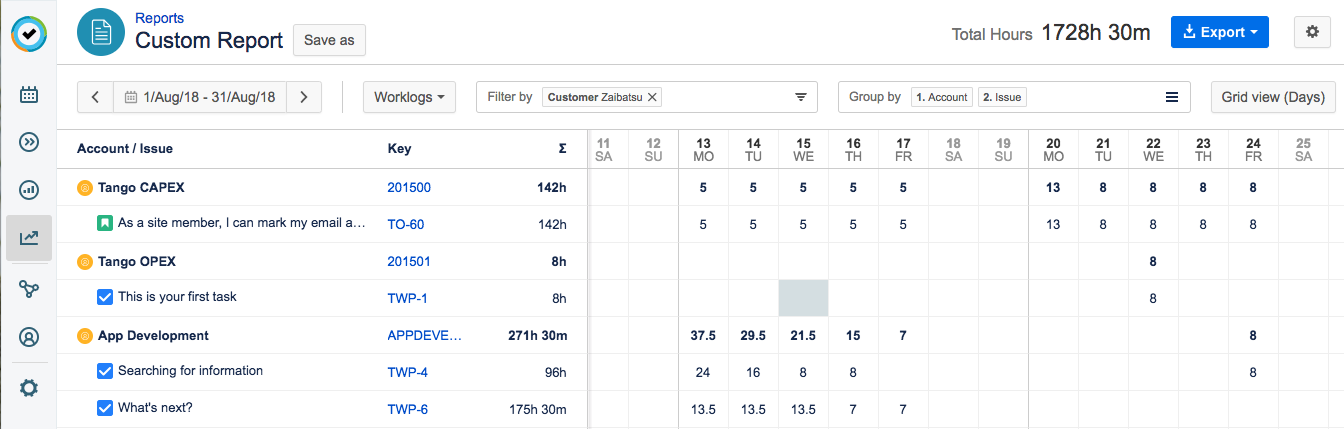
Step 6: Viewing all billable versus non-billable hours


You can generate a custom report to view all hours spent on the customer's projects. Filter the report by customer. Display the report in a Grid View and select Billable under Columns. You can then compare the billable hours and the total hours logged to the customer. You can also export the data for invoicing.

To filter information in a custom report...

  • Viewing worklogs for other team members requires the View All Worklogs and Browse Projects permissions for each project. 

  • You can view the worklog data from inactive or deleted Jira users in a report - see Inactive and Deleted Jira Users and Tempo Timesheets for more information.

  • Viewing plans requires the View Team Plans permission.

  • To report on planned time, you need to have Tempo Planner version 7.8 or later and Tempo Timesheets 10.8 or later installed. 

  • To report on planned vs actual time, you need to have Tempo Timesheets version 10.15 or later and Tempo Planner version 7.15 or later installed

You can customize your reports so that they show what you need in a meaningful manner. By default, report results are displayed in a grid format but you can also view the data as a detailed list. You can apply filters, organize the information into groups, sort the data by columns, set report preferences, and add columns to show Jira fields and work attributes as needed. When viewing reports as a grid, you can also define whether the grids represent days, weeks, months, or quarters.

Tempo remembers all your view settings and preferences between sessions. 

To access reports:

  • Select Reports in the Tempo sidebar.

Switching between the Grid and List Views

Click the View button at the top-right, and then select either Grid view or List view.

Grid View

By default reports are displayed in a grid view. The grid view displays the report information in a timesheet-format. Each column in the grid represents a day, week, month, or quarter, depending on the Grid Periods option you select on the Grid view drop-down menu. You can also specify the what data to display using the Columns options.

  • For worklog reports, you can click the cells and log hours on issues.

  • By default, the grids represent days. You can select a different grid period and use the date picker to select a period to see what you need. Click Grid view at the top-right to select a grid period.

List View

You can select to display the report as a detailed list. The list view shows you the report information in table-format. You can choose which which attributes or work attributes to show using the Columns and List View Columns options on the List view drop-down menu.

Filtering Data 

Select filters for the reports to show only the information you need. You can, for example, select to view time logged on a specific project or all planned work for your team. The Filter by box at the top of the report shows which filters are applied.

To filter data in a report:

  1. Click the Filter by box to display a list of filter options. 

    timesheets-dc-filter.jpg
  2. Select a filter option to begin refining your report.

    • To add a filter, select its check-box. To remove a filter, clear the check-box or click the beside its name in the Filter by box. 

    • If you select to filter by issues, you can also choose to include sub-tasks.

    • Click Back to return to the list of filters. 

      timesheets-dc-filter-selected.jpg
  3. Click Apply & Search to apply the filter to your results.

The Filter by box shows what filters are being applied in the report. You can remove a filter by clicking the x to the right of its name.

Below is an overview of the various fields you can use to filter your reports:

Filter

What it does

Teams

Filters by Tempo team(s)

Roles

Filters by staff role

Users

Filters by Jira user

Locations

Filters by office location

Customers

Filters by Tempo customers

Accounts

Filters by Tempo account(s)

Account Categories

Filters by Tempo account categories

Category Types

Filters by account category types, including billable, capitalized, internal and operational

Projects

Filters by Jira projects

Epics

Filters by Jira epic(s)

Issues

Filters by Jira issues

Jira Filters (JQL)

Filters by predefined JQL filter

Grouping Data

Group data in your reports to help you structure your information in a meaningful way. The groups are displayed in the report according to Jira hierarchy. 

To simplify the report view, reports containing multiple levels of grouping do not display "empty" hierarchy levels. The following example shows a report that has been grouped by Epic/Issue/Sub-task/Worklog. No Epic hierarchy level is shown for Issue PRO-11 since it is not linked to an epic. Also, there is no hierarchy level for Sub-tasks because the issues do not have any. This makes the report look tidier and more easy to read.

To group data in a report:

  1. Click the Group by box to to display a list of possible choices. Select the groups you want to add. 

  2. To remove a level of grouping, click Group by, and then click x to the right of the specified group level.

Tip

In Plan Time reports plans submitted for approval are labelled with a colored dot to indicate their approval status. A green dot means that they have been approved, yellow that they are in review, and red indicates a rejected plan. You can hover the mouse pointer over the dot to get approval details.

Below is an overview of the various fields that you can use to group data and organize your report results:

Group by

What it does

Available report

Project

Groups data by Jira project(s)

  • Logged Time

  • Planned Time

  • Capacity

  • Planned vs Actual

User

Groups data by Jira user

  • Logged Time

  • Planned Time

  • Capacity

  • Planned vs Actual

Location

Groups data by office location

  • Logged Time

  • Planned Time

  • Capacity

Account

Groups data by Tempo account(s)

  • Logged Time

  • Planned Time

  • Capacity

  • Planned vs Actual

Epic

Groups data by Jira epic(s)

  • Logged Time

  • Planned Time

  • Capacity

  • Planned vs Actual

Issue

Groups data by Jira issue(s)

  • Logged Time

  • Planned Time

Sub-task

Groups data by Jira sub-task(s)

  • Logged Time

  • Planned Time

Component

Groups data by Jira component

  • Logged Time

Fix version

Groups data by Jira fix version

  • Logged Time

Worklog

Groups data by worklog(s)

  • Logged Time

Sorting Data

One way of organizing your report is to sort the data in alphabetical or numerical order. Sort a report by the data in a particular column by clicking that column’s heading. Clicking a column header sorts data according to that column’s ascending or descending order: the text is sorted from A to Z, numerical data is sorted from highest to lowest, and time/date data is sorted from earliest to latest.

  • Up and down arrows next to a column name indicate that data is being sorted by that column.

  • To reverse the sort order, click the column heading a second time.

  • In a report with multiple grouping levels, data is grouped by the top-level group. For example, the report above shows the most number of planned hours at the top sorted by user.

Adding and Removing Columns and Work Attributes

Adding and removing columns lets you select what information is displayed in your report. For example, if you want to view how many billable vs how many non-billable hours were spent on issues linked to an account, filter the report by Customer and group the information by Account. Then add the Billable column to compare billable and logged hours.

Column options are not the same for Worklog and Plan reports, and column availability depends on how report results are grouped, for example, worklog columns are only available when grouping by worklogs, issue columns when grouping by issue, etc. Work attributes can only be displayed when the report is in List view and when the report is grouped by Worklog. When trying to add a column that is not available, a pop-up message will show you what is required for the column to become available. 

To add columns and work attributes:

  1. Click the Grid view or List view button at the far-right. The button's label depends on which view is displayed.

  2. Select the columns and work attributes you want to show in your report. 

  3. To remove a column or a work attribute from the view, clear the check-box next to its name on the Grid/List view menu.

Below is a list of the various columns you can use to bring additional data into your reports:

Logged Time report

Column

What it does

Columns

Logged

Displays time logged

Logged/Required

Displays logged time vs. required time

Required

Displays estimates of how much time the user is required to log, based on the workload and holiday scheme of the user

Billable 

Displays billable time logged

Planned

Displays time planned

List view columns

Remaining

Displays estimated hours that are remaining

Estimated

Displays estimated hours

Account

Displays account associated with time records

User

Displays user associated with time records

Log delay

Displays the time difference between when you created the time record and the date and time that the time record was logged to

Created

Shows when the time record was created

Planned Time report

Column

What it does

Columns

Planned

Displays time planned

Planned/Required (R%)

Shows what percentage of time has been planned

Required (R)

Displays estimates of how much time is required

List view columns

User

Displays user associated with plan

Planned by

Displays who created the plan

Status

Shows the status of the planned issue(s)

Reviewed by

Displays who reviewed the plan(s)

Requested reviewer

Displays who has been requested to review the plan(s)

Status updated

Shows if the status of the plan has been updated

Setting Date and Time Formats

You can select how dates, time, and duration are shown in your reports. Your preferences are applied immediately and are saved on a per-user basis. This affects how the date is displayed in the Date and Created columns in the List view when grouping by worklog, and in the Report Title field when saving.

The Duration options are not available in Tempo Timesheets versions 9.x.

To change the date, time, and duration format:

  1. Click the Settings button :settings_dc:  at the top-right of the report.

  2. Select options as desired.

Viewing Issue Hours

If you have the View issue hours permission for the project but not the required permissions to view other users' worklogs, you can see the total number of hours per issue in the project, but not individual worklogs from other users.

Related Topics

JavaScript errors detected

Please note, these errors can depend on your browser setup.

If this problem persists, please contact our support.