Approving or rejecting project time only validates the time spent on Tempo projects. It has no impact on Tempo Timesheet's approved or rejected hours. Email notifications are sent to the user when their project time has been approved or rejected.
If users resubmit their hours after their timesheet was rejected outside the project, all project time are reset to the Waiting for Approval status. Notification emails are resent to project time approvers.
Before you begin
-
Project Time Approval must be enabled in Tempo Settings by a Tempo Project administrator.
-
A Tempo Project Administrator must enable the Project Time Approval feature for their project.
Reviewing Project Time Submitted For Approval
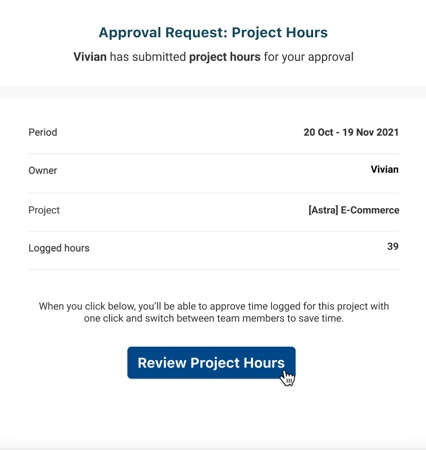
As a project time approver, you can monitor the hours logged on your project and approve them as they are submitted. You receive email requests to approve the project time. You can also view all your approvals in My Work > Approvals. This includes timesheets and project time.
-
Select the Tempo project that your team is working on.
-
Do one of the following:
-
Click the Approvals tab.
-
Click the Review Project Hours button in the email request to approve team members' hours.
-
-
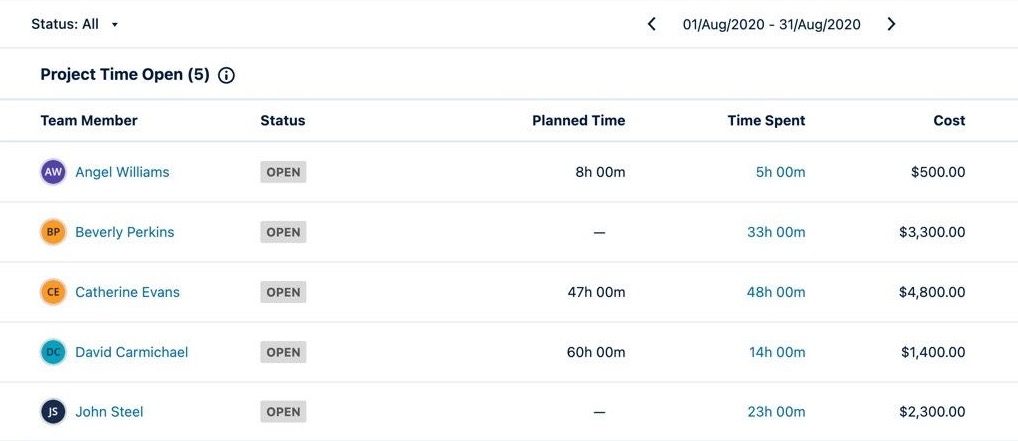
A list of project time is displayed by Status for team members who have logged more than 0 hours in the selected period. Status is set to All by default:
-
If hours that are related to this project are not submitted, they have the Open status.
-
If hours are submitted, then they are placed in the Waiting for Approval status.
-
All other hours will show in the Approved or the Rejected status.
-
-
If you wish to view other periods, scroll through the date range:
-
To find the project's Start date, scroll to the oldest period.
-
To find the project's End date, scroll to the last period.
-
-
Click Status: All or select to filter by a status from the list.
The submitted hours are displayed with the following details:
|
Column |
Description |
|---|---|
|
Team Member |
The name of the team member who submitted hours for this project. |
|
Status |
The Project Time Approval status indicates the approval status of the submitted hours:
An asterisk (*) is displayed next to an approval status if a change occurred to the worklogs after they were approved or rejected. Hover over the asterisk to view how many worklogs were modified and the number of hours changed. If project time is rejected, the user must resubmit their timesheet with the amended project time. |
|
Planned Time |
The planned time for the team members. We recommend using Capacity Planner by Tempo to plan your teams' time. |
|
Time Spent |
The number of logged hours for the period. |
-
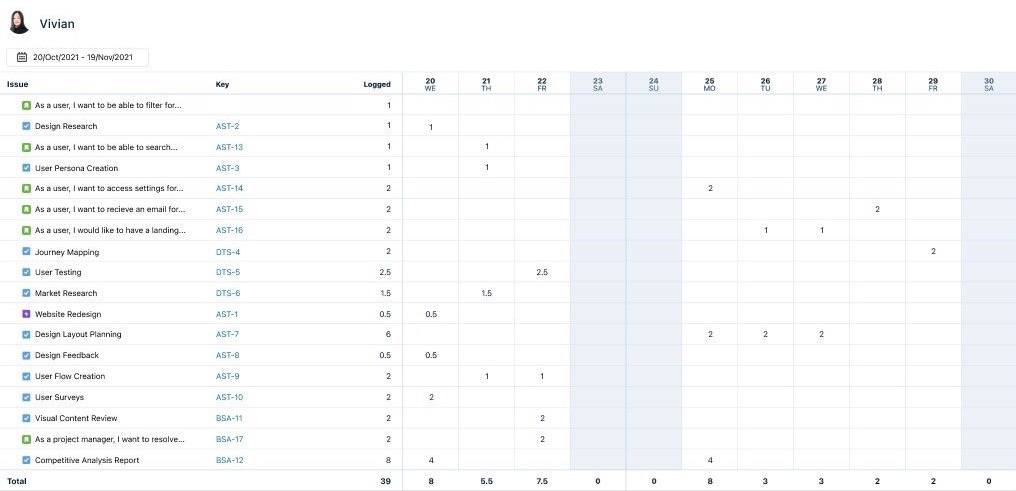
Click on a row in the Team Member column to see a breakdown of the logged hours in a timesheet view.
-
Open the Approvals tab to return to the approvals list to continue to approve or reject the submitted hours.
Approving Your Team's Submitted Project Time
-
Open the Approvals tab and verify the items in the Waiting for Approval status.

-
Select the row you wish to review for members with submitted project time.
-
If you wish to see a breakdown of the hours:
-
Click on the name in the Team member column or the Time spent value to view the hours in a timesheet view.
-
Click the Approvals tab when done.
-
-
Click Approve to approve the selected row.
-
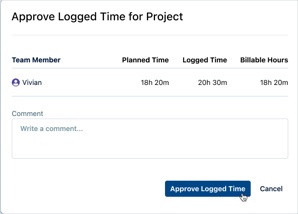
In the Approve Logged Time for Project window, enter a message in the Comment box if needed.
-
Click the Approve Logged Time to approve the hours.
-
The approved hours are moved to the Approved status under the Project Time Approved table.
The submitted hours are updated with the Approved status.
-
Scroll down to the Approved section to see a list of the hours you approved or filter with Status: Approved to see Approved items only.
-
Hover over a row in the Approved table to see a tooltip containing the date and timestamp of the approval and the comment that was added by you, the reviewer.
Rejecting Your Team's Submitted Project Time
-
Open the Approvals tab and verify the items in the Waiting for Approval status.
-
Select the row you wish to review for members with submitted project time.
-
If you wish to see a breakdown of the hours:
-
Click on the name in the Team member column or the Time spent value to view the hours in a timesheet view.
-
Click the Approvals tab when done.
-
-
Click Reject to reject the selected hours.
-
In the Reject Logged Time for Project window, enter a message in the Comment box if needed and click the Reject Logged Time to reject the hours.
The rejected hours are moved to the Rejected status under Project Time Rejected.
-
Scroll down to the Rejected section to see a list of the hours you rejected. Hover over the rows to see a tooltip containing the date and timestamp of the rejected hours and the reviewer's comment that you added.
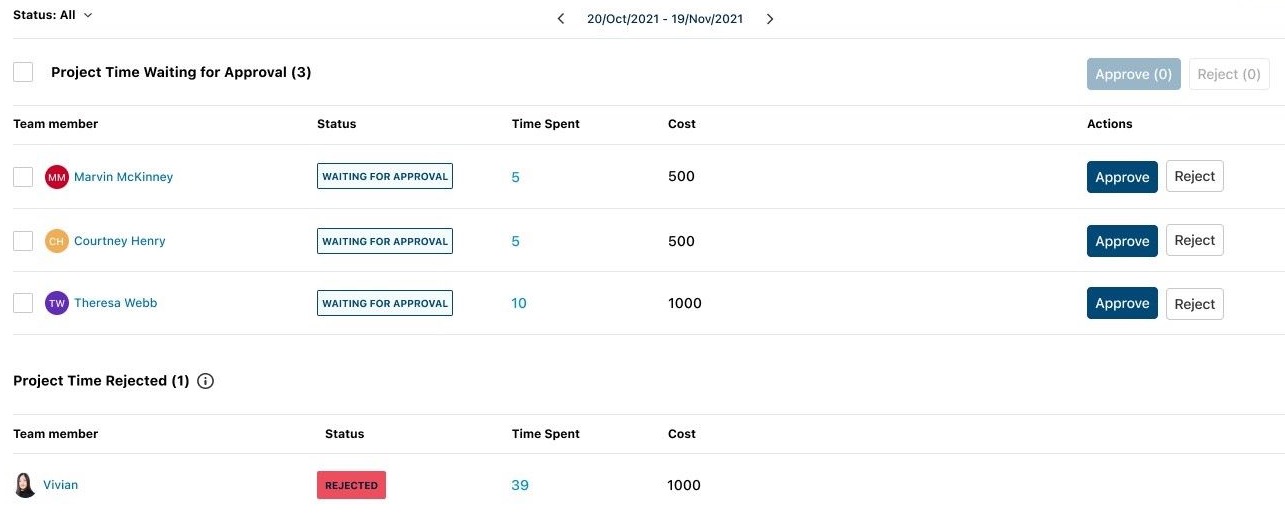
Once rejected, the user can modify the project time and resubmit their timesheet.
Approving or Rejecting Multiple Requests
You can make multiple selections of submitted hours for multiple members or select all submitted requests before approving or rejecting all.
-
You can approve all submitted hours at the same time. View the list in the Waiting for Approval status.
-
Scroll down to the Waiting for Approval list or filter by selecting Filter: Waiting for approval.
This filters the page and displays items in this status only.
-
To select all rows, add a checkmark to select Project Time Waiting for Approval (#).
This selects all rows. The (#) indicates the number of rows filtered in this selection.
-
To select individual rows, add a checkmark in front of each row that you wish to approve.
-
Do the following to approve the selections:
-
Click Approve (#) to approve them.
The (#) indicates the number of selected rows to approve.
-
A list of Team member names with the Logged Time is shown. You can remove rows from the list by clicking the Remove (X) button.
-
In the Approve Logged Time for Project window, enter a message in the Comment box if needed.
The text in the Comment will be repeated for all hours approved here.
-
Click the Approve Logged Time to approve all selected hours.
-
-
Do the following to reject the selections:
-
Click Reject (#) to reject them.
The (#) indicates the number of selected rows to reject.
-
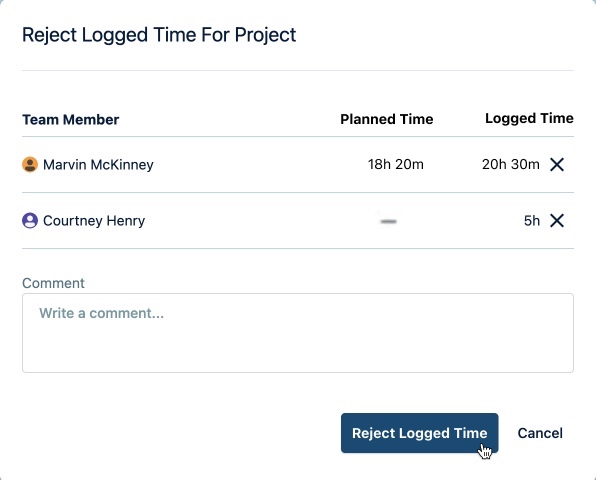
A list of Team of Team member names with the Logged Time is shown. You can remove rows from the list by clicking the Remove (X) button.
-
In the Reject Logged Time For Project window, enter a message in the Comment box if needed.
The text in the Comment will be repeated for all hours rejected here.
-
Click the Reject Logged Time to reject all selected hours.
-
-
Scroll down to view:
The approved hours are moved under Project Time Approved, and the rejected hours are moved to Project Time Rejected. The status is changed accordingly.
