If Structure’s generators aren’t enough for your needs, you can also build a Power Mode structure manually. This requires more work and maintenance than the other methods, but there are some situations where it can be useful:
-
You want complete control over the work items you include and where they appear in the hierarchy.
-
You want to visualize relationships that don’t exist in Jira.
-
You’re still in the planning phase and don’t want your actions to affect data in Jira.
When you manually add items to a structure, their position is stored within Structure. You can move items within the structure without affecting their Jira data. Unlike with generators, when you make changes to an item in Jira those changes are not reflected in your structure; it’s up to you to keep the structure up to date.
Changes to work item fields or properties in the structure are reflected in Jira, regardless of how you build your structure.
Populating your structure
When building your structure, you can create a new Jira item in Structure itself or you can add existing Jira work items.
Adding existing work items
To add existing work items to your structure:
-
Select Search & Add from the Add menu.
-
Select your search type (JQL or Text) and enter your search query.
-
Select the work items you want to include and click Add selected, or select Add all to add all of the work items that match your query.
To learn more about searching with JQL, see the Atlassian guide to Advanced searching.
Creating new work items
To create a new work item while in Structure:
-
Select Work Item from the Add menu.
-
Enter basic details for your item—its name, project, and work type—and select its location on the hierarchy.
If you need access to the full Jira creation dialog, select More details… -
Select Create.
Organizing Work Items
You can move work items in your structure by:
-
Clicking and dragging with a mouse.
-
Using keyboard shortcuts.
-
Using the dedicated buttons in the context menu.
-
Using cut-and-paste or copy-and-paste.
You can include multiple copies of a work item within a structure. The work item will still only exist once in Jira, but it can appear in multiple locations throughout your structure. This can be useful if, for example, a single task affects multiple stories.
Selecting multiple work items
To move multiple items, select the checkbox for each item. The selection checkbox is only visible when you hover over or select an item.
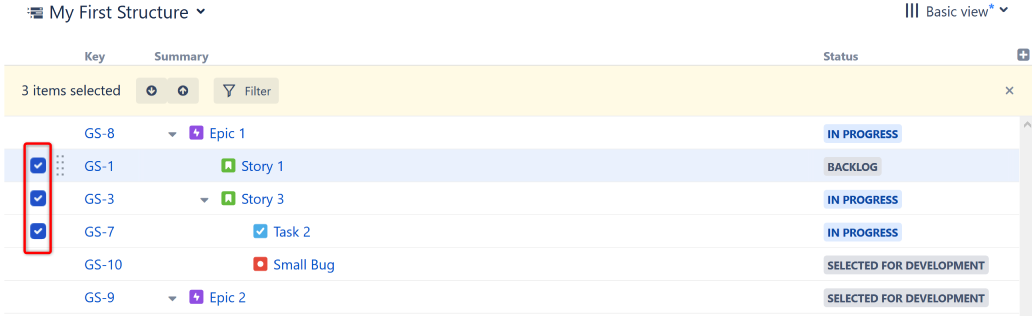
After selecting multiple work items, you can move them with the same methods as moving a single item.
You can navigate your selected items with the up and down arrows on the selection panel. You can also select Filter to hide all non-selected items. To close the selection panel and cancel your selections, select the close button (x) on the right side of the panel.
Next Steps
Next, we'll look at how to visualize your data within a structure.