Importing and exporting data to accounts requires the Tempo Account Administrator permission.
You can import accounts by setting the data up in either CSV or XML file format. The CSV file can either be in a custom format or imported from template. The third option is to wrap the data into an XML file to import them from service. Previously imported or manually created accounts, can also be exported in the Tempo Accounts Template CSV format.
Note
The Account Custom Field is installed automatically with Tempo Accounts, but needs to be associated to screens according to your needs.
To access the Import/Export Accounts page:
-
Select Settings in the Tempo sidebar.
-
Under Accounts, select Import/Export.
Importing CSV Files
You can import accounts using custom CSV import or by downloading a CSV template. In the custom CSV import you are guided through the process in four steps and it is possible to use a different order of columns than in the Import Template CSV.
-
On the Import/Export page, click Import Custom CSV. If you want to create the CSV file from a template, click the download link to download the template first.
-
Click Browse, and then locate the .csv file to import.
-
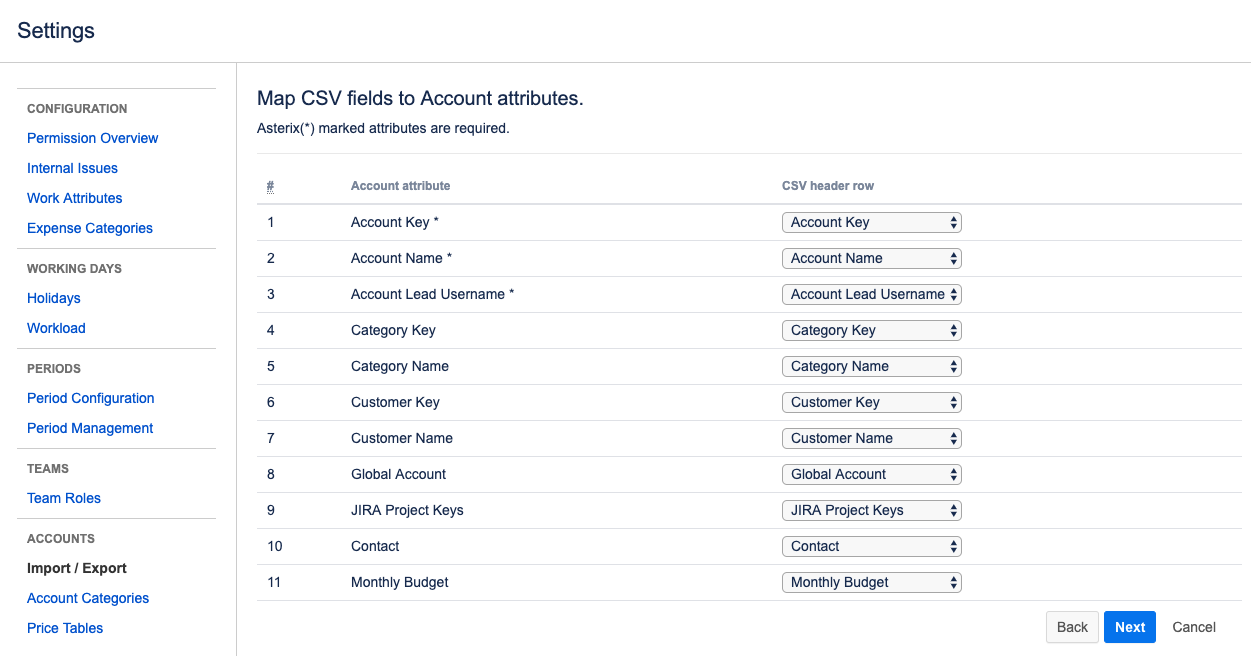
On the Map attributes page, match up the account attributes with the CSV header rows by selecting the appropriate row from the drop-down. If you use the recommended CSV header rows from the template, these fields will auto-fill. The following columns can be read by Tempo. Columns that are required are marked with an asterix (*).
-
When you have mapped all attributes correctly, click Next.
-
On the Validation page, Tempo validates the CSV file and indicates if there are any problems with converting the information, such as duplicated values or user names that cannot be found in the system. If all data is validated and confirmed, select an Import Option:
-
Update and add to current accounts list. The imported accounts will be added to the list of current accounts.
-OR- -
Archive existing accounts not included in the CSV file. All existing accounts will be archived and replaced with the imported accounts.
-
-
Click Import.
CSV File
The CSV file can either be an export from an external account system or a file that is maintained manually. The table below explains the CSV file template attributes or columns.
Note
The delimiter in the file has to be a semicolon (";") and there should be no quotes around the values.
Table: The CSV file attributes/columns in order, both required and optional
|
Order |
Name |
XML tag* |
Required** |
Description |
|---|---|---|---|---|
|
1 |
Account Key |
accountId |
Yes |
Unique identifier for the Account Name, but it is also used as primary key for an account dataset. |
|
2 |
Account Name |
accountName |
Yes |
Descriptive name for the account. The combination of the Account Key and Name is used to display the account in a Jira issue or in the Log Time dialog box. |
|
3 |
Customer Key |
customerId |
Yes |
Unique identifier for the Customer Name, which is only displayed on the add account Customers view. |
|
4 |
Customer Name |
customerName |
Yes |
Descriptive name for the customer. The customer is a way to group together Jira projects or cost centres by customer or a common entity of your definition for the projects. |
|
5 |
Customer Contact Name |
customerContactName |
Yes |
This is someone who represents the customer, either internally or externally. |
|
6 |
Category Key |
categoryId |
Yes |
Unique identifier for the Category Name, which is only displayed on the add account Categories view. |
|
7 |
Category Name |
categoryDescription |
Yes |
Descriptive name for the Category. This is a way to create a division for an Account/Customer like Development or Marketing. |
|
8 |
Account Lead Username |
employeeId |
Yes |
The Account Lead is responsible for the account. If a value is provided for the Account Lead in the import file, it either needs to be the Username or Name:
|
|
9 |
Account Lead Name |
employeeName |
Yes |
See no. 8 above on Account Lead Username. |
|
10 |
JIRA Project Key |
jiraProjectKey |
No |
The project key as in Jira. Use comma (",") separator to import keys for many projects for the same account. |
|
11 |
Global Account |
isGlobal |
No |
If you want the account to be Global, add value TRUE for this attribute in the import file and it will be displayed as Global in the linked Projects column in the Accounts Browser. If the value is FALSE or no value is provided, the account is not Global. |
|
12 |
Monthly Budget |
monthlyBudget |
No |
The final available attribute is to add a Monthly Budget if preferred to the account. |
* Which XML tag in the XML Import from Service file maps to attribute are explained here.
** Required attribute/column, which means that the column needs to exist with a semicolon delimiter in the file, even though it has no value. The only required values are the Account Key and Name for successful import.
Notes
-
The Account Key - Name, Customer, Category and Account Lead Name are all searchable in the Account Timesheet and account Reports.
-
If the relationship between an account and a project is one-to-one, then the account is selected by default when a new issue is created in the project.
An example of a row in a CSV file, where two optional attributes are included, e.g. a JIRA Project Key (TST) and a Global Account as false.
12000002;TM Software: Tempo;12345;Tempo Development;John Doe;300;Internal Dev.;JJ;John Johnsson;TST;false
The Account, Customer and Category keys do not need to be numeric.
An example from the Tempo template where the Customer and Category Keys are not numeric (only required attributes are shown in this example).
#Account Key;Account Name;Customer Key;Customer Name;Customer Contact Name;Category Key;Category Name;Account Lead Username;Account Lead Name
2200001;Acme Development;ACME;Acme Corporation;John Steel;DEV;Development;erica;Erica Jefferson
Importing Accounts from Service
Note
-
The XML Import from Service was included in Tempo Account Manager in Timesheets versions lower than 7.10. It is available in Tempo Accounts to respect backwards compatibility.
-
The Account Custom Field is installed automatically with Tempo Accounts, but needs to be associated to screens according to your needs.
This is an ideal way to establish a semi-automatic way to import accounts as explained below:
-
Prepare an XML file (see guidelines below) and place it where it can be accessed by your Jira server via an HTTP or file URL.
-
Go to the Import/Export Accounts page in Tempo Settings.
-
Click Import from Service.
Note
file:// URLs only work when the XML file is present on the Jira server filesystem, not on your local machine.
-
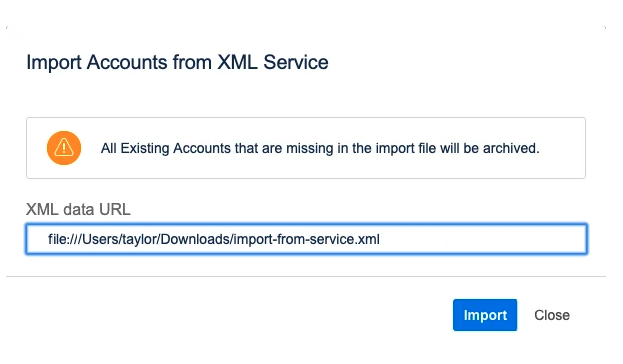
Copy the URL for the XML file and paste it into the text box of the Import Accounts from XML Service dialog box.
It is the Jira server that will execute the request and therefore your Jira server must have access to your service url.
-
Click Import to finish the process, or the Close link to opt out.
Notes
-
Jira issues created before linking their project to an account, do not automatically become set to the account value. The value needs to be set afterwards and it is possible to bulk edit the Jira issues.
-
If the relationship between an account and a project is one-to-one, then the account is selected by default when a new issue is created in the project.
-
Newly created accounts, get status Open after import.
-
The Changing the Account Status - Tempo Server page explains when accounts get status Archived and other possible cases/results from the import.
-
It is currently not possible to import with a scheduler that runs the job each hour, as a way to automate this process.
XML File
The code block below shows the structure of the XML file, with an example of two accounts.
Note
The creation of this file could be automated in an external account system, but you will always have to manually click the button as explained above.
The mapping of XML tags to attribute names is explained in the table in CSV File above. It is not always necessary to use the complete set of XML tags, like the last three can be omitted easily. The latter account in the code example is associated to two different Jira projects, by using a comma (",") separator between the project keys.
Code block, showing an example of an XML file containing two accounts
<?xml version="1.0" encoding="UTF-8"?>
<accounts>
   <account>
      <accountId>901401</accountId>
      <accountName>Development New</accountName>
      <customerId>100201</customerId>
      <customerName>CloudBay</customerName>
      <customerContactName>John Brown</customerContactName>
      <categoryId>300</categoryId>
      <categoryDescription>Development</categoryDescription>
      <employeeId>erica</employeeId>
      <employeeName>Erica Jefferson</employeeName>
      <jiraProjectKey>CLOUD</jiraProjectKey>
      <isGlobal>true</isGlobal>
      <monthlyBudget>0</monthlyBudget>
   </account>
   <account>
     <accountId>ERT</accountId>
      <accountName>TO OPEX</accountName>
      <customerId>ERTA</customerId>
      <customerName>GreenCl.</customerName>
      <customerContactName>John Steel</customerContactName>
      <categoryId>ERTB</categoryId>
      <categoryDescription>Service plus Mant</categoryDescription>
      <employeeId>robert</employeeId>
      <employeeName>Robert Penn</employeeName>
      <jiraProjectKey>SUPPORT,TO</jiraProjectKey>
      <isGlobal>false</isGlobal>
      <monthlyBudget>200</monthlyBudget>
   </account>
</accounts>
Exporting Accounts
You can export account data in CSV format.
-
Select Settings in the Tempo sidebar.
-
Under Accounts, select Import/Export.
-
Click Export Accounts.
Related Topics