To use the Tempo Mobile App for Server, you need to have Tempo Timesheets version 10.0 or higher installed.
On iOS, the Tempo mobile app requires iOS 9.0 or higher and is compatible with iPhone, iPad and iPod Touch. The Android version requires Android version 5.0 or higher.
With the Tempo Mobile App for Server you can plan and track time on the go. Plan your work, create time entries and time trackers on the go, submit your timesheet and convert your Google Calendar or Office 365 Calendar events and plans on Jira issues into time records. Also, keep track on pending timesheet and plan approvals and requests from your team via notifications in your inbox.
You can use the Tempo Mobile App for Server on your Android and iPhone mobile devices.
Signing In to Tempo Mobile for Server
The app will prompt for a login when first opened.
-
Open the app and tap Continue.
-
Enter the URL to your Jira site, and then tap Connect. Need help finding your site URL? See How to find your site URL to set up the Jira Server mobile app.
You only need to enter the URL once, and then the URL remains on the app manager.
-
Sign in using the same email and password you use to log in to your Jira site. If you cannot remember your login credentials, tap the Forgot link to ask for assistance.
-
You'll be taken to My Work where you can connect your Google Calendar or Office 365 Calendar account and start logging your time.
Connecting Your Google Calendar or Office 365 Calendar Account
If the time you track often lines up with the events in your Google Calendar or Office 365 Calendar accounts, integrating your calendar app with Tempo mobile lets you view your calendar schedule and quickly log time on it.
-
When you install the Tempo Mobile app for Server, Tempo creates a calendar event for you that invites you to connect your Google Calendar or Office 365 Calendar account. Tap the link and sign in with your account. Select the calendar to use for syncing with Tempo and determine whether you want notifications to display on your phone when a calendar event ends.
-
You can sign in and out from your account or switch accounts anytime in Settings. There you can also change the settings for calendar event notifications.
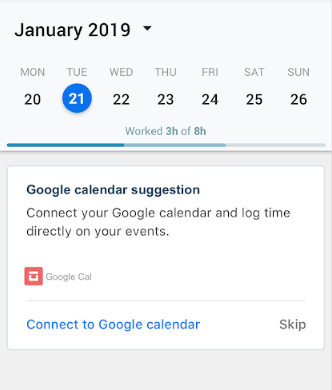
Navigating in Your My Work Calendar
When you sign in to the Tempo Mobile app, you'll see your My Work calendar. There you see your plans, upcoming Google Calendar or Office 365 Calendar events (if connected), and time entries.

-
To switch days, simply tap the day you’d like to enter time on.
-
To move between weeks, swipe left or right in the week bar.
-
To jump back to today’s date, tap the Today in the upper right-hand corner.
-
To move between months, tap the month at the top, and then swipe left or right in the calendar.
Tracking Time
A real-time tracker helps you accurately track time spent on tasks no matter where you are. When you start working, just tap the plus button, to start a time tracker. Or, continue a tracker from previous activity.
To start tracking time:
-
Tap the plus at the bottom, and then tap Track Time.
-
Select the issue you're working on and/or enter a description.
-
Start the tracker by tapping Track Time in the upper right-hand corner. The tracker will start running at the bottom of the screen.
-
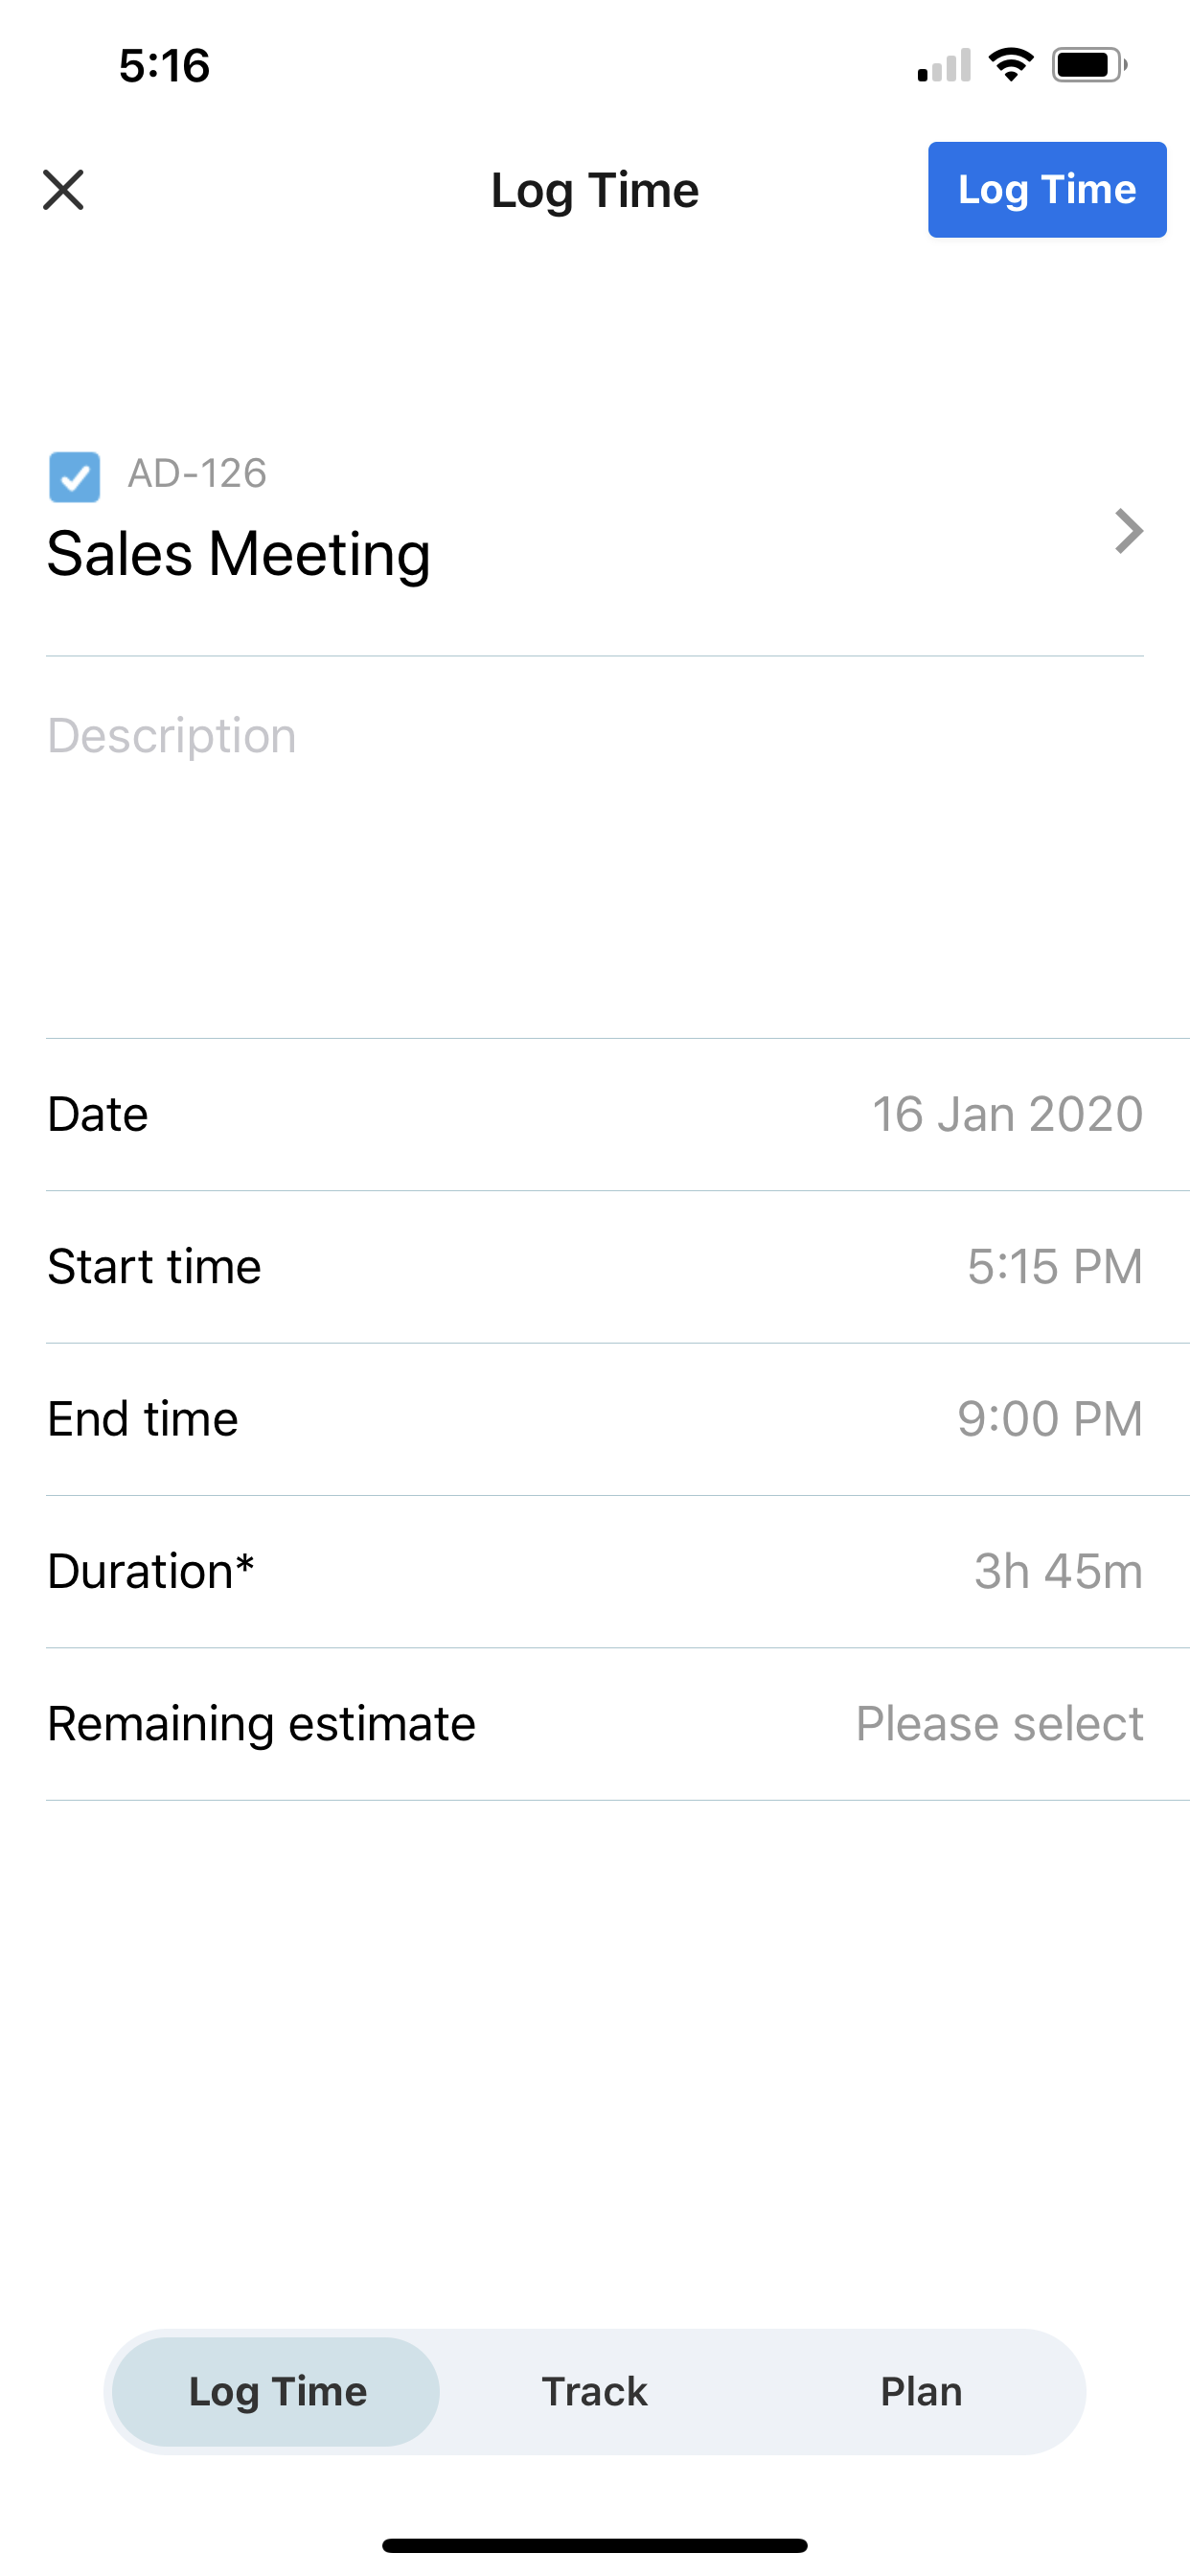
When you've finished work on the issue/activity, tap the active tracker, and then select LOG TIME.
-
On the Log Time screen you can select any field to edit it. When you're finished, tap Log Time in the upper right-hand corner.
You can also start the tracker without selecting an issue, and then fill in the details later.
Managing Trackers
-
The current tracker is displayed at the bottom of the screen. Tap it to access a complete list of all your trackers. From there you can start and pause any tracker, and convert trackers into time entries.
-
Use the controls to stop and start trackers.
-
To delete a tracker, select it in the list of trackers, and then tap the trash can icon in the upper right-hand corner.
-
Trackers are managed locally on your mobile device and will not sync with your desktop application.
-
You can only run one tracker at a time. Starting a time tracker will pause a tracker that's already running.
Creating Time Entries
You can create time records by entering the time you spent on a Jira issue. Also, turn your plans and Google Calendar and/or Office 365 Calendar events into time entries.
-
To create a new time entry, tap the plus at the bottom and find the issue you were working on. When searching for issues, you can use the filters at the bottom to help you find what you're looking for.
-
To turn plans on Jira issues and Google Calendar or Office 365 Calendar events into time records, simply tap the plan/event. If you haven't already linked a Jira issue to the calendar event, select a Jira issue.
-
On the Log Time screen select any field to edit it.
-
When you're done, tap Log Time in the upper right-hand corner.
-
The time entry is displayed in your My Work calendar.
Editing and Deleting Time Entries
You can edit the date, time, description, and duration of time entries.
-
On the My Work screen, tap the entry you need to change.
-
Select any field to edit it.
-
When you're done, tap Update in the upper right-hand corner.
-
To delete a time entry, swipe to the left on the desired entry, and then tap DELETE.
Planning Time on Jira Issues
For plan approvals you need to have Tempo Capacity Planner installed and Plan Approval enabled.
Create plans on your mobile and plan your work alongside all your tasks and events in My Work. You can also request approval of your plans if needed (if Tempo Capacity Planner is installed). At the end of the day you can quickly log time against your plans
-
Tap the plus at the bottom, and then tap Plan Time.
-
Find the issue you want to plan work on. When searching for issues, you can use the filters at the bottom to help you find what you're looking for.
-
If you need to have your plan approved, tap Reviewer, then the down arrow and select from the list of available reviewers.
-
When you're done, tap Plan Time in the upper right-hand corner.
-
Your plan is listed in My Work and there you can tap on it to turn it into a time entry.
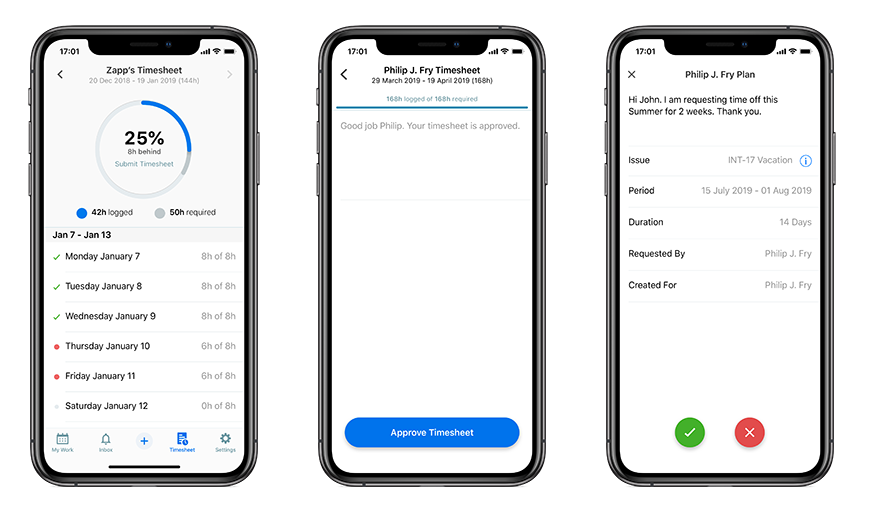
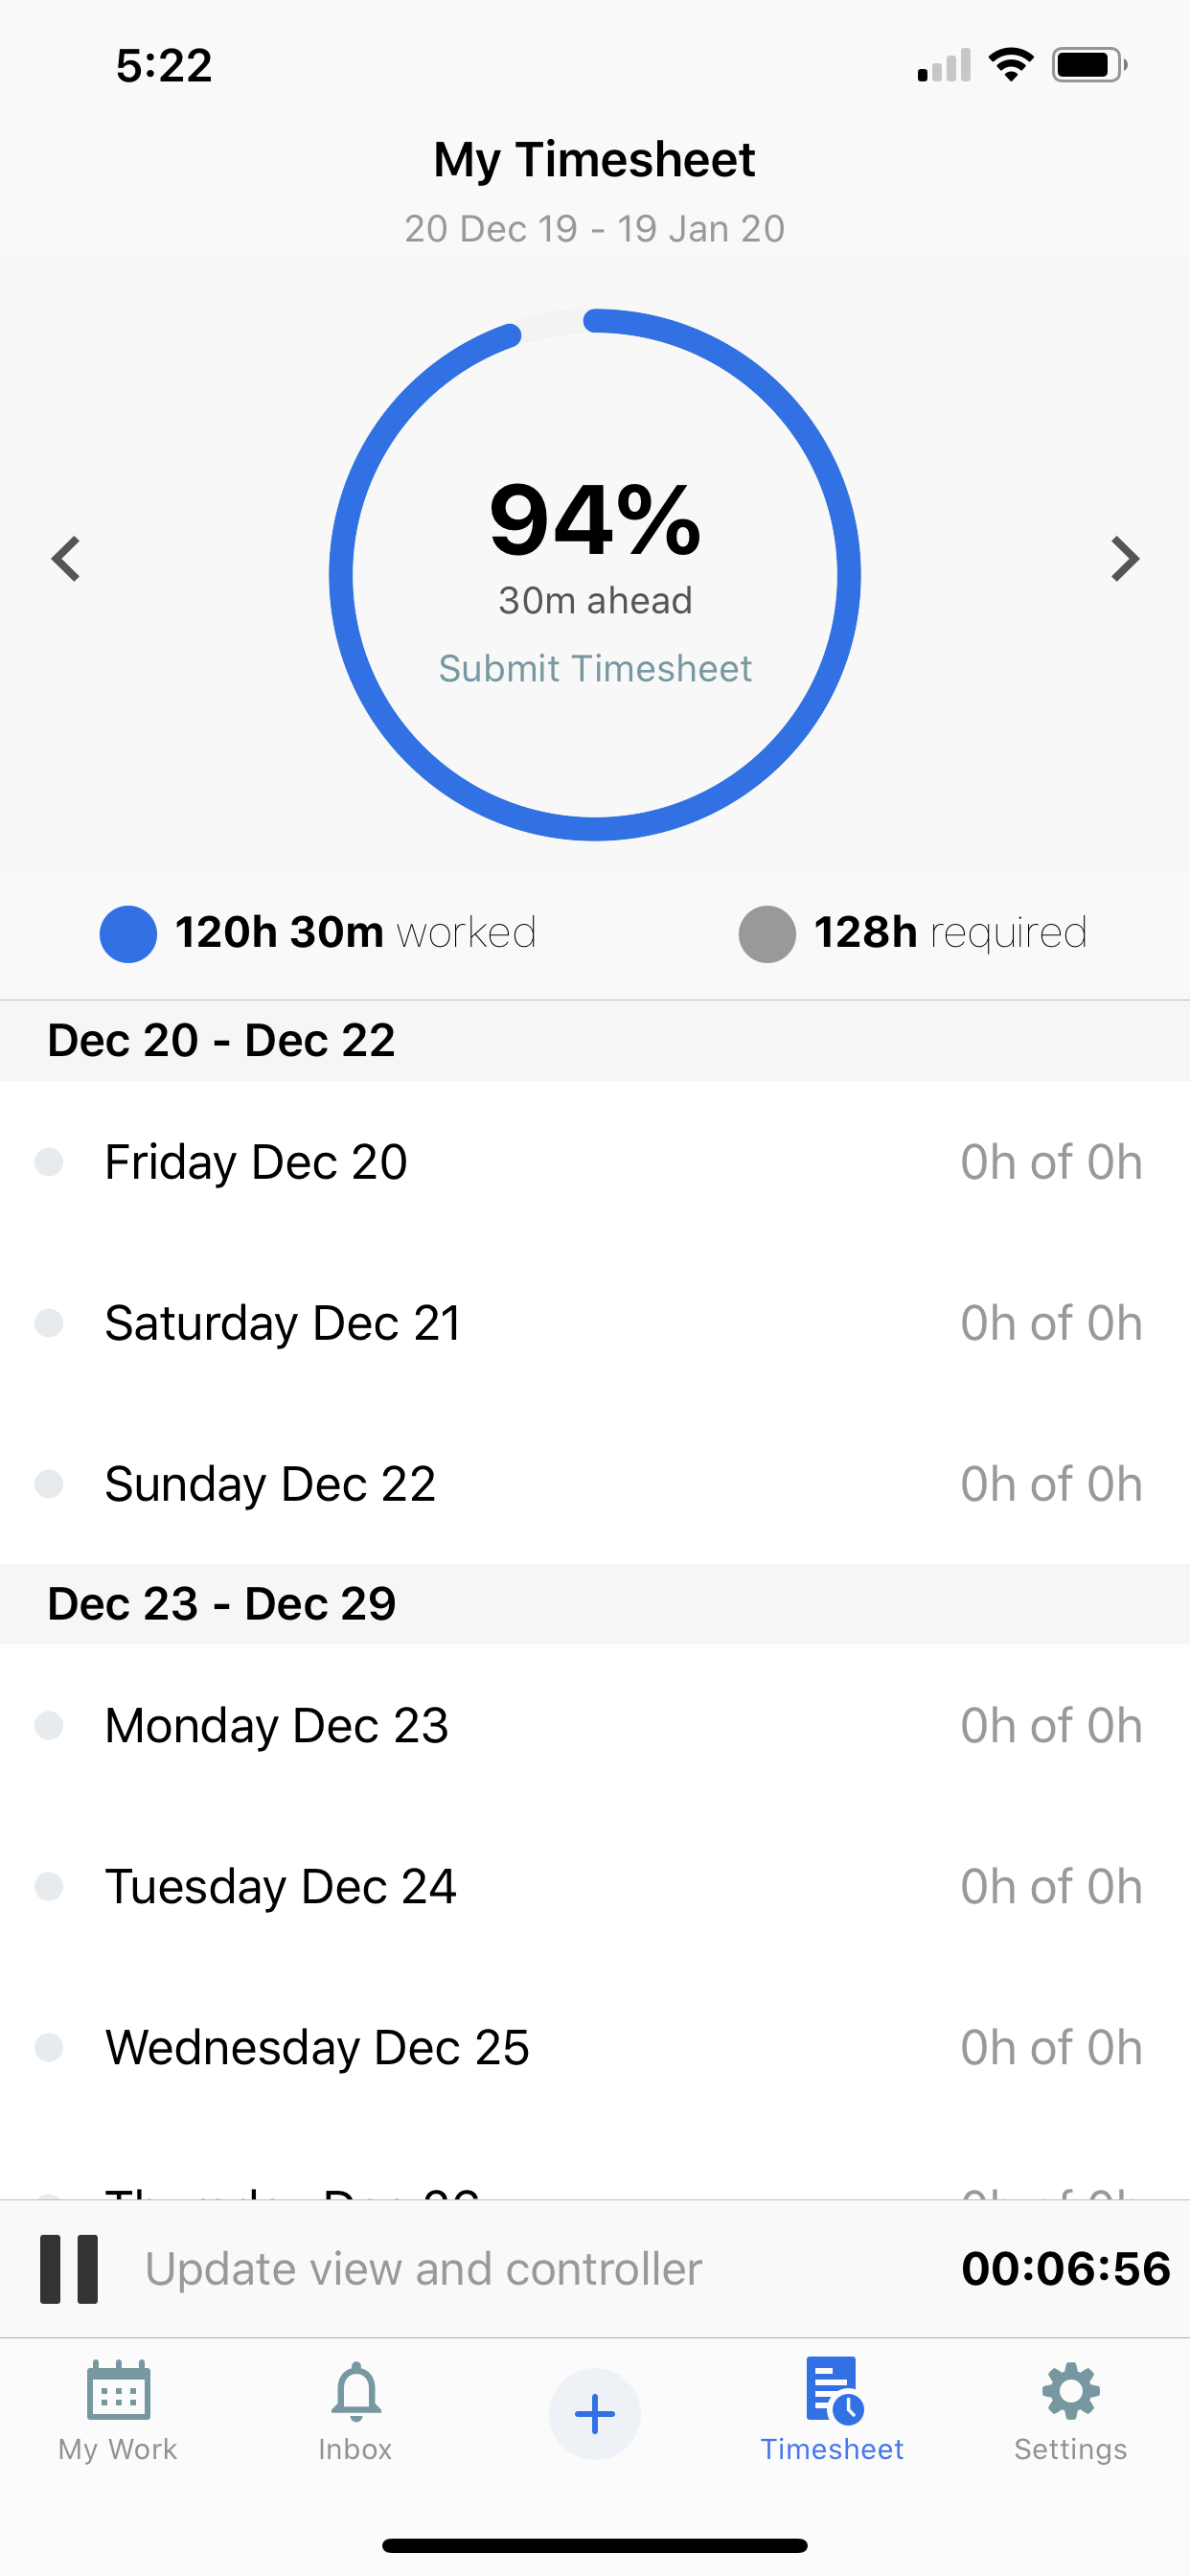
Checking Your Timesheet Status
See how much time you have logged and what is left to complete.
To view your timesheet status:
-
Tap the Timesheet icon at the bottom. The current timesheet is displayed.
-
At the top of your screen you see your time tracking progress. You can quickly navigate between periods using the previous (<) and next (>) arrows.
-
Tap on any date to see exactly what you worked on that day – and make changes as needed.
-
When the timesheet is ready for review, tap the progress circle, select your reviewer, and then tap Submit.
Reviewing and Approving/Rejecting Time Entries and Plans
As a manager, take action on your responsibilities of reviewing and approving/rejecting timesheet and plan requests from your team. Tempo notifies you when you have pending timesheet and plan approvals.
To approve/reject an approval request:
-
Tap your Inbox icon and see all timesheet or plan approval requests at a glance.
-
Select the request you want to review.
-
When you've reviewed the request, tap the check-mark to approve, or the x to reject.
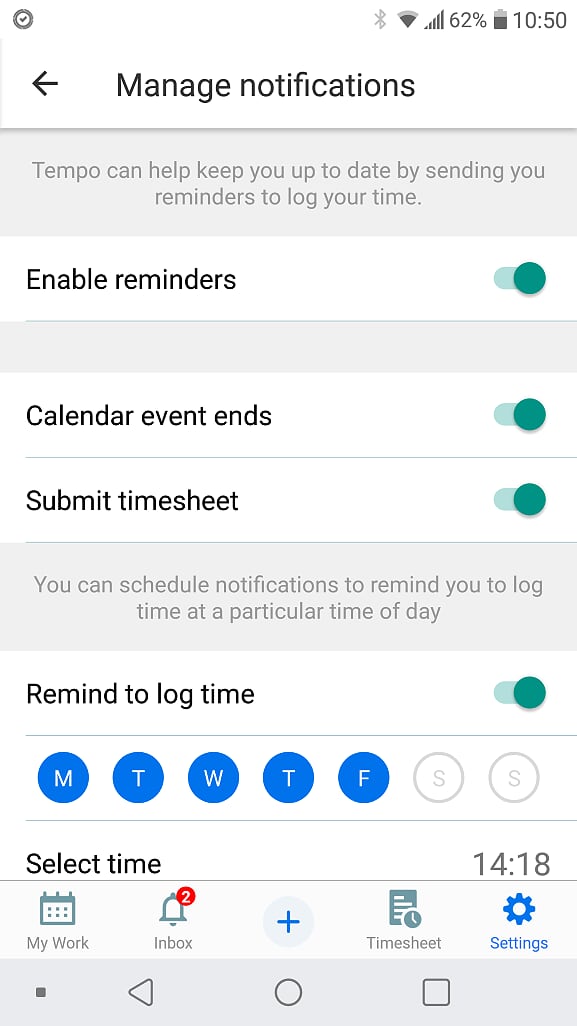
Managing Notifications
Stay up-to-date on your notifications. When you first download the Tempo Mobile App for Server, your notifications should already be enabled. The reminders and notifications pop up on your mobile device but you can also view them in your Inbox. You’ll be reminded of when a timesheet is due for an approval from your manager and managers get reminded of pending timesheet and plan approvals. Tempo can also help you keep up-to-date by sending you reminders to log time. To take action, tap the notifications.
If you want to disable notifications for Tempo Mobile app, or you aren't seeing any when you expect to, you can change the notification settings.
-
Tap Settings at the bottom, and then Manage notifications.
-
To enable or disable notifications, switch each notification toggle button on or off.
-
Enable reminders – If you don't want to receive any reminders from Tempo, switch this off.
-
Calendar event ends – Receive a notification when a Google Calendar or Office 365 Calendar event ends, inviting you to quickly log time on the meeting/event.
-
Submit timesheet – Get a reminder when your timesheet is due to be submitted for review.
-
Remind to log time – When this option is switched on, you can schedule notifications to remind you to log time at a particular time of the day. Select the days you want to be reminded. You can also tap the time to set at what time of the day you'd like to receive the reminder.
-
Get Support
You can get help, or let us know how we can improve Tempo Mobile here.