Planning time for others requires the View Plans and Manage Plans permissions for the team in which the resource is a member.
Creating plans for resources and team members can often be time-consuming, especially when you or your team members have already spent time setting up Jira projects and creating issues. To help reduce the amount of time and effort needed for planning, you can import the data that's already in the Jira issues and create plans from them in the Resource Planning view. Not only does this let you create plans quickly, you can also keep the plans up-to-date when there are changes to the Jira issues (as long as you don't modify the plan in planner and break the link between Jira and Planner).
For plans to be created, you need to make sure that the Jira issues meet these conditions so that they can be imported:
-
All 3 of these fields need to be filled in Jira issues: Assignee, Due Date, and Original Estimate.
-
The Due Date needs to be today or a later date. The due date field might not be part of the default issue fields and will have to be added.
-
The Jira issue's Status is not resolved (i.e., Closed, Resolved).
When you import the Jira issues, plans are created for each Assignee over the time periods that are determined by the issue's Due date and Original Estimate fields. The Due Date is the end date for the plan, then working backwards from that, the hours in the Original Estimate are divided over the working days as determined by the resource's Workload scheme. For example, if a user has 8 hours available for work per day and is importing a plan that requires 24 hours, the plan will be distributed over 3 days with 8 hours each dedicated to that imported plan. If the user has 2 days left until the due date, then it will distribute 12 hours per day.

Best practices for creating plans
-
Creating plans is most effective for short-term or sprint planning when you have assigned Jira issues to resources and have a good idea of the due dates and amount of work required.
-
It's good practice to start with a clean slate: import Jira issues first to create plans, then add or adjust other plans around them as you need. This is because plans already created for a resource are not considered when importing Jira issues to create plans. For example, let's say that Amy has 10 out of her required 40 hours already planned for the week. Then Jira issues are imported, and plans are created for her based on her workload scheme (40 hrs per week), so she now has 50 hours planned for that week.
-
Use filters in the Resource Planner view to select the resources for whom you want to plan before you create plans. This determines which Jira issues can be imported, and reduces their number so you're seeing only what you need. See Filtering the Resources for more information.
-
To edit a plan created from a Jira issue, it's best to edit the Jira issue and then update the plan. This keeps the connection active between the plan and its Jira issue. Changes made to Jira issues in Planner will not be reflected in Jira. See Editing Plans and Updating Plans below.
Creating Plans from Imported Jira Issues
To create plans:
-
Make sure that Jira issues have met the criteria to be imported - see the list above.
-
Make sure that you have the Manage Plans permissions for the resources for which you're planning, otherwise their Jira issues will not be imported.
-
Select a filter in the Filter by field (see Filtering the Resources) to display only the resources for whom you're planning.
The Assignee in the Jira issues must match the resources displayed in the Resource Planning view to be able to import their Jira issues. For example, if you filter so that only the Lunar Labs team is displayed, then only Jira issues that match these team members are imported. -
Click the Import button at the top-right.
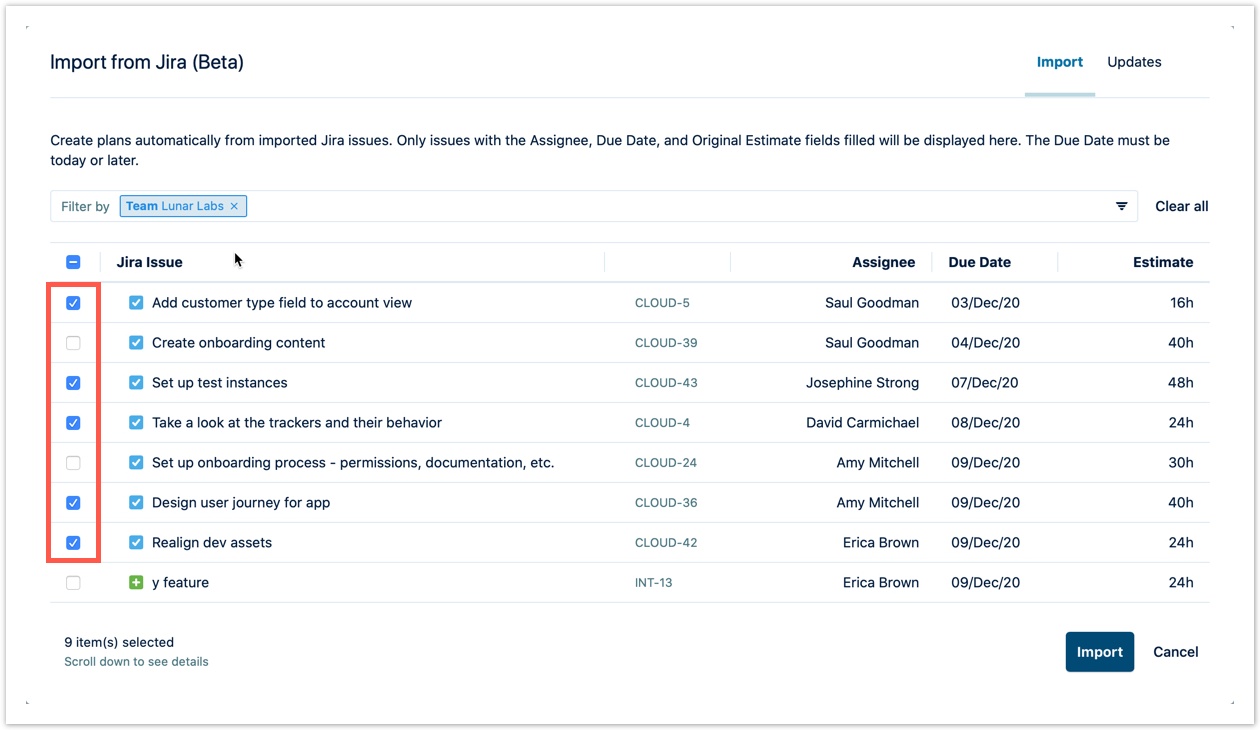
All Jira issues that are eligible to be imported are listed in the Import from Jira dialog according to the filter that you have selected. You can add a filter in this dialog, which doesn't affect the filters in the Resource Planning view.-
If a filter you select doesn't appear here, it may be that you don't have Manage Plans permission for that team or resource.
-
-
Check the box for each issue you want to import, or check the box beside Jira Issue at the top of the list to select all issues, and then click Import.

-
Plans are created for each Assignee over the time periods that are determined by the Jira issue's Due date and Original Estimate data. The Due Date is the end date for the plan, then working backwards from that, the hours in the Original Estimate are divided over the working days as determined by the resource's Workload scheme. These plans are indicated by an Import icon and Tempo Capacity Planner keeps a connection (a mapping ID) between the plan and its corresponding Jira issue. The Import icon will also appear next to the resource's name and will disappear once the page is refreshed.
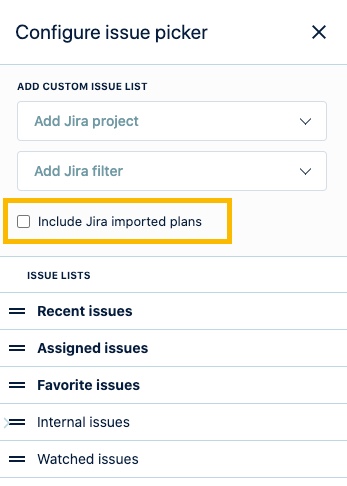
By default, issues of imported plans will not appear in the Issues list. To include them in the Issues list, go to the Issue side panel, click on Settings and check the Include Jira imported plans box.
Editing Plans
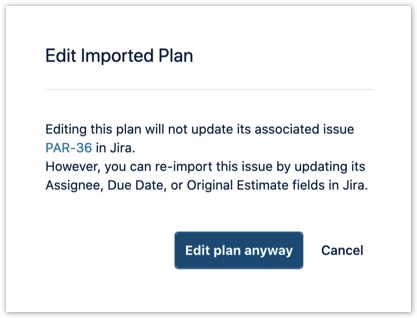
A plan that's been created from a Jira issue retains a connection to it. If you edit a plan in a way that changes the data from the issue's 3 relevant fields (Assignee, Due Date, or Original Estimate), this connection will be broken. For example, if you move the plan to another team member, move the plan on the timeline, or change the number of hours assigned for each day, a dialog appears in which you can decide to edit the plan anyway or cancel the operation:

-
Edit the plan anyway: The connection between the plan and its Jira issue is broken, so you won't be prompted for an update if any changes are made to the 3 relevant fields in the Jira issue. You can then edit the plan as you like - for example, you can adjust how the work on an issue is spread over a resource's working days. If you import the same Jira issue again, a new plan is created from it, and your edited plan remains unchanged.
-
Cancel: The connection between the plan and its Jira issue is retained so that any changes made to the 3 relevant fields in the Jira issue can be updated for the plan (see below).
You can add or change the Description in a plan without affecting the connection to its Jira issue.
Updating Plans
When you make changes to any of the relevant fields in the Jira issue (Assignee, Due Date, or Original Estimate) after you have imported it, you can update the related plans so that they use this new Jira data. This can save you a lot of time because you don't have to also manually update the plans in the Resource Planning view as your project changes.
To update plans:
-
Click the Import button at the top-right.
-
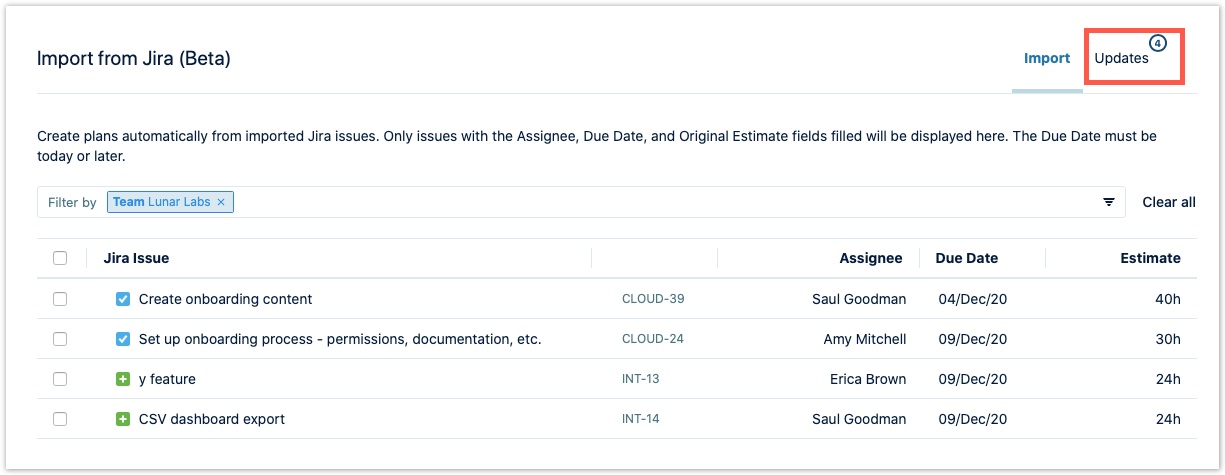
In the Import from Jira dialog, click the Updates tab.
A notification appears on this tab with the number of updates to indicate that at least one of the 3 relevant fields in an imported Jira issue (Assignee, Due Date, or Original Estimate) has changed since the issue was last imported. All the Jira issues that have changed are listed here. -
Check the box for each issue you want to update, or check the box beside Jira Issue at the top of the list to select all issues.
-
Click the Update button to confirm that you want to update the plans from the selected Jira issues.
Any current plans based on these Jira issues are updated with the change. For example, if a resource manager changes the Assignee from Amy to Erica in Jira and performs an update in the Resource Planner, then Amy's plan will be reassigned to Erica.

When the Import from Jira dialog is closed, you'll see a number on the Import button to indicate when changes may have been made directly in the Jira issues. You can choose to update the corresponding plans with this new data.
Example of how to import Jira issue to create plans
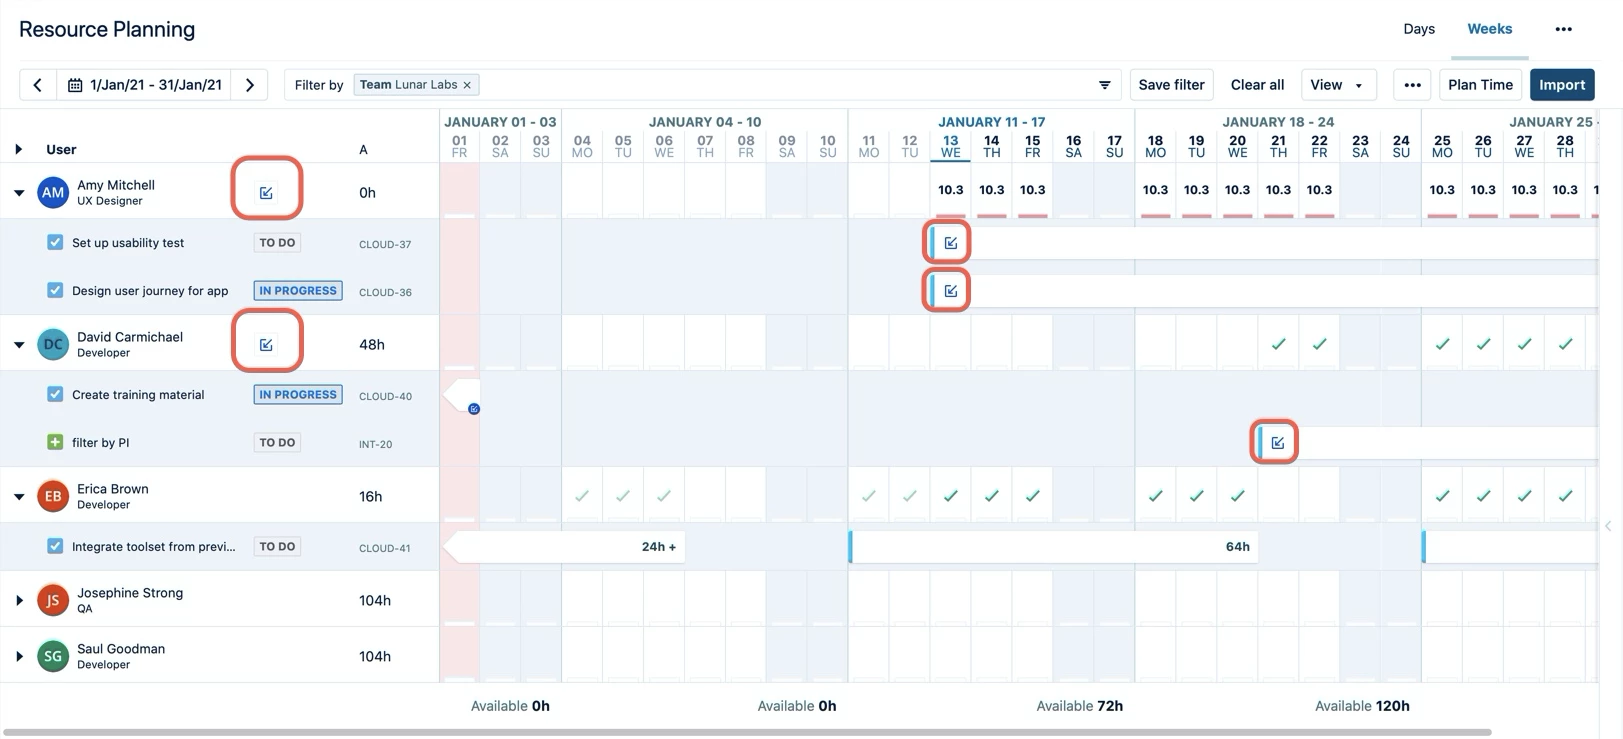
Catherine Evans is a resource manager who manages several developer teams. She wants to review the plans for one of her teams (Lunar Labs) for the upcoming sprint to make sure that the team members are maximizing their productivity and are on track to meet their deadlines. The dev team has just finished their sprint planning session and the devs have already filled out the information in their Jira issues. Catherine thinks that it would be more efficient to use this data to create plans instead of re-entering the data manually in Planner. Catherine leverages the Import function of Planner to import all the Jira issues so that she can get an overview of what the Lunar Labs team has planned.
Importing Jira issues to create plans
Before importing the Jira issues, Catherine needs to verify a few things. She needs to make sure that:
-
All the Jira issues she wants to import have these three Jira issue fields completed: Assignee, Original Estimate and Due date. Planner uses data from these fields to create plans, so they need to be filled.
-
The Due Date for the Jira issues is today or later.
-
The status of the Jira issues is not Closed.
To import the issues and create plans:
-
From the Weeks view in the Resource Planning view, Catherine uses the date picker to set the dates for the sprint. In this case, it's 2 weeks.
-
She also filters by TEAM so that she only views Lunar Labs' team members: since she's filtering in the Resource Planning view, she won't have to filter again when she goes to import the Jira issues.
-
Catherine is now ready to import the Jira issues into the Resource Planning view. She clicks on the Import button in the top-right corner. The Import from Jira dialog is already filtered by team because Catherine filtered for it in the Resource Planning view.
-
The list displays all Jira issues that are assigned to these team members and may not be part of the sprint, so she checks only the ones she wants to import.
-
Catherine clicks the Import button at the bottom, and a notification appears alerting her of the number of imported plans that have been created.
In the Resource Planner view, an icon appears next to the resources’ names to indicate that there are plans created from the imported Jira issues.
Now that all the issues have been imported, Catherine can start reviewing everyone's plans!
Making changes to the Jira issues
If Catherine wants to make a change to a Jira issue's Assignee, Due date or Estimate field, she must first decide whether she wants the change to be made in both Jira and Planner or only in Planner.
Here are two scenarios where she makes changes:
-
Catherine wants to make changes to the Original Estimate of a Jira issue.
-
She changes the Original Estimate value in Jira. When she returns to Planner and clicks Import, she notices that there is a notification on the Updates tab. She wants the change of estimate value to reflect in Planner so she clicks the Update button and selects the issues for the plans that she wants to update.
-
-
Catherine notices that Amy and David have been over-allocated. She wants to change the Due Date for her Jira ticket (PAR-36) in Planner to fix this.
-
She makes the changes to the plans in Planner because she doesn't think that it's necessary to make this change in Jira. When she drags PAR-36's plan, a notification window alerts her that the changes she makes in Planner will not be reflected in Jira. She decides to go ahead by clicking Edit plan anyway.
-
Analyzing Planner data
Tempo Timesheet must be installed to access the Planned vs. Actual Report.
Once the sprint has ended, Catherine can look at what was planned and the hours that were actually logged in by the team. The Planned vs. Actual Report will give valuable insights into the team's capacity (Actual) in relation to what was planned. This could be used as a metric in Retrospective meetings as it'll give Catherine and the Lunar Labs team a clear idea of the team's capacity, and they'll be able to set more realistic expectations for future sprints.