These migration steps can be done automatically using the JCMA migration assistant tool. Tempo recommends using the automated migration assistant tool to facilitate the migration of Tempo Data Center to Tempo Cloud.
Tempo data setups are different for every instance. Depending on your dataset, you may need to take all of the steps described below or only a selection of them.
Please note that you need to migrate Jira data before starting to configure Tempo and / or migrate Tempo data that is not worklog data.
When you migrate from Jira Data Center to Jira Cloud with an XML backup from Jira or the Jira Cloud Migration Assistant tool, all worklogs will be migrated to Jira and synced to Tempo. DO NOT attempt to import the Jira Data Center worklogs to the Jira Cloud instance in those cases.
Key Steps for a Successful Tempo Timesheets Migration
-
Export worklog data from the source destination with the Tempo worklog servlet or by using the Jira Cloud Migration Assistant.
Exporting worklogs is only needed in cases where you have worklog attributes configured or if you have not migrated the worklogs to Jira Cloud with the Jira backup/restore functionality.
-
Export the Tempo Account data in .csv format.
-
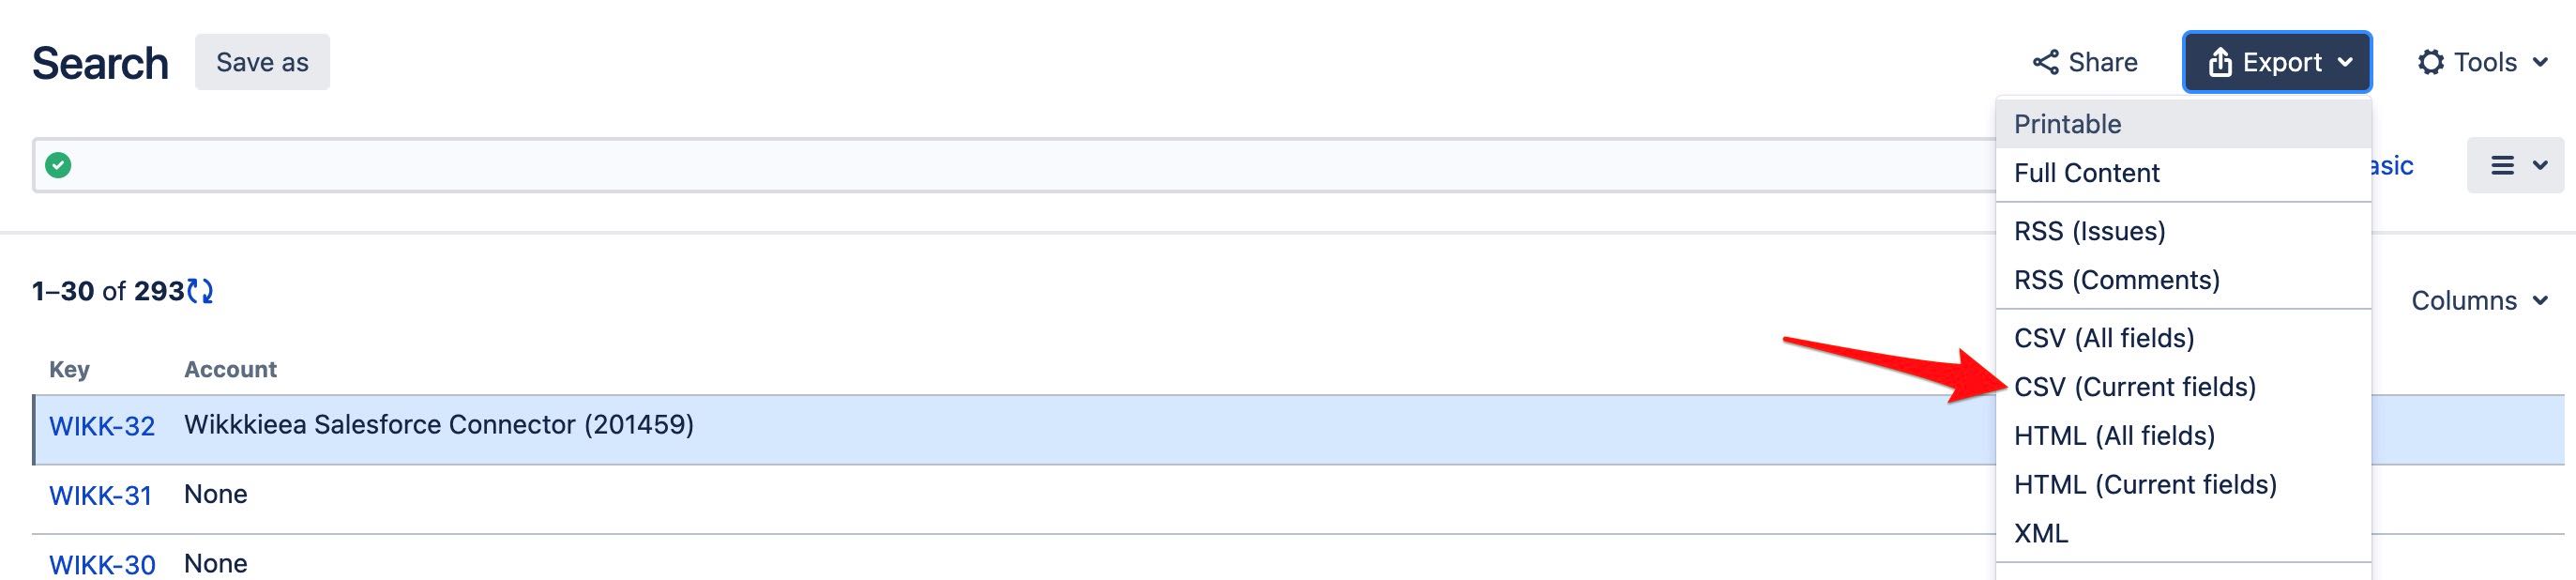
Export a Jira work item list to .csv that includes the Jira work item key, the Tempo Account, and Tempo Team custom field value (if set in your source instance). This step is required to prepare for updating the custom field values on your Cloud instance (see step 8 below).
You can access this list by conducting a Jira work item search and then selecting Export and CSV (Current fields).
Please note that the Team role Jira custom field is not supported / available on Tempo for Jira Cloud.
-
Export timesheet approvals using the API for timesheet approvals.
-
Install and Configure Tempo in your new Cloud instance (Jira permissions, Tempo configurations).
-
Set up internal work items in your Jira projects. The migration process can expose internal work items to people without the proper permissions. Given the subsequent privacy concerns, we recommend that you configure internal work items immediately after you configure Tempo in your new Cloud instance. This may entail 1) archiving your old internal work items and creating new internal work items for your Jira projects, 2) implementing security schemes or 3) simply moving the internal work items to other projects with limited permissions.
If you want your internal work items from your Data Center instance to be kept private, please be sure to create new internal work items. Reusing old internal work items could expose personal data in the migrated worklogs due to the way that data is stored in Tempo Data Center.
-
Reexamine your project permission settings since they can be different on Tempo Cloud than Tempo Data Center. For instance, Tempo Cloud has the View work item hours permission which doesn't exist for Data Center. You should go through this and other permissions to determine whether adjustments need to be made.
-
Set up Tempo teams in your new Cloud instance and configure team permissions. There are no native export options (.csv or .xls) for Tempo teams from Tempo for Jira Data Center. To import/export the Tempo teams between your instances you will need to invest an amount of time that you need to evaluate if it is worth the effort compared to a manual entry of the teams in your Jira cloud instance. Moving to a new instance might be a good point to review your team setup within Tempo so that you only merge those teams that are needed.
Note: Creating and updating team permissions is not available from a REST endpoint. By default, the endpoint creates two permission roles: one associated for the team lead and another one for team members. The permission role for the team lead implies all permissions (view / manage worklogs and plans and the ability to manage the team) and the role for the team members implies no additional permissions (means each team member can only see their own plans / worklogs).
-
Set up and configure the Tempo workload and holiday schemes in your new Cloud instance. There are no native export options (.csv or .xls) for workload and holiday schemes. To import / export the Holiday / Workload schemes between your instances you will need to invest an amount of time that you need to evaluate if it is worth the effort compared to a manual entry of the workload / holiday schemes in your Jira cloud instance. After you have configured your workload / holiday scheme you will need to assign your users (Atlassian Account IDs) to these schemes.
-
Import the Tempo Accounts .csv file. Before you import the Accounts into Tempo you need to match the current user key from Jira Data Center to the new Atlassian Account ID. You also need to add columns to the .csv where you can add the Atlassian account IDs for the Account Lead and Contact ID. This information is not available in Tempo Data Center and hence is not exported.
Not sure how to retrieve your Atlassian Account ID? There are a few different options:
-
It is shown in the URL when viewing a user in JIRA Cloud user management (JIRA Settings, User management, select a user and check the URL).
-
If you don't have many users to retrieve information for and you are a JIRA Administrator, you can use this REST call in a browser to get the information about users one by one: https://domain.atlassian.net/rest/api/latest/user/search?query=[e-mail address]
-
You can use the JIRA REST API to retrieve user information. Please refer to this article to learn more.
-
-
Confirm that you can see your Tempo worklogs by going to Tempo's Logged Time Report. If you have the proper permissions, you should be able to see all the worklogs there.
-
Note that currently saved reports cannot be migrated, so you will need to re-create them on Cloud.
-
Got the correct permissions but don’t see your Tempo worklogs? They may not have synced yet from Jira to Tempo. Please reach out to our Support team for assistance.
-
-
Update the worklogs in your new Cloud instance with missing parameters (like billed hours or worklog attributes). There are a few things to keep in mind when doing so:
-
Worklog attributes from the type DYNAMIC_DROPDOWN are not supported on Jira Cloud and need to be converted to a static list (type STATIC_LIST) values.
-
The values from the worklog attributes for each worklog are exported with the worklog servlet and the REST API as plain text / numeric values. However, when you have worklog attributes from the type ACCOUNT (Tempo Account field) the returned value is the Account Key in the Tempo database. The Account key can be set during the Account setup process but is not editable afterwards.
-
If you have a worklog attributes of the type DYNAMIC_DROPDOWN the returned value is the key. If the key is different than the provided name from the UI you will need to match the key to the name.
-
Worklog ID mapping is provided by our support team. Please request this mappings after your Jira migration is complete, via our support channel.
-
Update the Tempo Account and Team Custom fields for the Jira work items in your new Cloud instance. This can be done using the Jira Cloud REST API. You can request your worklog ID mappings from our Support team after you've migrated your Jira data.
-
Recreate timesheet approvals using the information you exported above and the Cloud API for timesheet approvals.
Tempo Timesheets v.8 (and Tempo Planner v.5) have a different Team structure than newer releases. This means you will need to adapt to the current Team permission structure if you are running one of those versions.