Database Container Launch
The container is started using the docker command with the appropriate settings:
docker run
  --name mssql-2019
  --volume /opt/mssql2019/dbdata:/var/opt/mssql/data
  -e "ACCEPT_EULA=Y"
  -e "SA_PASSWORD={STRONG_PASSWORD}"
  -p 1436:1433
  -u root
  -d
mcr.microsoft.com/mssql/server:2019-latest
Here's a breakdown of each parameter:
-
--name mssql-2019sets the container name to "mssql-2019", which includes the database type (mssql) and version (2019). -
--volume /opt/mssql2019/dbdata:/var/opt/mssql/datasets the container volume, which is used to save data if the container is restarted or rebuilt. The external folder where our data will be stored is "/opt/mssql2019/dbdata", and the internal folder where we want to save the data is "/var/opt/mssql/data". More information on container volumes can be found in the corresponding Docker manual page.
Note: If Docker installed on Windows, plese create appropiate directory (e. g. C:\Temp\mssql\data) befor running command --volume "C:\Temp\mssql\data:/var/opt/mssql/data"
-
-e "ACCEPT_EULA=Y"accepts the end user license agreement. -
-e "SA_PASSWORD={STRONG_PASSWORD}"sets the superuser password for SQL Server, which is a required container variable.
Note: A strong password must be more than 8 characters in length and satisfy at least three of the following four criteria: contain uppercase letters; lowercase letters; numbers; non-alphanumeric characters.
-
-p 1436:1433sets the port that will provide access to the container. In this case, the external port on which the container will be available is1436.
Before deploying a container to a specific port, you need to ensure that this port is free and not used by other containers. You can use docker ps -a to view all running and stopped containers.
-
1433sets the port on which the database is accessible inside the container. Thus, we forward requests from an external port to an open port inside the container. -
-u rootruns the container as therootuser, which is necessary for the database to generate files correctly. -
-d-(“detach”) runs the container in the background. -
mcr.microsoft.com/mssql/server:2019-latestspecifies the SQL Server image that exists on the Docker Hub with the corresponding version.
After executing this command, you should see a result console indicating that the container has been started successfully:

Database Console Launch
To launch the bash console of a docker container, use the following command:
docker exec -it mssql-2019 /opt/mssql-tools/bin/sqlcmd
  -S localhost
  -U "sa"
  -P "{STRONG_PASSWORD}"
This command will log you into the console of the container, and you will see the following output:

Setting up the Database and Access Mode
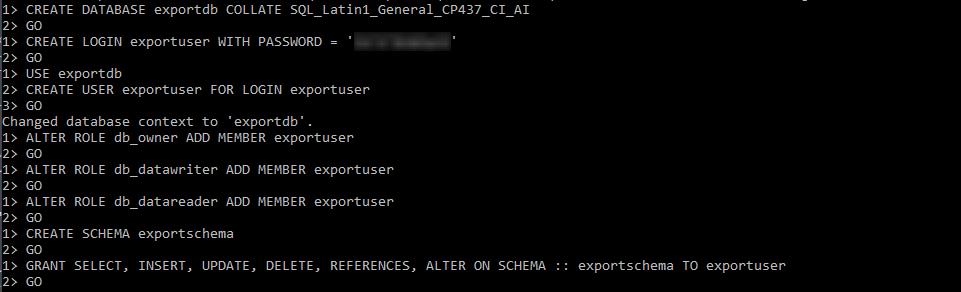
To configure the database, we need to execute a series of SQL queries.
First, let's create a database to store Jira's data:
CREATE DATABASE exportdb COLLATE SQL_Latin1_General_CP437_CI_AI
GO
Next, let's create a login that will provide access to the database for Jira:
CREATE LOGIN exportuser WITH PASSWORD = '{STRONG_USER_PASSWORD}'
GO
Note that {STRONG_USER_PASSWORD} is the password we will use to configure the Jira instance later.
Now, let's create a user for the database that will use the login we just created:
USE exportdb
CREATE USER exportuser FOR LOGIN exportuser
GO
Next, we need to add the created user to the appropriate roles that will determine their accessibility:
ALTER ROLE db_owner ADD MEMBER exportuser
GO
ALTER ROLE db_datawriter ADD MEMBER exportuser
GO
ALTER ROLE db_datareader ADD MEMBER exportuser
GO
Finally, let's create a schema that Jira will use:
CREATE SCHEMA exportschema
GO
We will then give the user permission to work with the corresponding schema:
GRANT SELECT, INSERT, UPDATE, DELETE, REFERENCES, ALTER ON SCHEMA :: exportschema TO exportuser
GO
After executing these commands, you will see the following output in the console:
To exit the console, type exit.
Now, we can check if we have configured our database correctly by attempting to connect to it.
Read our step-by-step guide on how to export Jira data to Microsoft SQL Server in our blog ⬇️
https://www.alphaservesp.com/blog/jira-sql-integration-how-to-connect-jira-to-sql-with-sql-connector-for-jira