Navigate to Iterations in the navigation menu to access the feature.
Use Iterations to create a prioritized scheduling hierarchy and plan tasks within a specific timeframe, such as a sprint or a month. Iterations lets you group tasks from multiple projects, packages, and collections within your workspace and manage the priority of those tasks from the Iterations View, which is independent of the Projects view.
|
1 |
Iterations Priority
|
Priority in the Iterations view is different than in the Projects view. In the Projects view, projects are positioned in order of priority, from highest to lowest. Within each project, tasks also follow this hierarchical order of priority. However, the position of a project in the view always determines the overall priority of any given task. For example, a task within a project that is higher in the view will always be prioritized over a task within a project that appears below it.
In the Iterations view, you can prioritize tasks across multiple projects. When you assign a task to an Iteration, the task stays within the project and does not move from its location. However, it also displays in the Iteration view, where you can manage it independently from its project priority.
|
2 |
Iterations View
|

The Iterations view contains a list of your iterations. Everyone in your workspace can view all iteration rows and summary data, expand each Iteration to view its tasks, and adjust the column selections. The following actions are available depending on your role:
-
Create, Edit, Delete, and Prioritize Iterations: Org Admins, Workspace Managers, and Project Managers at the Workspace level.
-
Associate Tasks with Iterations: Project Editors or higher can link or unlink tasks to Iterations.
-
Prioritize Tasks within an Iteration: Project Editors at the Workspace level or above can reorder tasks within an Iteration.
Tasks associated with iterations will schedule in priority order. Changing the Iteration order changes the schedule priority for all the tasks in the iteration
Filters
The Iterations View can be filtered by Project, Task, Person, Resource, Placeholder, and Group.
-
Use the Columns button to open the column selector modal.
-
All columns can be added to the view.
-
Customize column order by dragging them up or down in the selector modal.
-
The example below shows a Story Points column. It also shows an orange icon next to the name because a Story Point limit was added to it (Story Point Limit is optional).
-
An orange Iteration icon means you are over the limit.
-
-
Active Iterations is the default view. This can be changed to view All Iterations or Done Iterations.

|
3 |
Create a New Iteration
|
To create a new iteration, you must be an Org Admin, Workspace Manager, or Project Manager in the Workspace. Select +Iteration to open the edit panel.
The Iterations Edit Panel has the following tabs:
-
Planning: Includes Name, schedule status (active or done), color, description, Story Point Limit
-
Properties: Includes Work Metrics and Schedule Dates roll up from tasks
-
Scheduling: Includes Insights, Target Dates (optional)
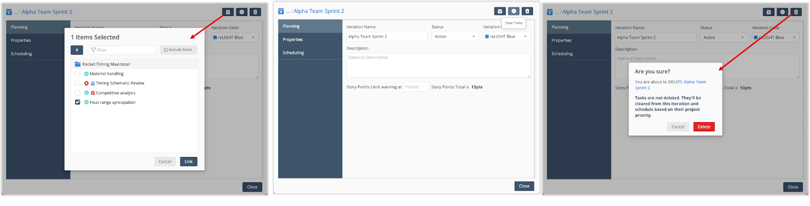
The Iteration Edit Panel also has the following buttons as shown below:
-
Add tasks to the Iteration.
-
Clear tasks from the iteration. Warning: You have to add them again if you clear by accident.
-
Delete Iteration, which clears tasks from the iteration. Tasks are not deleted.
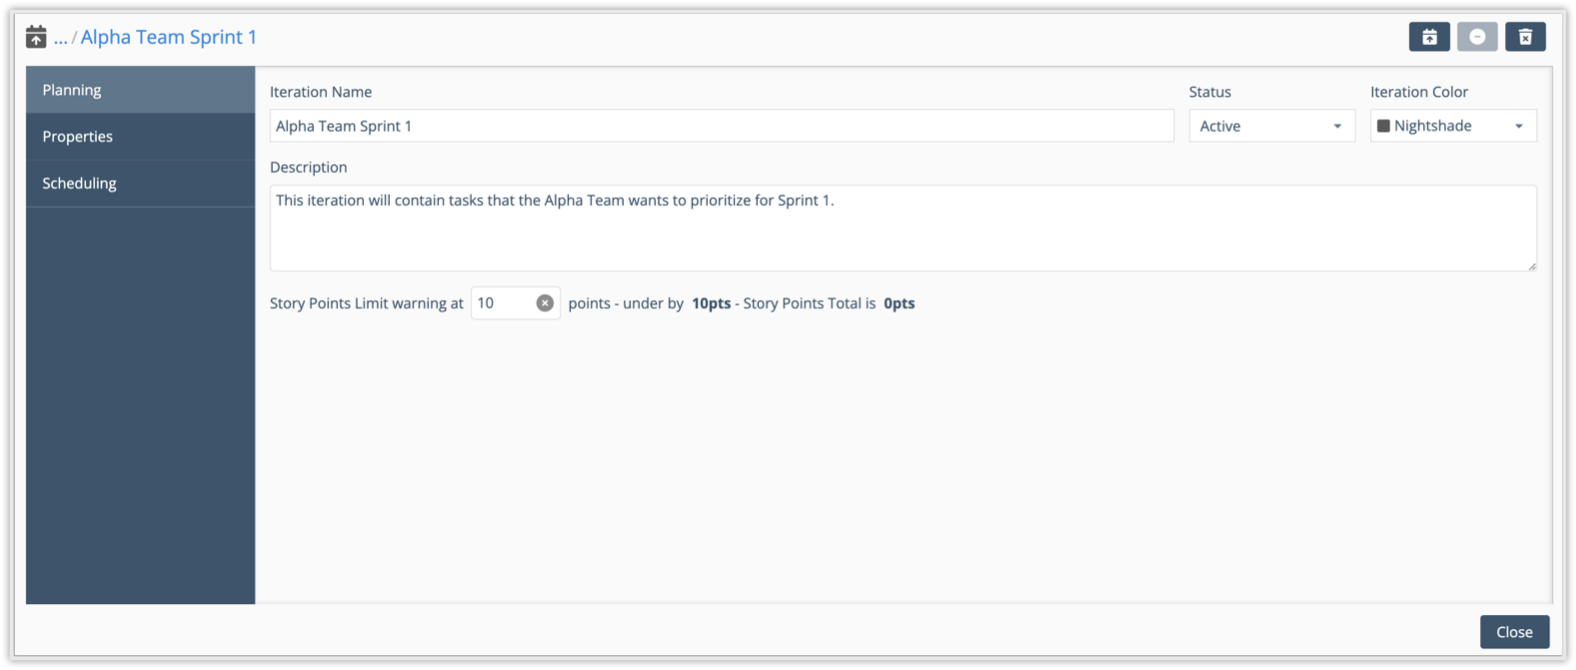
Create a new iteration starting in the Planning tab. Enter a name for your Iteration and an optional description that suits your needs. If your team uses iterations for sprint planning, for example, we recommend that you use a name that identifies the team name and your sprint. For example: Alpha Team Sprint 1. You can set a Story Point Limit warning for each iteration to help manage your workload. For example, if your team usually completes 10 story points per sprint, you can set a limit to alert you when the total is nearing that number. Edit or clear the story point limit at any time.
The example below shows a Story Point limit added to the Iteration.
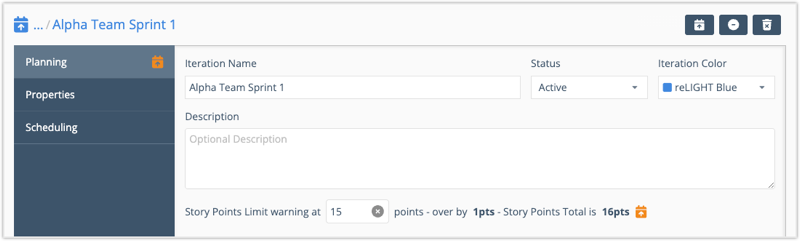
The Story Point Limit is optional. An Orange Iteration Icon in the Iterations view indicates that you are over the limit.
Select the Scheduling tab to set a Target Start and Target Finish date for your iteration (optional).
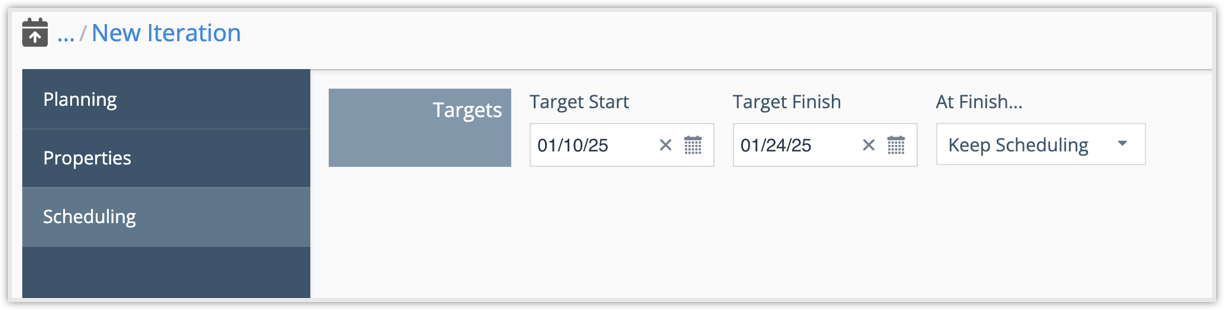
Setting a Target Finish date, for example, helps you know if any tasks are scheduled to finish later than planned. Tasks will show if they go past the target finish date. If this happens, it’s a signal that might need your attention. The target finish date on tasks is shown with an alert. Learn more about Target Dates.
If multiple target finish dates are involved (such as on an Iteration, Package, Project, or Sub-Folder), the alerting is driven by the earliest date.
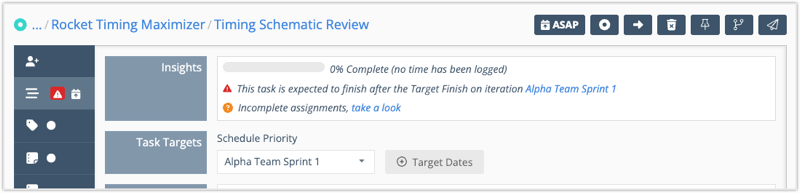
To understand what triggers an alert, view the Insights on the Task Edit Panel.
|
4 |
Add Tasks to your Iteration
|
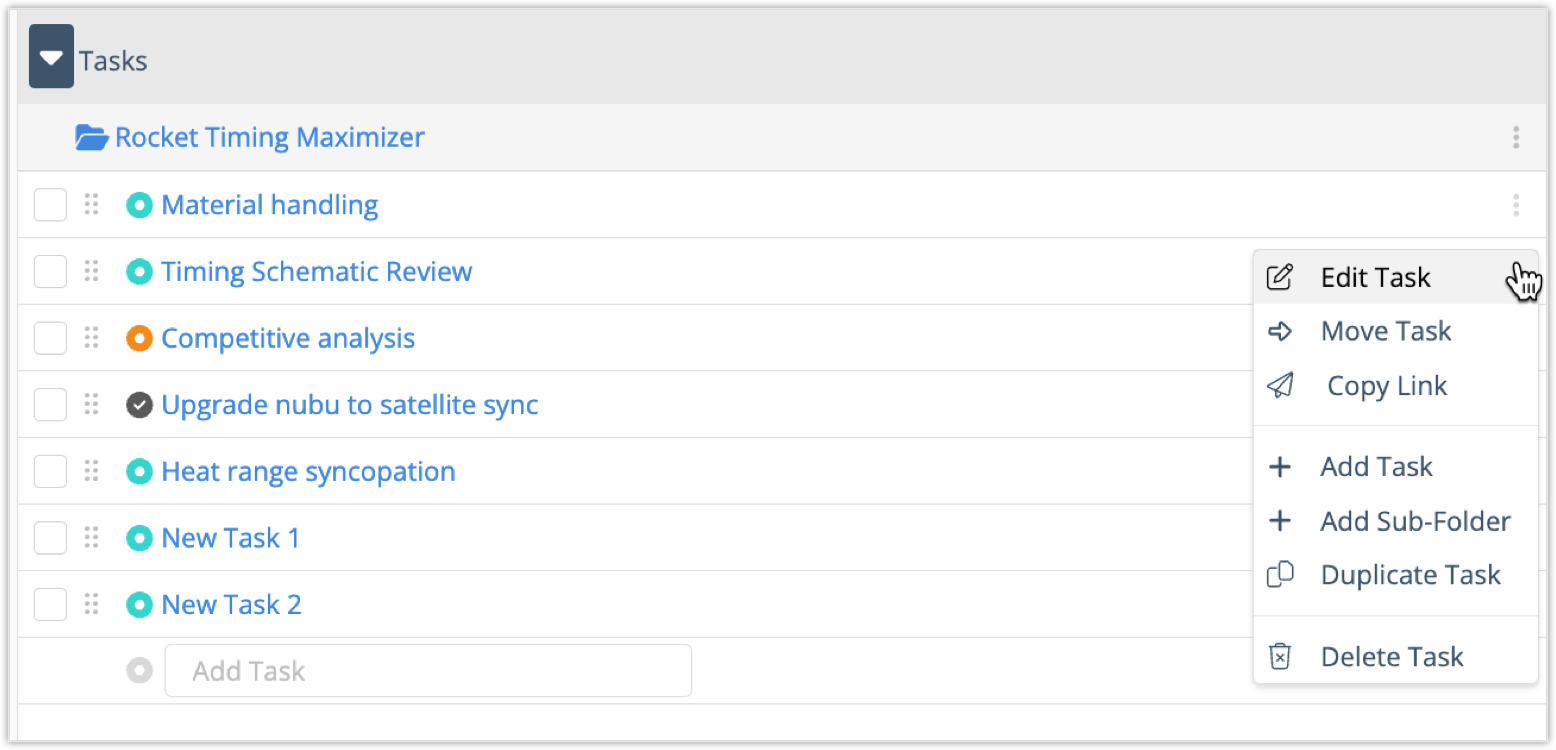
The next step is to add tasks to your iteration. From the Projects view, navigate to the project that contains the task you want to add and select Edit Task.
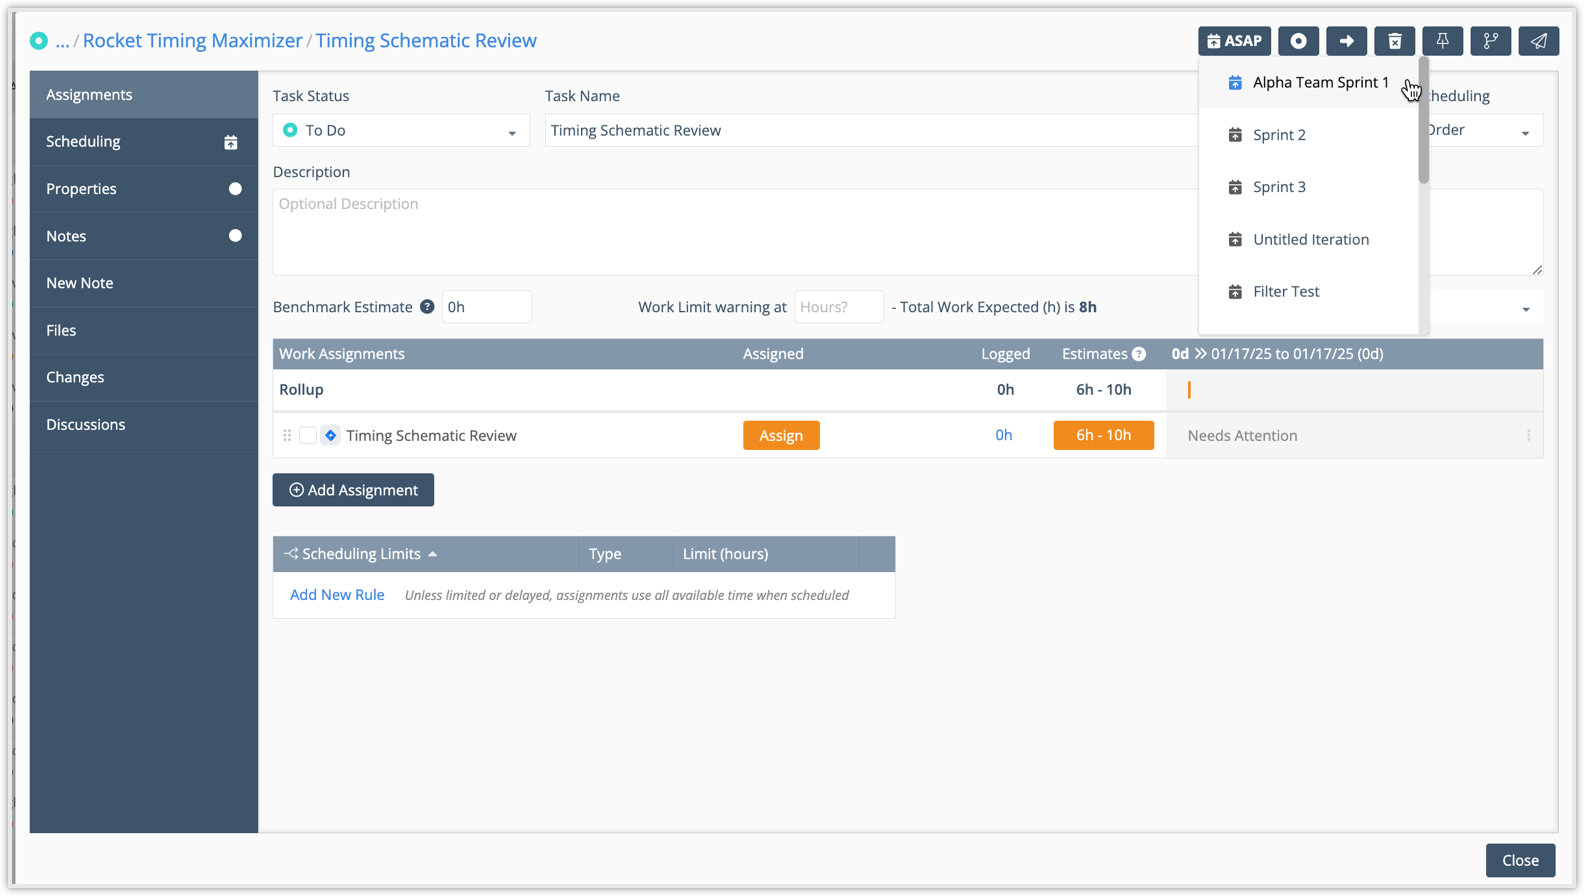
The Edit Task window displays. Use the ASAP button to add the task to your iteration. Alternatively, you can select the Scheduling tab and add your task to the iteration using the Schedule Priority drop-down menu.
You can also bulk edit tasks. From the Projects view, select multiple tasks using the checkboxes and then select the Edit button.
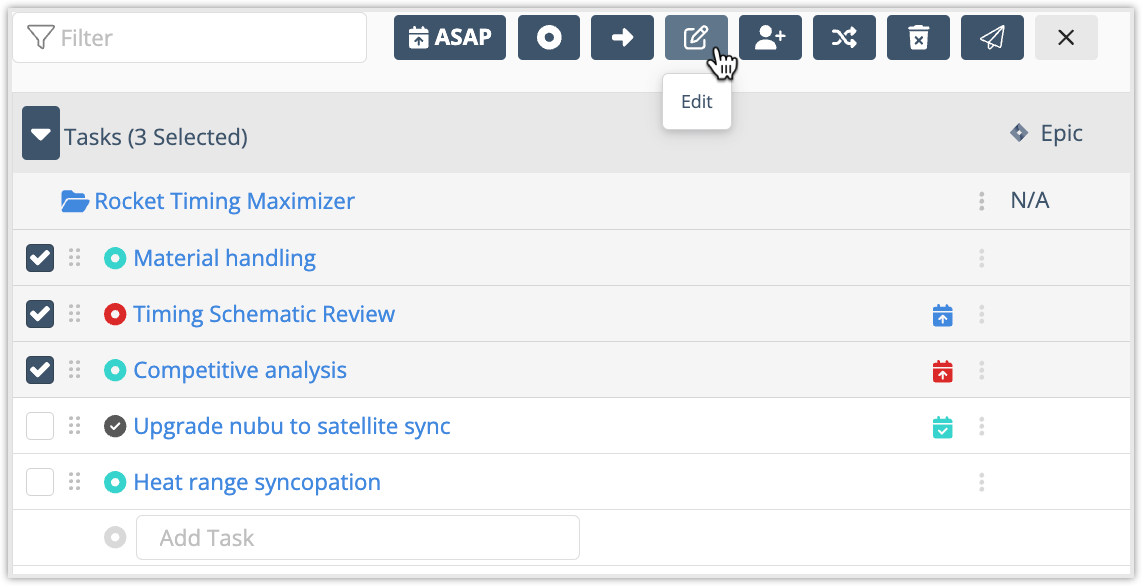
Add additional tasks to your iteration as needed. As you add tasks, you'll be alerted if the total time exceeds the target finish date. Setting a target finish date at the end of an iteration lets you easily manage tight deadlines.
In the Projects view, tasks added to iterations display a new Iteration icon. Hovering over this icon shows the name of the Iteration to which the task belongs.
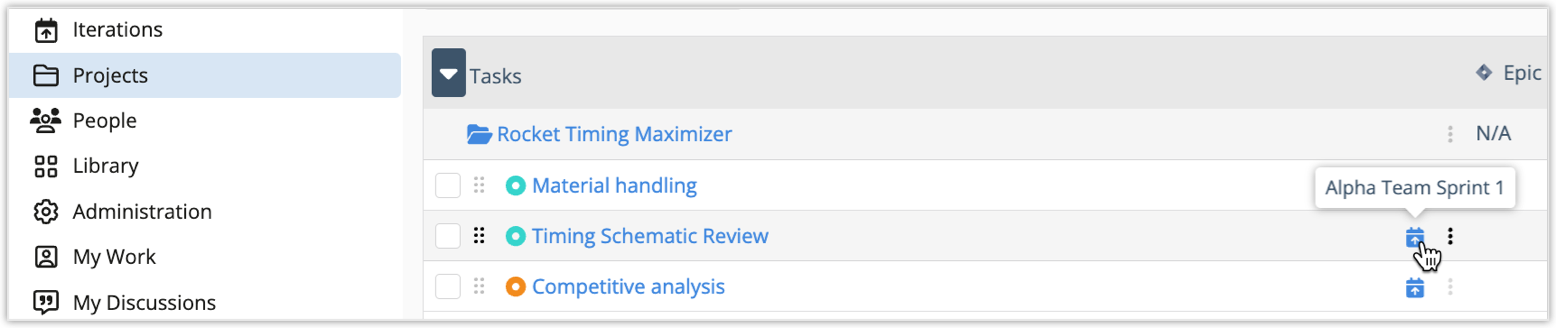
When you are finished adding tasks, return to Iterations. Your new Iteration and tasks are now listed on the Iterations view page.
|
5 |
Manage Iterations
|
Just like in the Projects view, visual indicators help you manage risk to help you spot potential delays. A red risk alert indicates that a task may be expected to finish past its Target Finish date.

If a task is running slightly past the target finish date, it may not be a major concern. If necessary, you can move tasks to another iteration.
Use the filters to manage your Iterations. You can filter by:
-
Iteration Status
-
Project Status
-
Task Status
-
Task Assignment
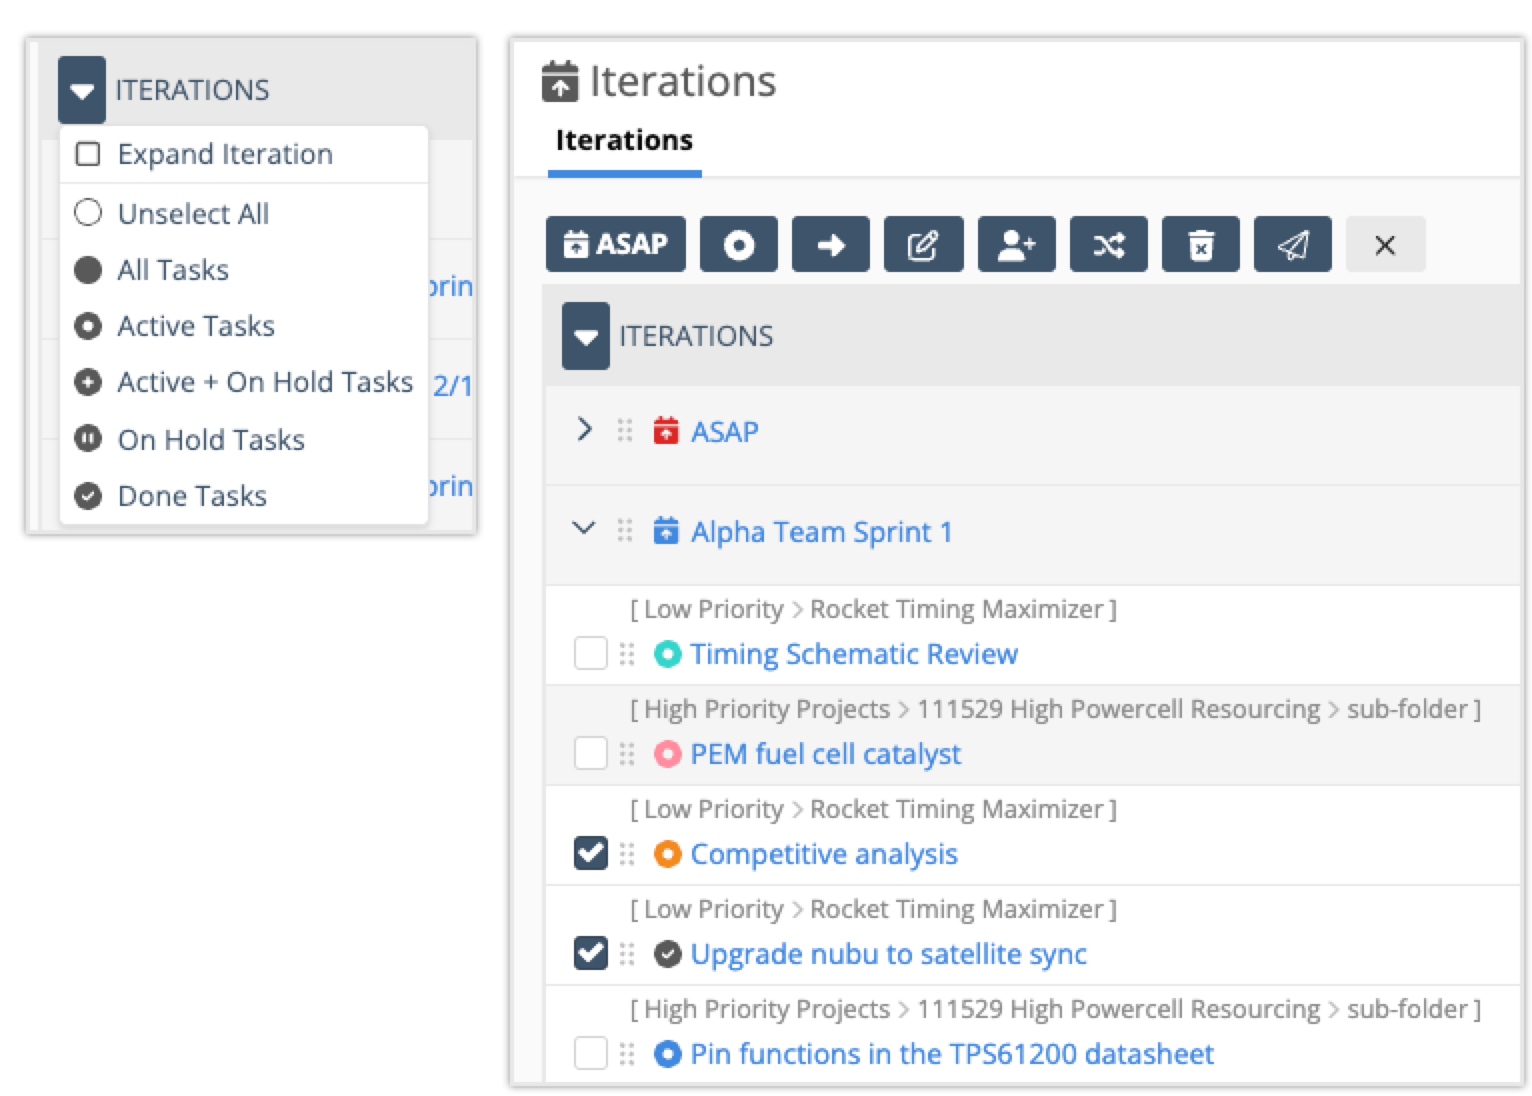
Use the arrow next to Iterations to expand all. You can also change multiple task priorities using the bulk editor. Use the checkboxes to select tasks and edit in bulk.
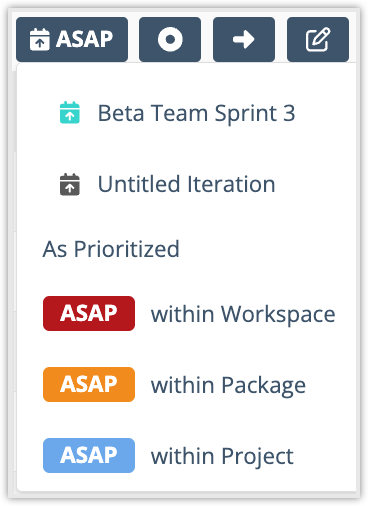
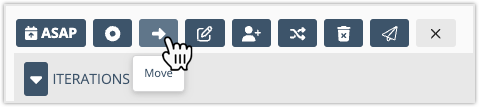
The ASAP button also allows you to manage one or more tasks. Select one or more tasks and then select ASAP. You can then choose to move tasks to a different iteration. Select As Prioritized to clear tasks from the iteration and schedule them according to the project priority. Select ASAP within Workspace to clear tasks from the iteration and use an ASAP priority override instead.
You are also able to move tasks to a different Project. Use the move button in the Iterations View.
|
6 |
Use Cases for Iterations
|
Sprint Planning
If you are planning a sprint:
-
Set a Target Finish date for the iteration (e.g., the end of the sprint).
-
Add all the tasks your team wants to complete during the sprint.
-
Assign tasks and estimate the effort, or add story points needed during your sprint planning meeting (you can assign tasks ahead of time if that works better for your team).
-
Monitor the schedule. If tasks turn red, they risk not being completed on time.
Monthly Planning
If you are planning for a month:
-
Start by adding all tasks you aim to complete for the month.
-
Assign and estimate the tasks.
-
Set the iteration's Target Finish date to the last business day of the month. If you want to timebox, you can use both Target Start and Target Finish.
-
Plan ahead by adding tasks from multiple projects for the current or upcoming months.
-
Monitor your team's availability to avoid overpromising to stakeholders. Alerts will let you know if you’ve exceeded your capacity for the month.
|
7 |
Iterations and Jira Integration
|
The Iterations functionality has also been added to the Portfolio Manager Jira Integration. When tasks from Jira are pulled into Portfolio Manager and those tasks are associated with sprints in Jira, you can enable a setting that automatically creates Iterations in Portfolio Manager. This new feature, as part of our integration with Jira, allows Project Managers to view and prioritize sprint tasks directly in Portfolio Manager without having to switch back and forth to Jira, and it maximizes visibility between the two platforms.
Note that Portfolio Manager will not create or close sprints for you in Jira. Tasks cannot be added to closed sprints in Jira, even if they appear active in Portfolio Manager due to a pending sync. You still have to manage those sprints in Jira itself. The key benefits of this feature are:
-
Sync Jira sprints and tasks into Portfolio Manager for centralized management.
-
Reprioritize tasks in Portfolio Manager’s Iteration View and sync updates back to Jira.
-
Maintain control of sprint planning and execution while staying connected to Jira’s sprint structure.
-
Ensure consistent data across both platforms to get the most out of agile planning.
The Iterations functionality in the Jira Integration is represented by the Sync Jira Sprints setting in the Sync Settings section.

Sync Jira Sprints
This setting is enabled by default on new integrations, and users can enable it manually on existing integrations. When syncing Jira tasks with sprint associations, select Sync Jira Sprints to create a new iteration in Portfolio Manager.
When tasks from Jira are pulled into Portfolio Manager and those tasks are associated with sprints in Jira, this setting lets you automatically create Iterations in Portfolio Manager. Note that Portfolio Manager will not create or close sprints for you in Jira. Tasks cannot be added to closed sprints in Jira, even if they appear active in Portfolio Manager due to a pending sync.
Sync Workflow
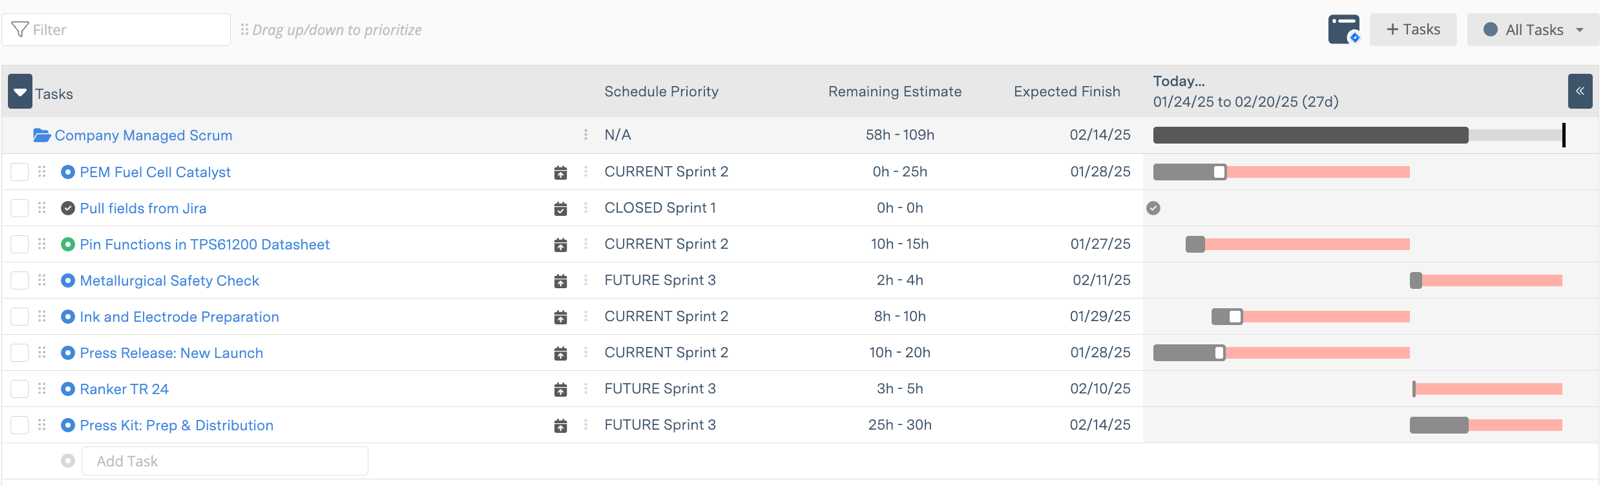
The example below shows sprint data from Jira displayed in Portfolio Manager after a sync. The sprints populate in both the Projects view and Iterations View.
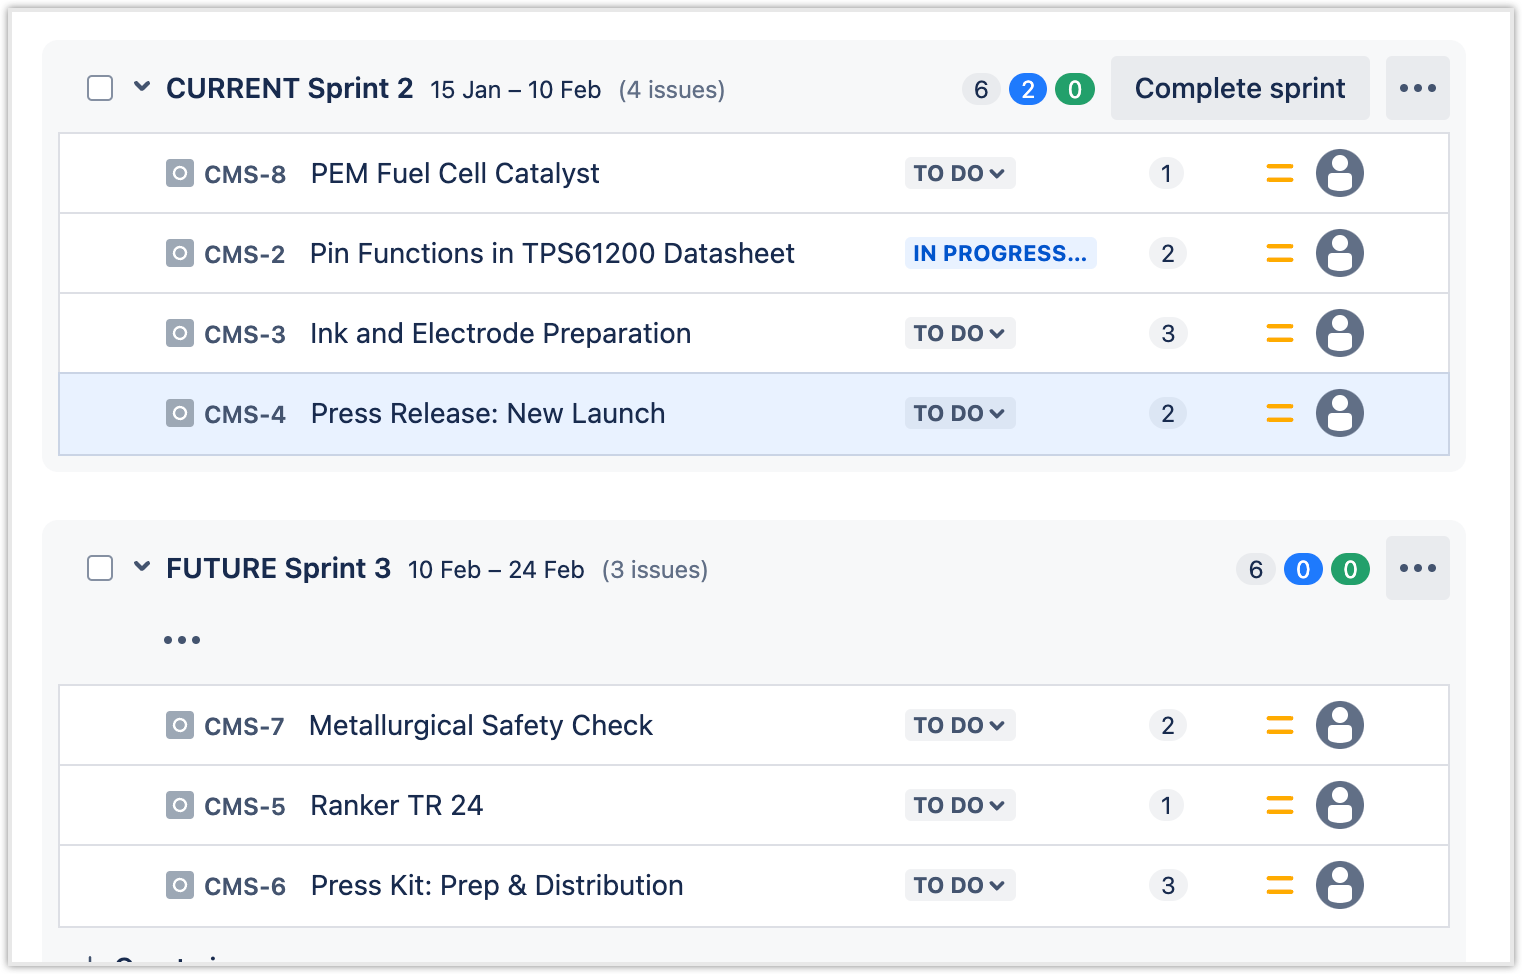
The sprints populate in both the Projects view and Iterations View.
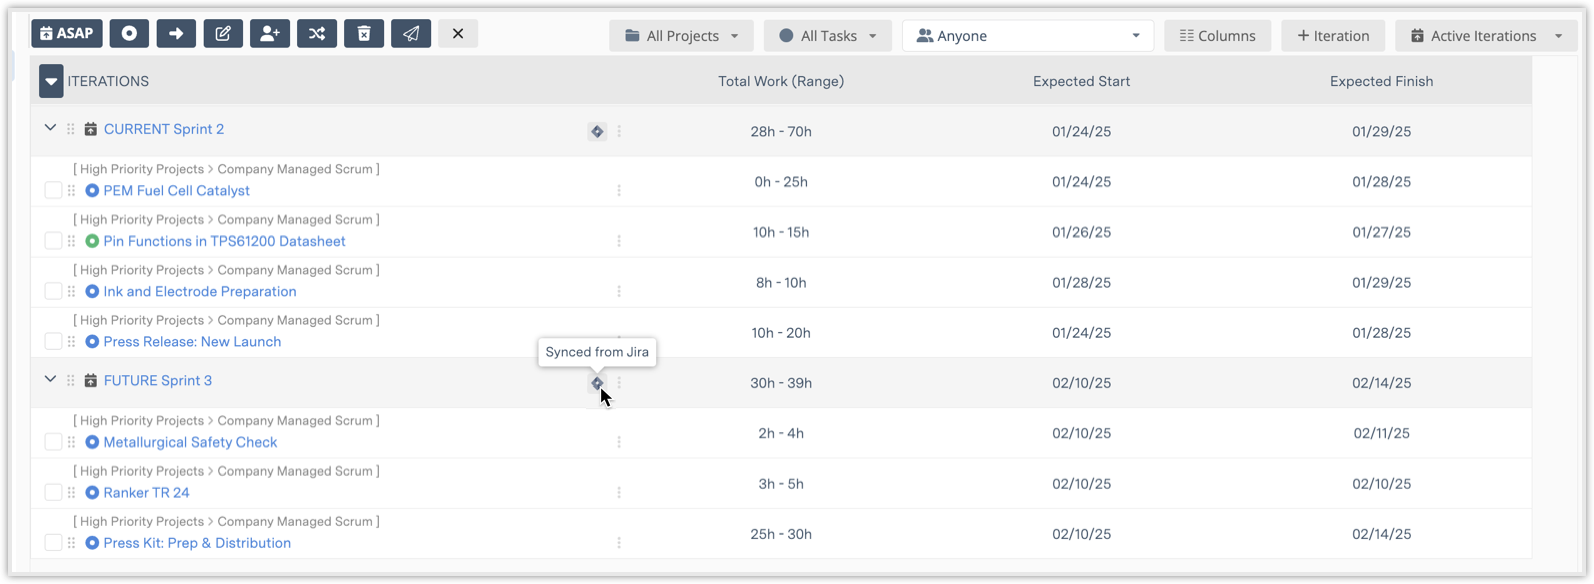
From the Iterations View, you can view all synced sprints (active, future, or closed) from Jira. From here, you can review sprint goals, start/finish dates, and associated tasks.
Reprioritize and move tasks in Portfolio Manager
From the Iterations View, you can also reprioritize tasks in Portfolio Manager and sync them to have the new priorities reflected in Jira. Drag the tasks higher or lower on the list to reorder based on priority. You can also move tasks between sprints in the Iteration View. Drag the tasks between sprints as needed.
You can then run a sync by going to the Project View to push the updated order back into Jira. If you do not run a sync, Jira will not reflect the updates made in Portfolio Manager.
Considerations
-
Sync regularly to ensure data consistency between Portfolio Manager and Jira.
-
Changes in priority and task order in Portfolio Manager’s Iterations View will also impact Jira’s project view after a sync since they will overwrite Jira’s Lexorank.
-
Manual and one-way syncs give users full control, allowing you to finalize changes before pushing them to Jira.
-
Tasks added to a closed sprint in Jira will generate an error during syncing.