-
Moving staff members between locations and workload and holiday schemes requires the Tempo Administrator or Tempo Team Administrator permission.
-
Moving staff between workload and holiday schemes is only available in Tempo Timesheets 10.7.0 and later.
-
Moving staff between locations is only available in Tempo Timesheets 10.12.0 and later.
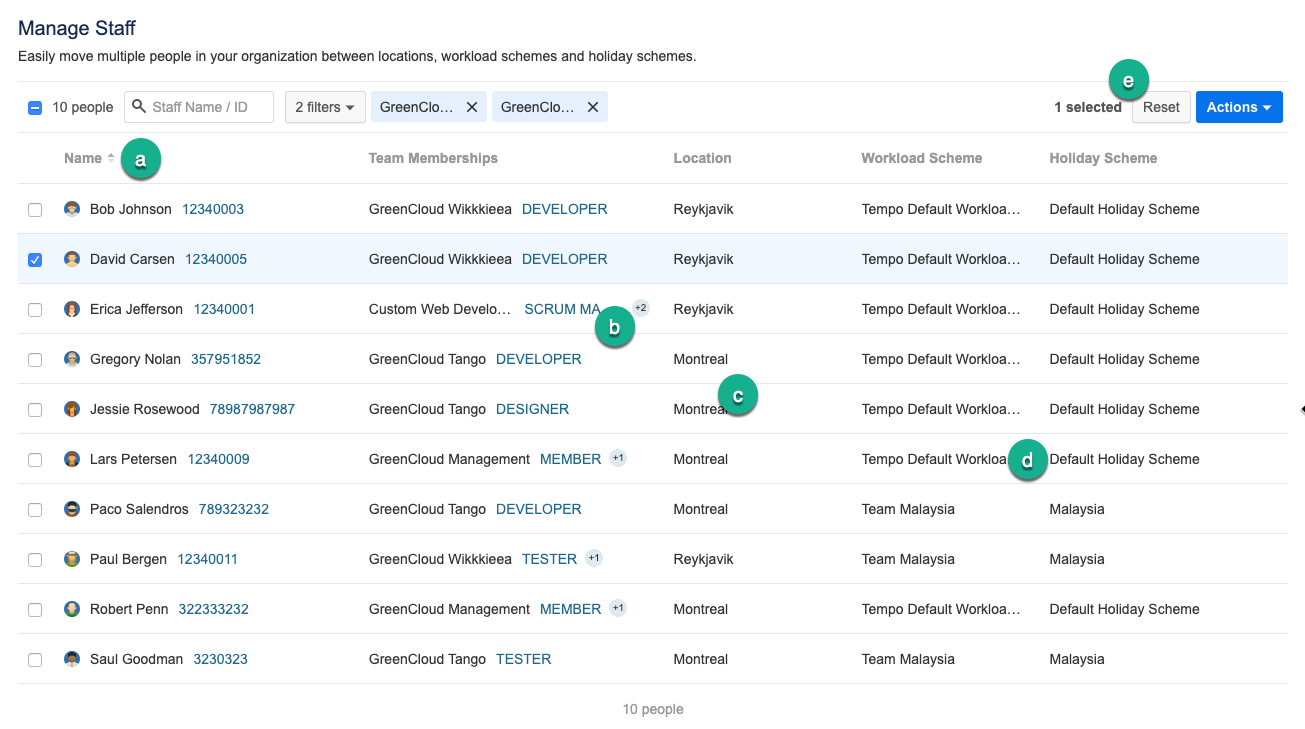
The Manage Staff page gives an overview of how staff is assigned to locations, workload, and holiday schemes. Here you can move staff from their current location, holiday- or workload scheme to another already existing location or scheme, one-by-one or in bulk. Search for staff members by name or staff ID (if enabled) or apply filters to view staff by location, workload, holiday schemes, teams, role, or Jira groups.
To access Manage Staff:
-
Select Settings in the Tempo sidebar. You can also go to Tempo on the menu bar, and select Settings.
-
Under Staff in the sidebar, select Manage Staff.
-
By default, staff members are listed alphabetically in ascending order. You can click the arrows next to Name to reverse the order. If your organization is using the Staff id property, the ID is shown next to people's name.
-
The Team Memberships column shows the member's current team and role. Click a cell to also see previous and future team memberships for the selected member.
-
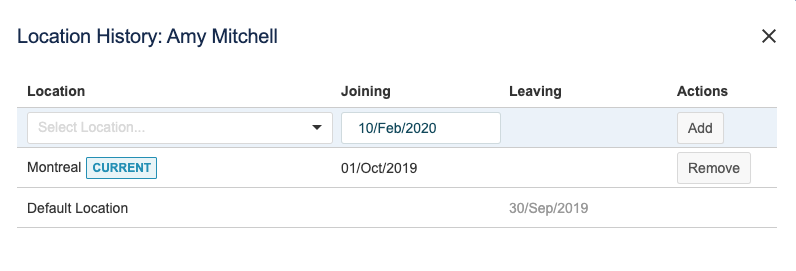
Click a location to view a staff member's location history. In the Location History dialog box, you can also move the selected member to a new location.
-
You can quickly change the workload or holiday scheme for a single employee. Click the Workload Scheme or Holiday Scheme column for the user you need to move, select the new workload or holiday scheme, and then click Move to confirm.
-
Filtering the Staff List
Use the search box to search for staff members by their name. If the Staff id property option is enabled, you can also search the list by staff ID. When you have a long staff list, applying filters will also help you find the staff you are looking for.
To apply filters:
-
Click the filter button next to the search box.
-
In the drop-down list, select what you want to filter by, for example Teams.
-
Search for and select the filters you want to apply. You can see applied filters at the top of the view next to the filter button.
-
Click Back to return to the filter options. You can select another filter criteria.
-
To remove a filter, clear the check-box for that filter on the filter drop-down list. You can also remove a filter by clicking the x to the right of its name at the top of the view.
-
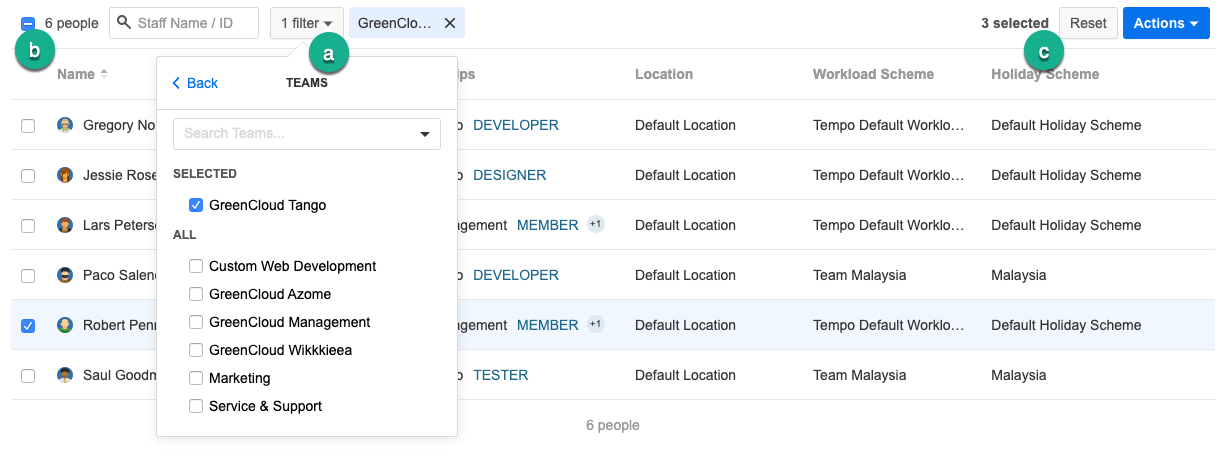
In this example the list has been filtered by one team. Clicking Back, takes you back to the filter options.
-
Currently 6 staff members are displayed and the blue check-box indicates that one or more of these is selected. Clicking the check-box selects all staff members in this filter.
-
In total, 3 staff members are selected. Your selection in one filter is preserved when you apply another filter and it will be preserved until you either clear the selections or perform an action. Click Reset to clear all selections. Selecting members activates the available Actions.
-
Moving Staff Members to Locations, Workload, and Holiday Schemes
You can quickly change the workload or holiday scheme for a single employee. Make sure that no other person is selected, click the Workload Scheme or Holiday Scheme column for the person you need to move, select the new workload or holiday scheme, and then click Move to confirm.
To move a single employee to a new location, click the Location column for that person to see the employee's Location History. Search for the new location and add it to the history, making it the employee's current location.
You can also move multiple people from their current location, workload or holiday scheme, to another.
To move multiple employees:
-
Select the people you need to move (see how to filter the list above), click Actions at the upper right and select what you want to do.
-
Select a new scheme or location, then click Move.
When moving staff between locations, you can enter a date for the change to take effect. -
Select the Keep selection check-box if you need to continue working with the same set of users. Click Close.
Viewing Team Memberships
The Team Membership column of the Mange Staff list lets you view team membership and roles of your staff members. The column shows a member's current team but you can click the column to view their other teams and roles, current, past, and future.
-
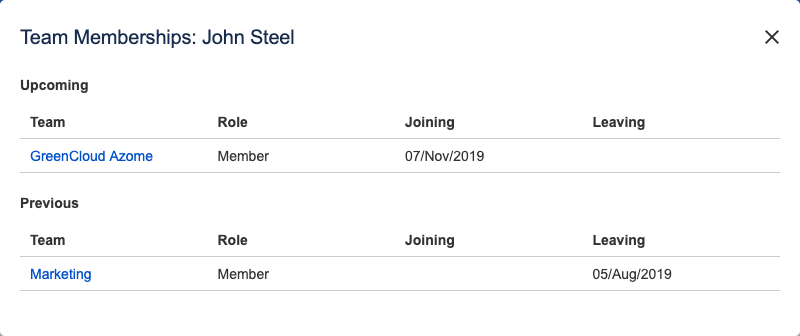
In this example John Steel is currently not a member of any team. Clicking the Team Membership column for him shows that until the 5th of August 2019 John was working with the Marketing team and he will be joining the GreenCloud Azome team on the 7th of November 2019.
Viewing Location History
Clicking the location for a staff member shows the location history for that member. You can see joining and leaving dates for each location. Here you can assign the staff member to a new location and also remove a location from the history. When you remove a current location, the staff member will be moved to their previous location.
Related Topics