In this tutorial, you will learn how to use Tempo Accounts to track hours spent on capital expenditures (Capex), as well as operating expenses (Opex), for a software project. There are many reasons to track work considered as Capex, and applying for research and development (R&D) tax credits from the government for that work is a typical one.
The government's Capex rules require that time-tracking software is used to accurately record the number of hours worked - this is where Tempo Timesheets and accounts come to your rescue!
To go one step further, you can track the costs of Capex and Opex hours in Tempo Financial Manager - watch this video to see how it's done: How to Track Capex and Opex in Financial Manager
Want to see this tutorial in action? Watch the videos in this playlist: Tutorial: Tracking Capex/Opex Work with Tempo Accounts
The scenario
Catherine Evans is a project manager at Lunar Industries, and her teams are creating a new mobile app called the H3 Mine app, for testing helium-3 levels for mining operations on the moon! Lunar Industries will use this app themselves, but also plan to sell it to other mining companies and make lots of money - and that’s why the time spent developing it is considered a capital expenditure (Capex).
Catherine wants to track the hours that her teams are working on both app development (Capex) and app maintenance (Opex). Then she can create reports of the Capex hours, as well as Capex/Opex hours, to send to the Accounting department. They will use the Capex report to apply for R&D tax credits from the government, and the Capex/Opex report for gaining insights into profits & losses on this app.
The setup
Related video: How to Get Set Up before Using Tempo Accounts
Related topics: Adding the Account Field to Jira Work Item Screens, Global Permissions, and Creating and Deleting Teams
-
The Tempo Account custom field needs to be added to the Jira Work Item screen to be able to log time to Tempo accounts. You need Jira Administrator Permissions add this field.
-
Catherine needs the Tempo Account Administrator permission to create Tempo accounts, account categories, and customers. Her Jira Administrator Permissions can grant her this Global permission.
-
Several Jira spaces are used to track the development and maintenance work for the H3 Mine app: H3 Mine App, Lunar Design, Lunar QA, and Lunar Docs
-
Several Tempo teams have been created to do the development, design, testing, and learning content for the H3 Mine app. Each team has a Jira space associated with their work.
Step 1: Create categories for the Tempo accounts
Related video: How to Create Tempo Accounts for Tracking Capex and Opex
Related topics: Creating Tempo Account Categories
Before creating the Tempo accounts themselves, Catherine creates two new categories for the Capex and Opex accounts to which the teams will be logging their time. Categories let you organize and group multiple accounts together in a way that makes sense for your company, such as for Administration, Research, and Internal Training.
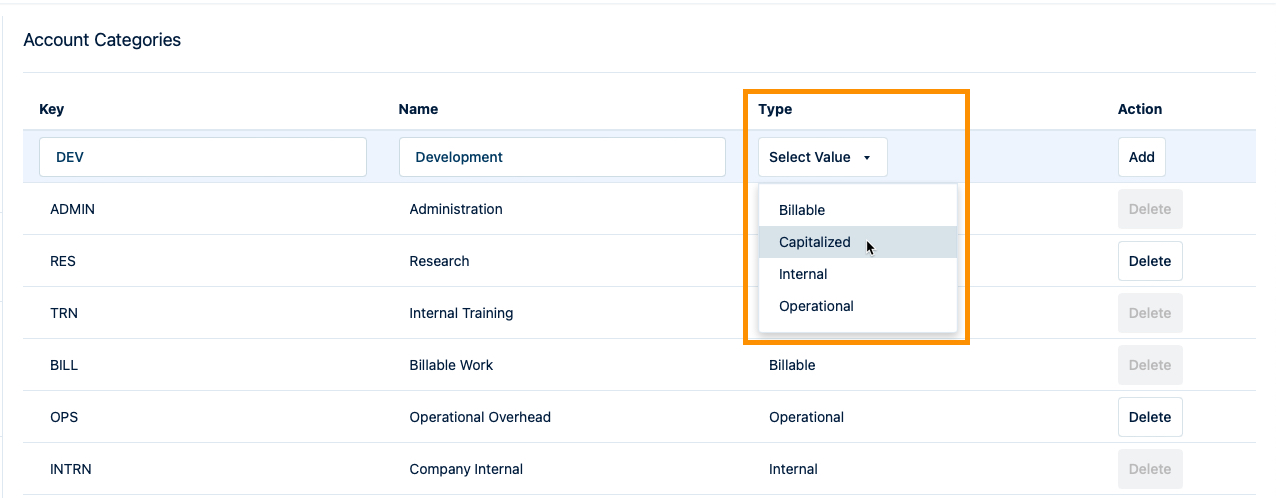
Account categories also let you identify accounts to be of a certain Type , and that's really important for filtering when you’re running reports later on. Four Types of categories are available: Billable, Capitalized, Internal, and Operational.
-
Select Settings in the Tempo sidebar.
-
Under Accounts, select Account Categories.
-
For the Capex account category, enter Development as the Name; DEV as the Key (a unique identifier for this category); and set the Type to Capitalized. Click Add beside the new category to create it.
-
For the Opex account category, enter Maintenance as the Name; MNTN as the Key; and set the Type to Operational. Then click Add.
Catherine now has account categories for both Capex and Opex in which she can organize the relevant accounts that she will create in Step 2 below.
Step 2: Create Capex and Opex Tempo accounts
Related video: How to Create Tempo Accounts for Tracking Capex and Opex
Related topics: Creating Tempo Accounts
Now Catherine is ready to create two new accounts for tracking work as either Capex and Opex. These are the accounts to which the teams will log their time.
-
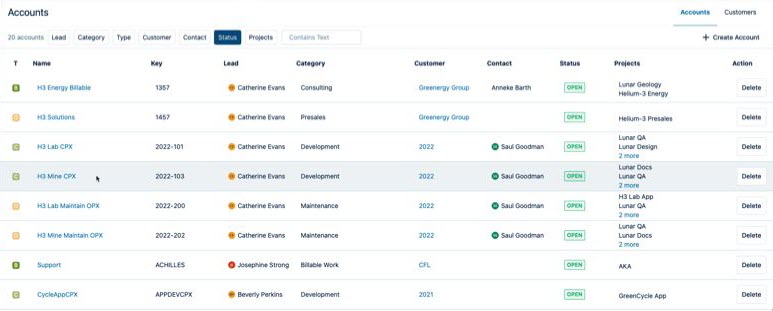
Select Accounts in the Tempo sidebar.
-
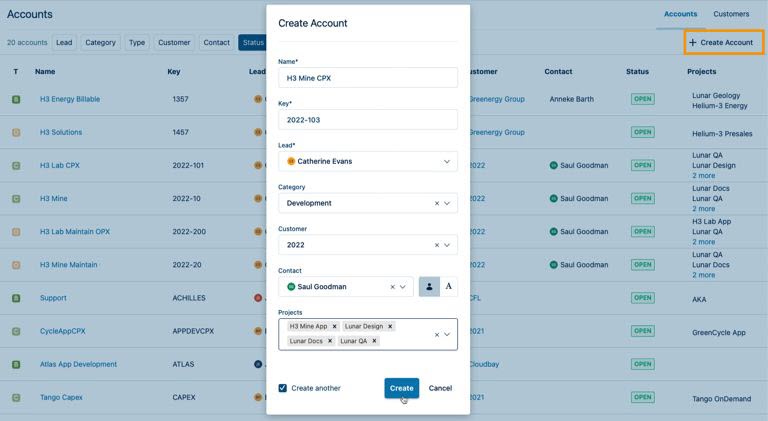
On the Accounts page, click the + Create Account button in the top right, and the Create Account form appears.
-
For the Capex account:
- Enter H3 Mine CPX as the Name
- Edit the automatically generated Key to be 2022-103. The account Key must be unique, and you can’t change it after you create the account, so make sure it’s what you want now! In this example, the account's Key matches the related data in the company's accounting system.
- Add yourself as the Account Lead
- Select Development as the Category, which is a Capitalized type.
- Select 2022 as the Customer. This field is optional and is often used to identify an external customer, or an internal customer, such as another department for whom you’re doing the work. But you can also use this field for any kind of data you like for organizing your accounts and filtering in reports later on, such as the year to identify Capex accounts for annual tax credits, as is done in this example.
- Select a Contact for this account. In this case, it's someone from the Lunar Industries Accounting team.
- Link the account to all the Jira Spaces that are associated with this account: H3 Lab App, Lunar Design, Lunar Docs, and Lunar QA. There are other ways to link accounts afterward - see Step 3 below.
-
Check Create another, then click Create. The Capex account is created and the Create Account form stays open.
-
For the Opex account:
- Enter H3 Mine Maintain OPX as the Name
- Edit the Key to be 2022-202. In this example, the account's Key matches the related data in the company's accounting system.
- Add yourself as the Account Lead
- Select Maintenance as the Category, which is an Operational type.
- Select 2022 as the Customer, the same as for the Capex account.
- Select the same Contact person as for the Capex account.
- Link the account to all the same Jira Spaces as for the Capex account.
-
Click Create and the Opex account is created.
Now Catherine has one account created for Capex work and one for Opex work.
Step 3: Link each Tempo account to its related Jira spaces
Related video: How to Log Time to Capex Tempo Accounts
Related topics: Linking Tempo Accounts to Jira Spaces and Setting the Default Tempo Account for a Jira Space
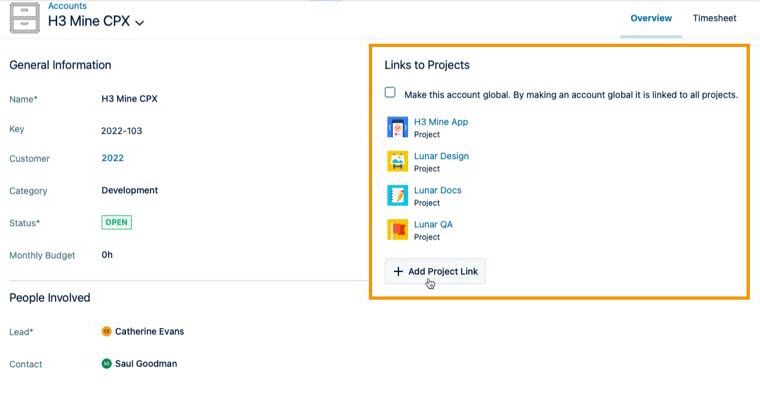
Linking Tempo accounts to related Jira spaces makes it possible for time to be logged to these accounts in the Jira work items (see Step 4 below). Catherine linked the Capex and Opex accounts to their related Jira spaces when she created the account, but there are other ways to do this afterwards.
-
On the main Accounts page, click the account name to which you want to link Jira spaces. Then on the account's information page, click + Add Space Link on the right and select a Jira space from the dropdown.
OR
-
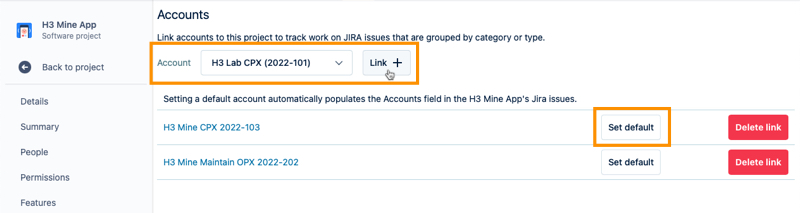
From a Jira space, go to the Space Settings and click Apps > Accounts. Then select an Account from the list at the top and click Link +.
Click the Set default button beside the account that you want to be used for all work items created in this Jira space from this point on. Setting the default account isn't mandatory, but it makes logging time to the correct account easier and less prone to error when multiple accounts are linked to a Jira space.
Step 4: Link Capex or Opex accounts to the Jira work items and log time
Related video: How to Log Time to Capex Tempo Accounts
Related topics: Logging Time to Tempo Accounts
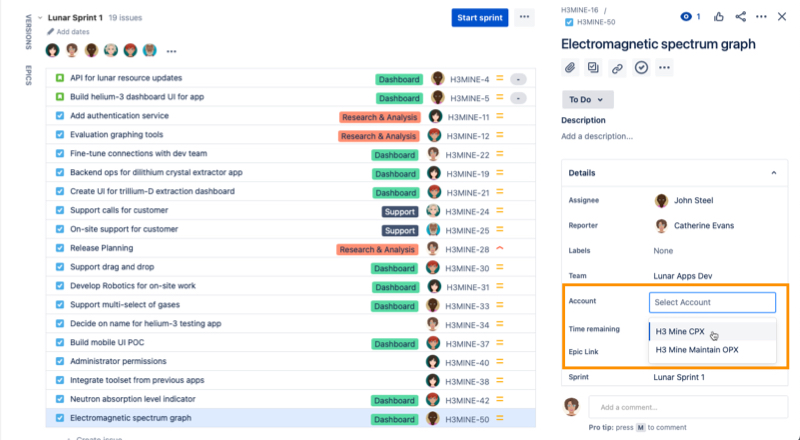
Now Catherine needs to link either the Capex or Opex account to the appropriate Jira work items in the Jira space. Then her teams can log their time to the correct account selected in the Account dropdown in each work item. This Account dropdown appears because the Jira administrator added it as a custom field to the Jira work item screens - see Adding the Account Field to Jira Work Item Screens.
-
Open the Jira space called H3 Mine CPX, which is for development work related to the H3 Mine app.
-
Open a work item in this space.
-
From the Account dropdown in the work item, select the H3 Mine CPX account. Only accounts that have been linked to this Jira space appear in this dropdown.
-
Log actual research or development time to this work item and the hours will be automatically assigned to this Capex account.
-
For bug fixing and other maintenance work, select the linked H3 Mine Maintain OPX account from the Account dropdown in the relevant work item, and then log time to it. All hours will then be automatically assigned to that Opex account.
-
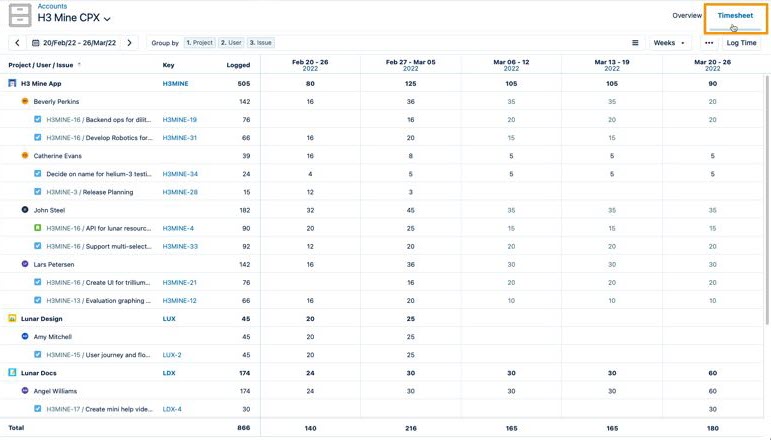
As time goes on, Catherine can check how much time is logged to each account in its Timesheet - see Viewing Time Logged to Tempo Accounts for information.
Step 5: Create a report on Capex hours for tax credits
Related video: How to Create a Report on Capex Accounts for Getting Tax Credits
Related topics: Creating Reports, Selecting a Reporting Period, Saving and Editing Reports, and Exporting Reports
All the work for development and maintenance on the H3 Mine app has been logged, and now Catherine can generate a couple of reports that she will export and send to her Accounting department:
-
One for both the Capex and Opex work done for the H3 Mine app for general financial data related to profits+losses.
-
One for only the Capex work done for development work on all the apps that Lunar Industries has created this year. This report will be the base for applying for R&D tax credits from the government.
-
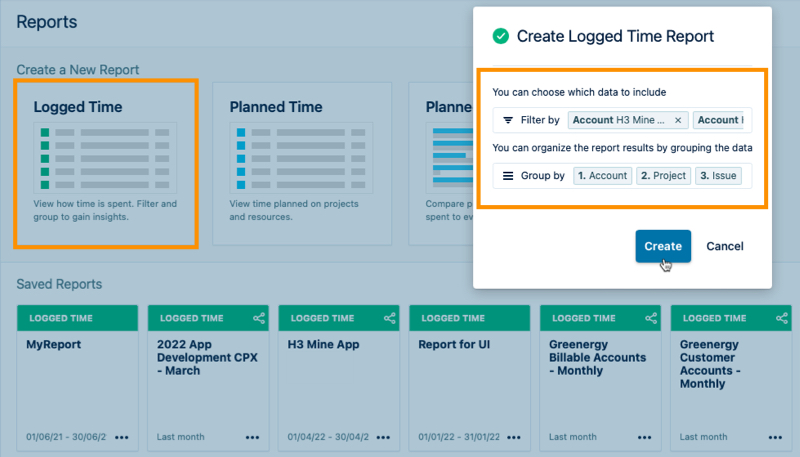
Select Reports :reports_dc: in the Tempo sidebar and click the Logged Time tile.
-
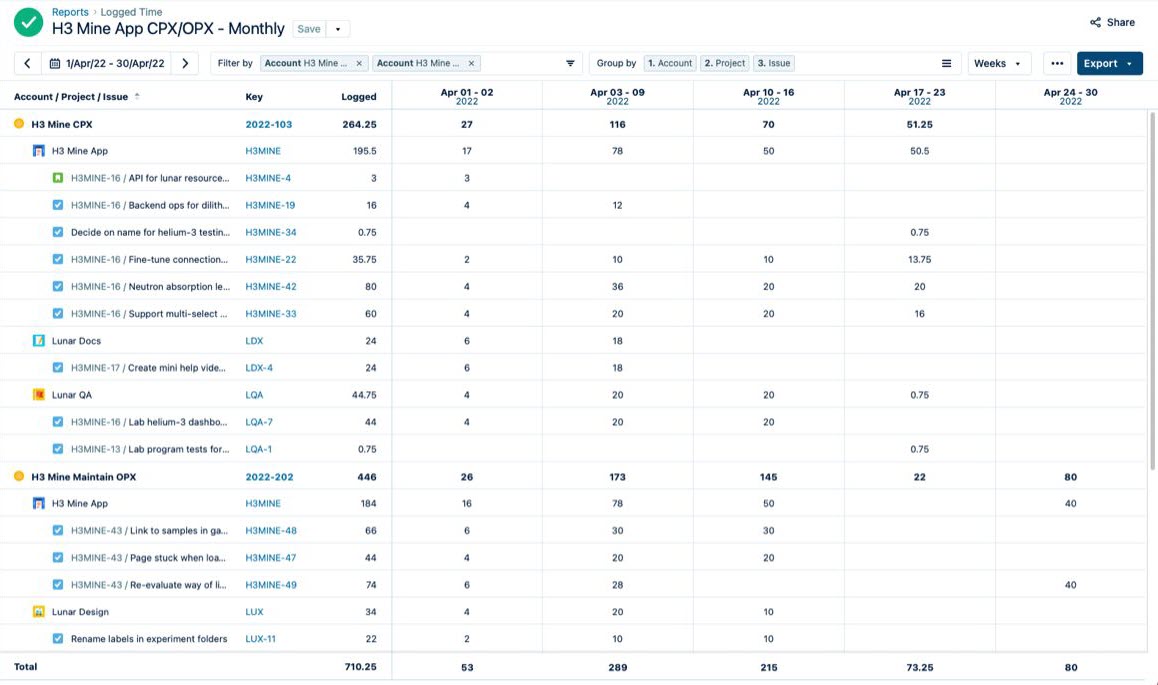
For the first report: In the Create Logged Time Report wizard, select Account in the Filter by field and check the H3 Mine CPX and H3 Mine Maintain OPX accounts in this list.
-
In the Group by field, select Account, Space, and Work Item. This way, the time logged to each Jira v is grouped separately into the two accounts: Capex and Opex with each space listed beneath it.
-
Click Create and the Capex/Opex account report is done.
-
In the date picker in the top left, select Last and then Month to create a report where the data shown is always for the last month relative to the current date (a dynamic-period report). Click Apply.
-
Click Save at the top and give the report a name, such as H3 Mine App CPX/OPX - Monthly, and click Save Report.
-
Click Export in the top right and select XLS Report Data, which saves the report in the Excel format.
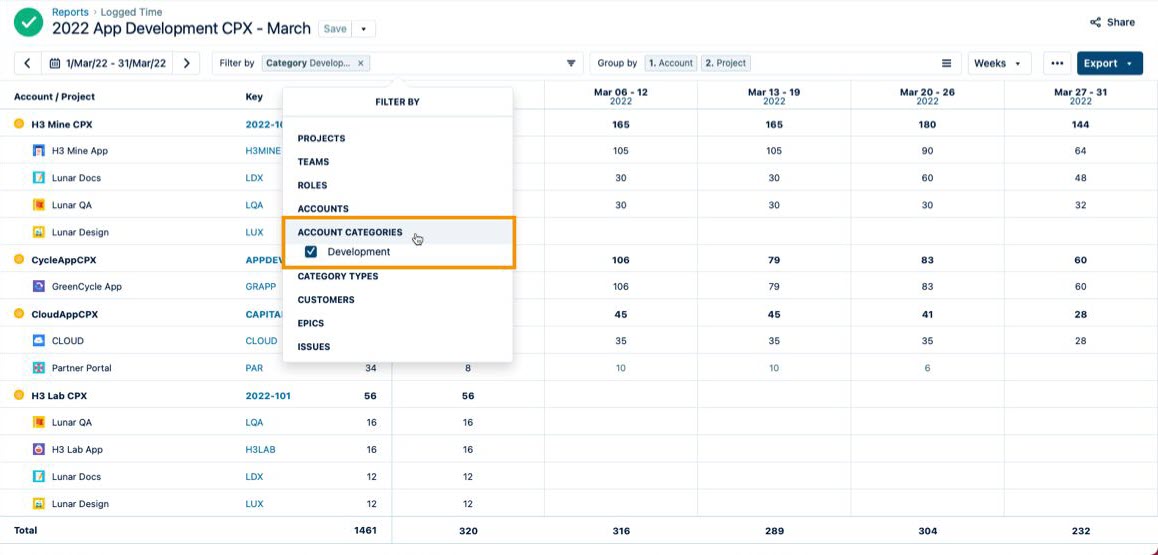
For the second Capex-only report, simply modify this first report:
-
Remove Work Item from the Group by field so that you see only Account and Space, and then click Apply.
-
Clear the Filter by field and then select ACCOUNT CATEGORIES and check Development, which is of the Capitalized Type so only Capex accounts will be displayed.
-
Open the Save menu and choose Save as and give the report a name, such as 2022 App Development CPX - March.
-
Click Export in the top right and select XLS Report Data, which saves the report in the Excel format.
Catherine will run this Capex report each month, then export it and send it to the Accounting department. These reports are run monthly instead of quarterly or yearly because of performance issues when there is a lot of data to process.
The application for the R+D tax credits will include all the monthly reports for the whole year, and that will be sent out at the end of the year by the Accounting team. And then Lunar Industries will get some juicy tax credits from the government for all their hard work on the apps!
Catherine can also share a saved report with others in her company - see Sharing Reports for information.