-
Editing your own worklogs requires the Edit Own Worklogs permission for the project to which the work item belongs.
-
Editing worklogs for other team members requires the Edit All Worklogs permission for the project to which the work item belongs.
-
Users with the Manage Worklogs permission can make changes to team member's worklogs in their timesheet even after the Scheduler has closed the timesheet period.
You can your own edit worklogs in the Timesheet as long the timesheets are within an open timesheet period. However, if you have the Manage Worklogs permission for your team, such as if you're a team lead, you can edit team members' worklogs even after the period is closed, or approved.
Clicking on cells for a work item in the timesheet provides you with a way to edit the number of hours logged quickly and easily.
If you need to do more advanced editing, you can use the ellipsis (....) button to pull up additional editing options, including moving logged hours to another work item, splitting the hours between two work items, and deleting worklogs.
To edit worklogs:
-
Open the Timesheet from My Work, Teams, or Accounts.
-
If you're editing a team member's worklogs, switch to their timesheet using the Name list in the top left.
-
If you want to edit a closed timesheet, notify your team lead, manager, or Tempo administrator. Depending on how Tempo is set up, the person who approves your timesheet or a Tempo administrator must do one or more of the following:
-
If you do not receive email reminders, your timesheet must be rejected.
-
If you do receive email reminders, you must be granted a grace period for the closed period.
-
If your organization manually closes time periods, the period must be re-opened in Period Management.
-
Editing Worklogs in the Days View
You can follow the same steps in the Weeks, Months, and Quarters views.
-
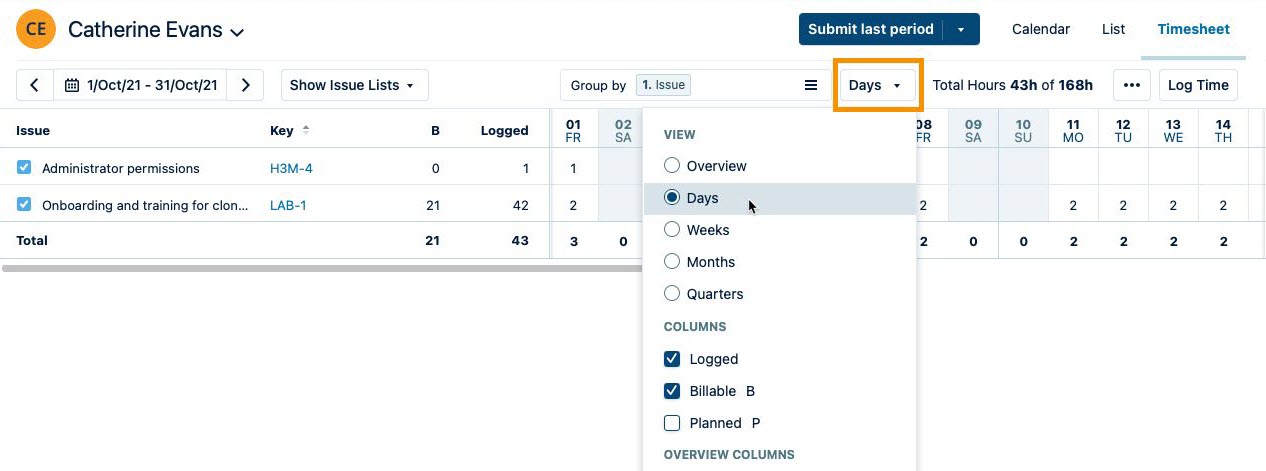
In the timesheet, set the view to Days from the menu in the top right.

-
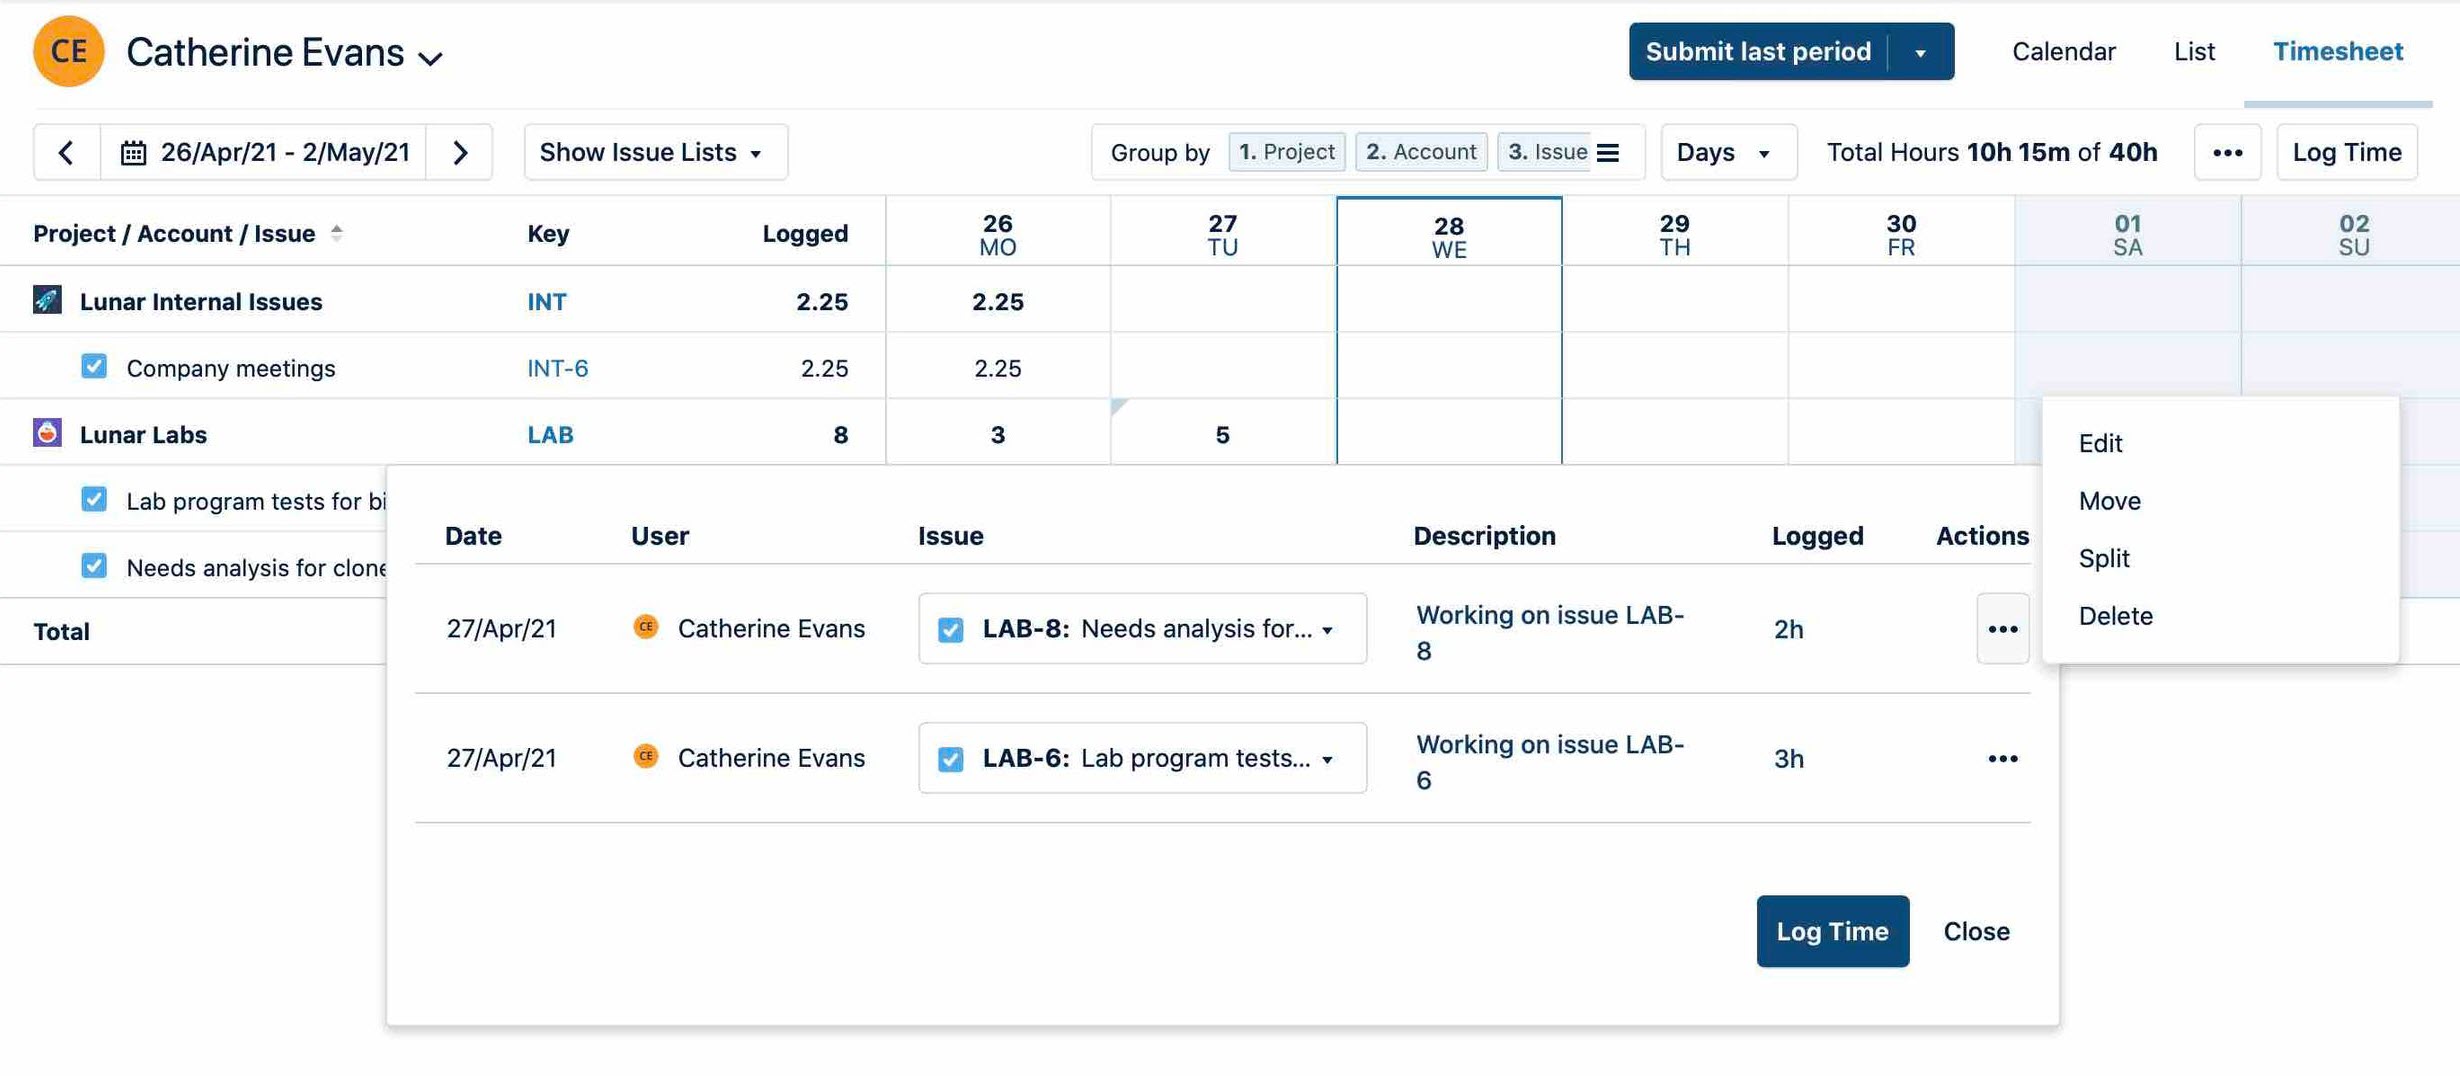
In the timesheet, click the cell for the Jira work item on the date you want to edit. A box appears with fields you can edit.

-
Edit the worklog information in any of these ways, such as correcting the number of hours that were logged on the work item:
-
Change the Date, Description, and Logged hours worked by clicking the fields and changing the entries. When you are finished, click Close.
-
Click the ellipsis (...) at the right side of the pop-up, then select Edit. The Edit Time Record dialog appears and you can update a wide range of fields, including billable hours and work attributes. Simply click Update to save the changes.

-
Moving Logged Hours in the Days View
If time was logged on the wrong Jira work item, you can easily move the hours logged on that work item to another work item. This will save you from having to delete the worklog and create a new one.
-
Click the ellipsis (...) at the right side of the pop-up dialog, then select Move worklog.
-
In the Move Worklog dialog box, select the work item to which you want to move the hours.
-
If the worklog is linked to an account and that account is not linked to the destination project, you may be required to select a new account. See Logging Time settings: Users can move worklogs when accounts are not linked to the destination project for more information.
-
Enter a new remaining estimate for the target work item, if needed.
-
Click Move. The time logged is moved to the work item you selected.
Splitting Worklogs in the Days View
Splitting allows you to divide the hours from one worklog between two Jira work items.
-
Click the ellipsis (...) at right, then select Split.
-
In the Split Worklog dialog box, select the work item with which you want to split the hours. Use the issue picker filters to narrow the search as needed.
-
In the Worked box, select hours that should be logged on the target work item.
-
Enter a new remaining estimate for the target work item, if needed.
-
Click Split. The time is divided between both work items.
Deleting Worklogs in the Days View
Deleting your own worklogs requires the Delete Own Worklogs permission for the project to which the work item belongs.
Deleting worklogs for other team members requires the Delete All Worklogs permission for the project to which the work item belongs.
-
Click the ellipsis (...) at right, then select Delete.
-
In the confirmation box, click Delete.
Editing Worklogs in the Overview
Editing work attributes, billable hours, and worked hours in timesheets requires the Edit Own Worklogs permission for the project to which the worklog belongs.
Editing billable hours also requires the Set Billable Hours permission for the project to which the worklog belongs.
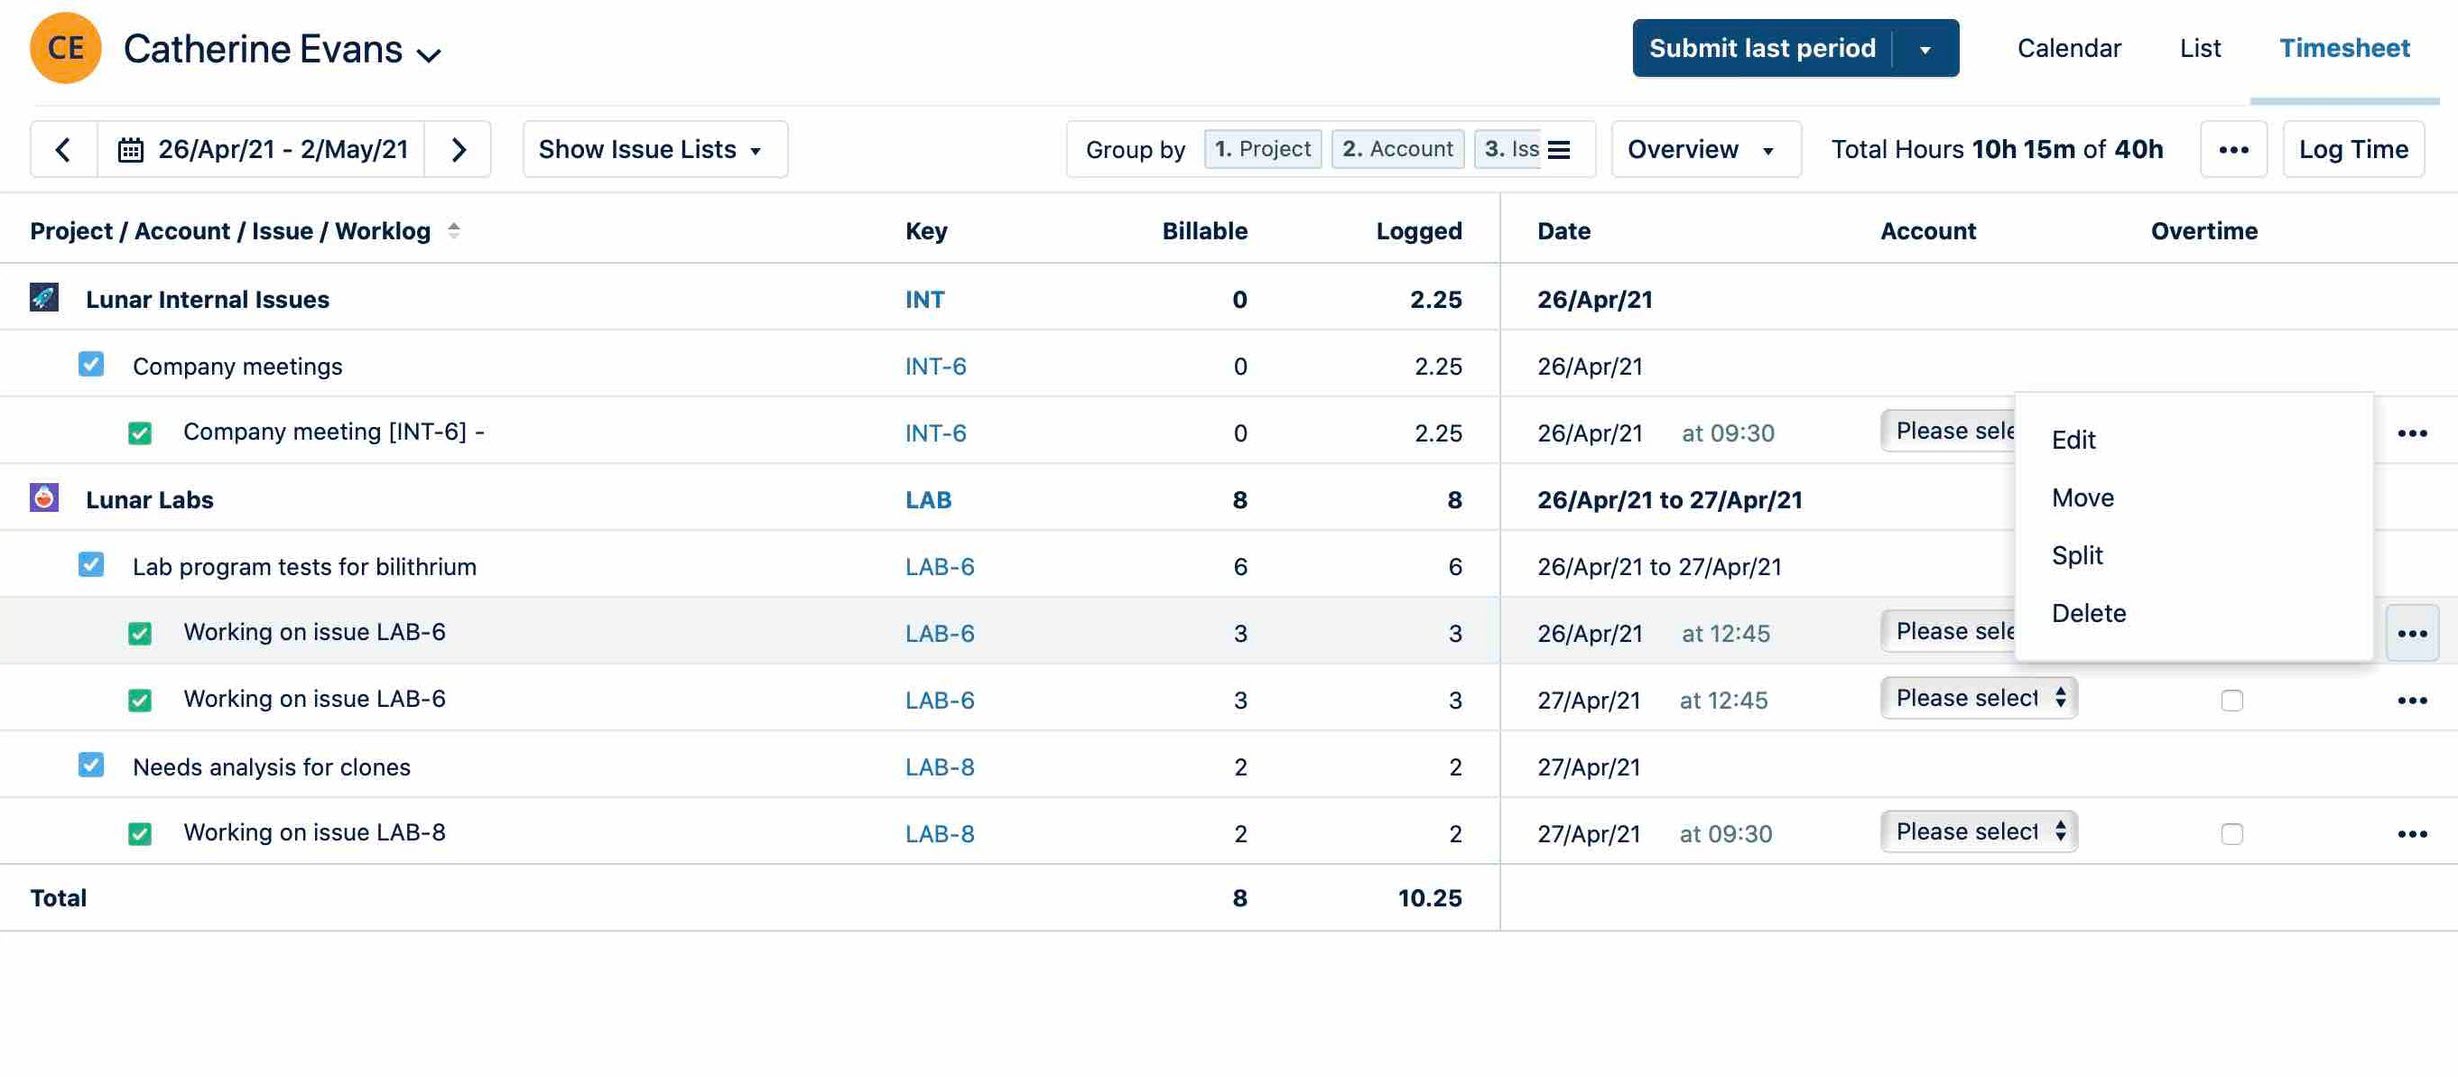
In addition to the Days, Weeks, Months and Quarters views, you can also edit, move, split, and delete worklogs directly in timesheets when you are in the Overview view.
-
Set the view to Overview from the menu in the top right.
-
In the Group by field, select Worklog.
-
From the Overview menu, select the work attributes, Billable, or Logged options that you would like to display in the timesheet.
-
In the timesheet, click directly in a cell for the Billable, Logged, or the work attributes and enter new values.
-
Alternatively, you can click the ellipsis (...) at the right and select Edit. The Edit Time Record dialog will appear and you can edit fields as needed.

Moving, Splitting, and Deleting Worklogs in the Overview
The steps to move, split, and delete worklogs in the Overview are the same as those listed above for the Days view. The only difference is that the ellipsis (....) is accessed from the far right side, as seen in the image above.
