Working with Tempo teams makes it easier to collectively manage the work done by a group of people, and teams need Team Leads. Being a Tempo Team Lead gives you permissions to view team members' worklogs, plan time for team members (if you have Tempo Planner installed), and submit and approve team members' timesheets.
Creating Teams
The first step to working with teams is to create one, and to do this you need the Tempo Team Administrator permission from your Jira administrator.
If you need to manage the plans and work done by your team, but not create or delete teams, you only need to be a member of a Permission Role with the Manage Team permission for that team.
See: Creating and Deleting Teams
Assigning the Team Lead Role
The most typical way to become a Team Lead is to assign yourself as the Team Lead when you create one or more teams. However, anyone else with the Tempo Team Administrator permission can also assign you as a Team Lead for one or more teams.
Being a Tempo Team Lead doesn't necessarily have anything to do with your position in your organization. If you're a manager, it's typical to create a team that includes employees who report to you, but you can create teams in Tempo with anybody in them. For example, you might be a Team Lead for a project that is being worked on by people from different departments in your company, or you could be the Team Lead for a scrum team whose members have different roles.
There can only be one Team Lead per team, but you can add someone to a Permission Role and then grant them all the permissions.

Adding Members to Your Team
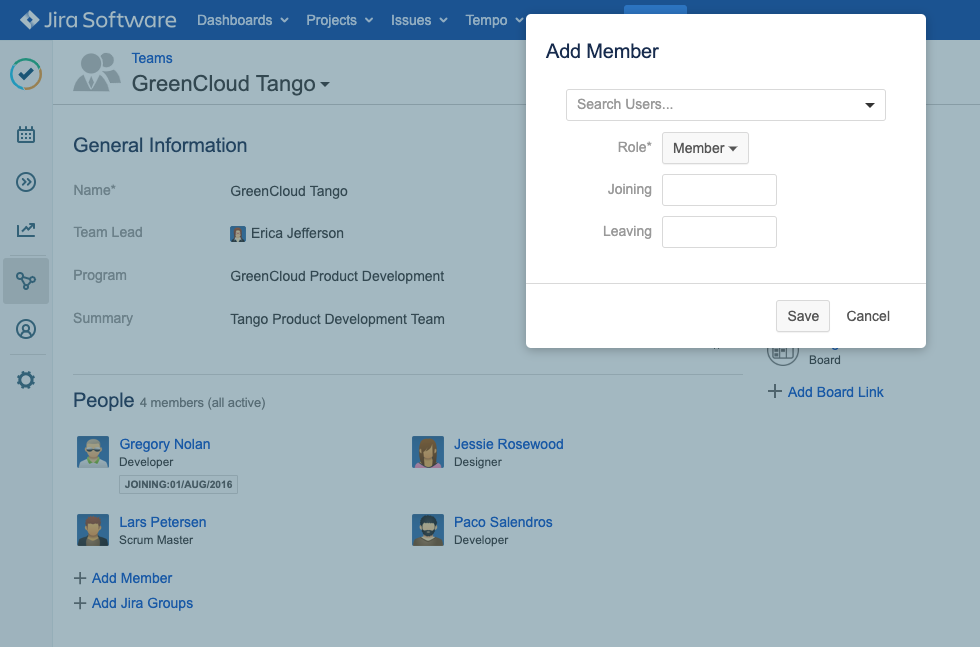
When you add members to a team, you can assign their Role for each team in which they're members, as well as the dates on which they join or leave the team.
One person can be on more than one team – in fact, the best way to use teams is to create several small teams with shared members. This gives you more flexibility for planning and logging time, and more options for viewing reports on each team.
You can also add members "in bulk" using a Jira group, which is a quick way to add many members at once. If you do this, however, you cannot set each member's team role, commitment, or joining and leaving dates because the Jira group is added as an entity.
Bulk Adding Members to a Team
You can add Jira groups to a team. The groups will be added as a single entity so you cannot define each member's role, commitment, or joining and leaving dates.
-
In the Teams view, select the team to which you want to add the Jira group.
-
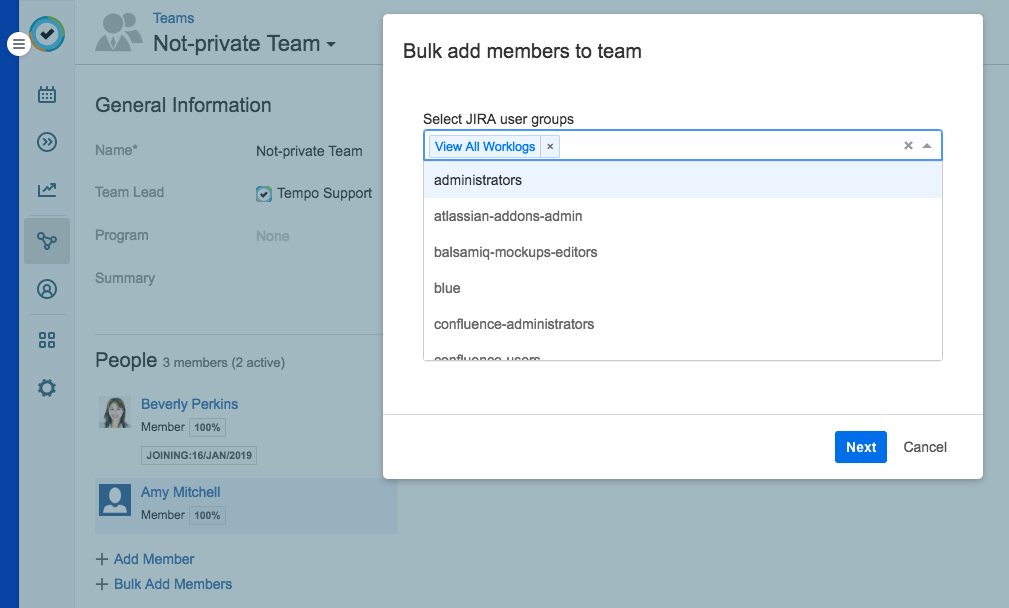
In the team overview, click Bulk Add Members at the bottom.
-
Start typing the name of the user group you want to add to the team, and select it from the matching results.
-
When you have selected all the groups you want to add to the team, click Next.
-
The dialog box will show how many users will be added to the team. Click Confirm to add these members to the team.
Managing Permissions for Your Team
Once you’ve added members to your team, you need to configure permissions for them. Click Teams in the sidebar to open the Teams view, then select your team to go to your team's overview. Click More and select Permissions.
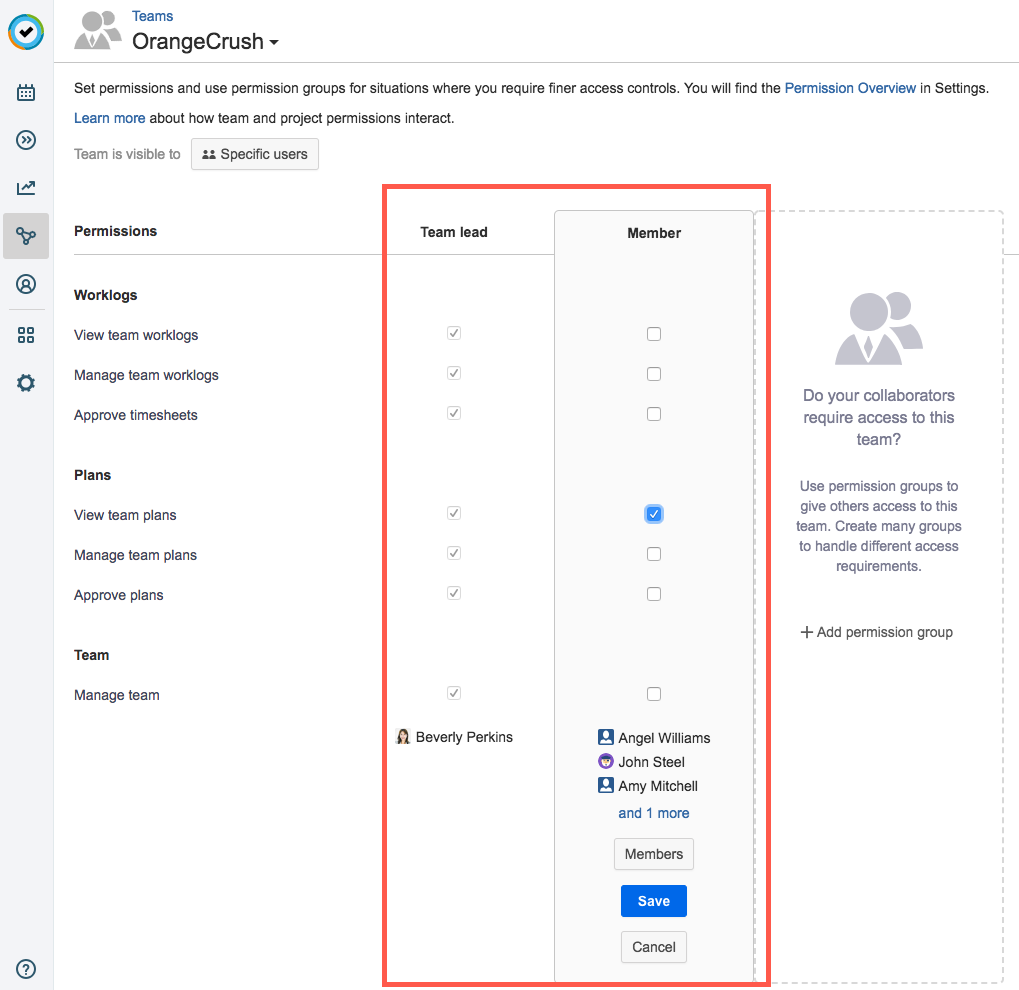
Tempo Team permissions define how teams view and work with worklogs, timesheets, and plans. These permissions are applied to Permission Roles within each team. By default, a new team has two Permission Roles: Team Lead and Member.
-
As a Team Lead, you have permissions to view, manage, and approve all plans and worklogs, and also to manage the team.
-
By default, Members don't have any team permissions - for example, they can’t view the worklogs of their teammates. You probably don't want all team members to be able to view each other's worklogs or plan time for each other, but giving them permissions to View Team Plans lets them see the work that is planned for or by their teammates.
A Permission Role is a powerful and flexible tool for giving specific permissions to certain team members or other non-members. For example, you can give more or all permissions to a senior team member so that they're like a Team Lead. You can also add a Jira user group to a Permission Group, such as giving a group of other Team Leads permissions to View Team Plans.
Team Leads are usually part of a team, too. When as a Team Lead you submit your own timesheet, you can select a Reviewer to approve your timesheet. If there are no available reviewers, you will need to be added to a team or ensure that an appropriate reviewer is granted the Approve Timesheets permission for a team you lead. It's important to note that you cannot approve your own timesheet.
Linking Your Team to Jira Projects, Boards, and Issues
From your Team Overview (click your team's name in the Teams view), you can link your team to Jira projects on which they're working. This makes your team available in Jira searches and filters. You can also link to Jira boards to help with project and issue management.
See: Linking Teams to their Jira Projects, Boards and Issues
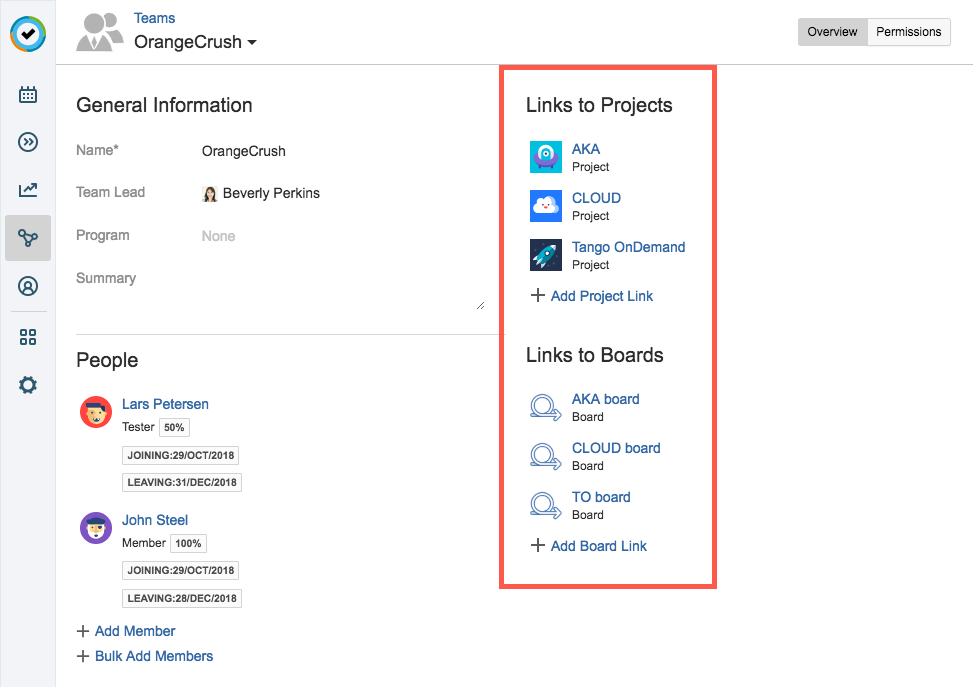
Linking projects and issues to your team also lets you plan time for your team members in Tempo Planner – see below.
Before you can plan with issues from these projects, you need to link your team to these issues:
-
Make sure that the Tempo Team Custom Field is visible in your Jira screens:
-
Click Jira settings on the Jira sidebar.
-
Select Issues.
-
Under Fields, select Custom fields.
-
Find the Tempo Team custom field.
-
Click the ellipsis (...) to the right, and then select Screens from the drop-down.
-
Select the screen you would like to associate the field to (for example, the Default Screen, the Resolve Issue Screen, or the Workflow Screen).
-
Click Update to save.
-
-
Link the Jira project or board to your team, as described above.
-
In Jira, open an issue to which you want to link your team, and then click Edit. Scroll down to the Team field, and select your team from the drop-down. Click Update at the bottom of the issue to save these changes.
-
Now your team can be used in the Jira Issue search, such as when creating filters for Jira Agile boards.
Planning Time for Team Members
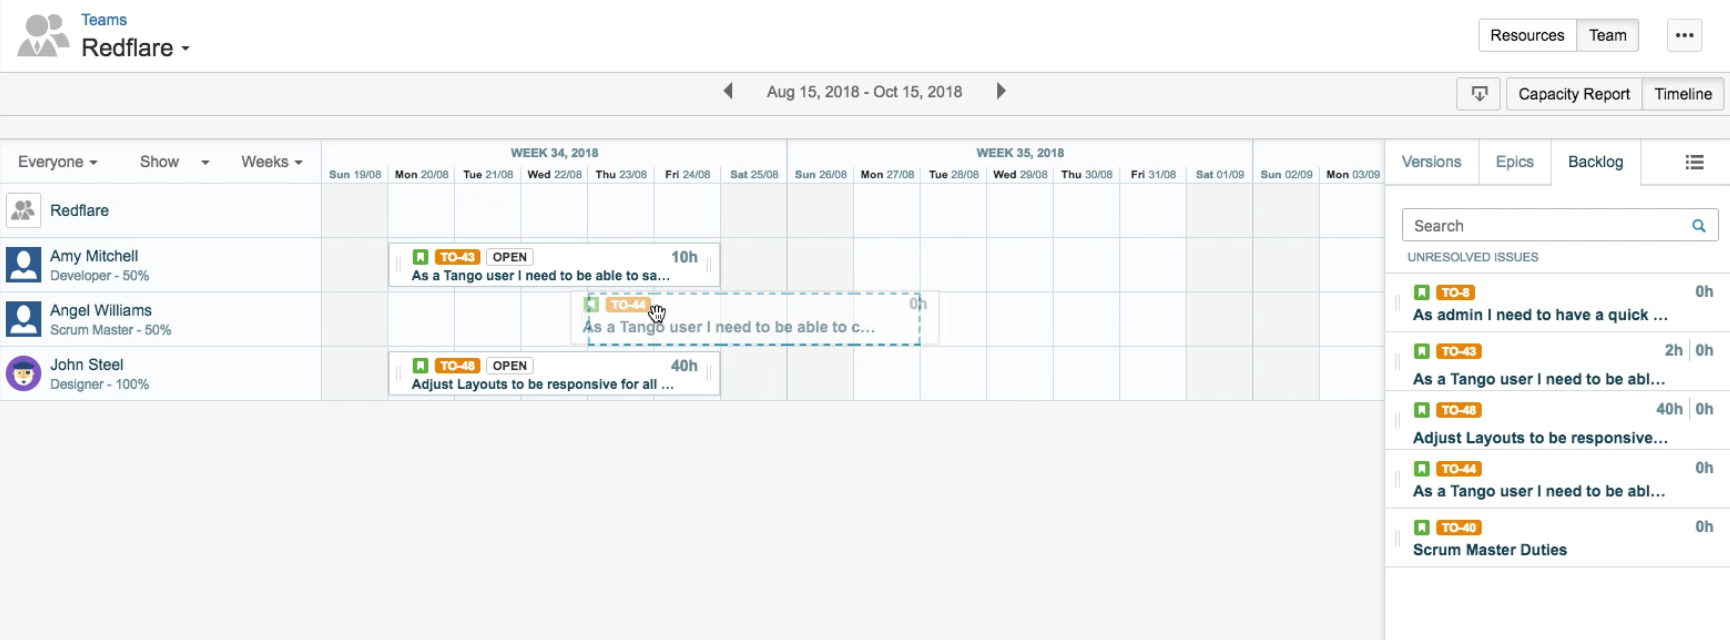
Teams make it easier to plan time for a project using Tempo Planner because you can consider each team member's availability and capacity for work. The Resource Planning view shows you at a glance how much work is assigned to each team member. For example, if a team member has room for more work, you can increase the number of hours assigned to them.
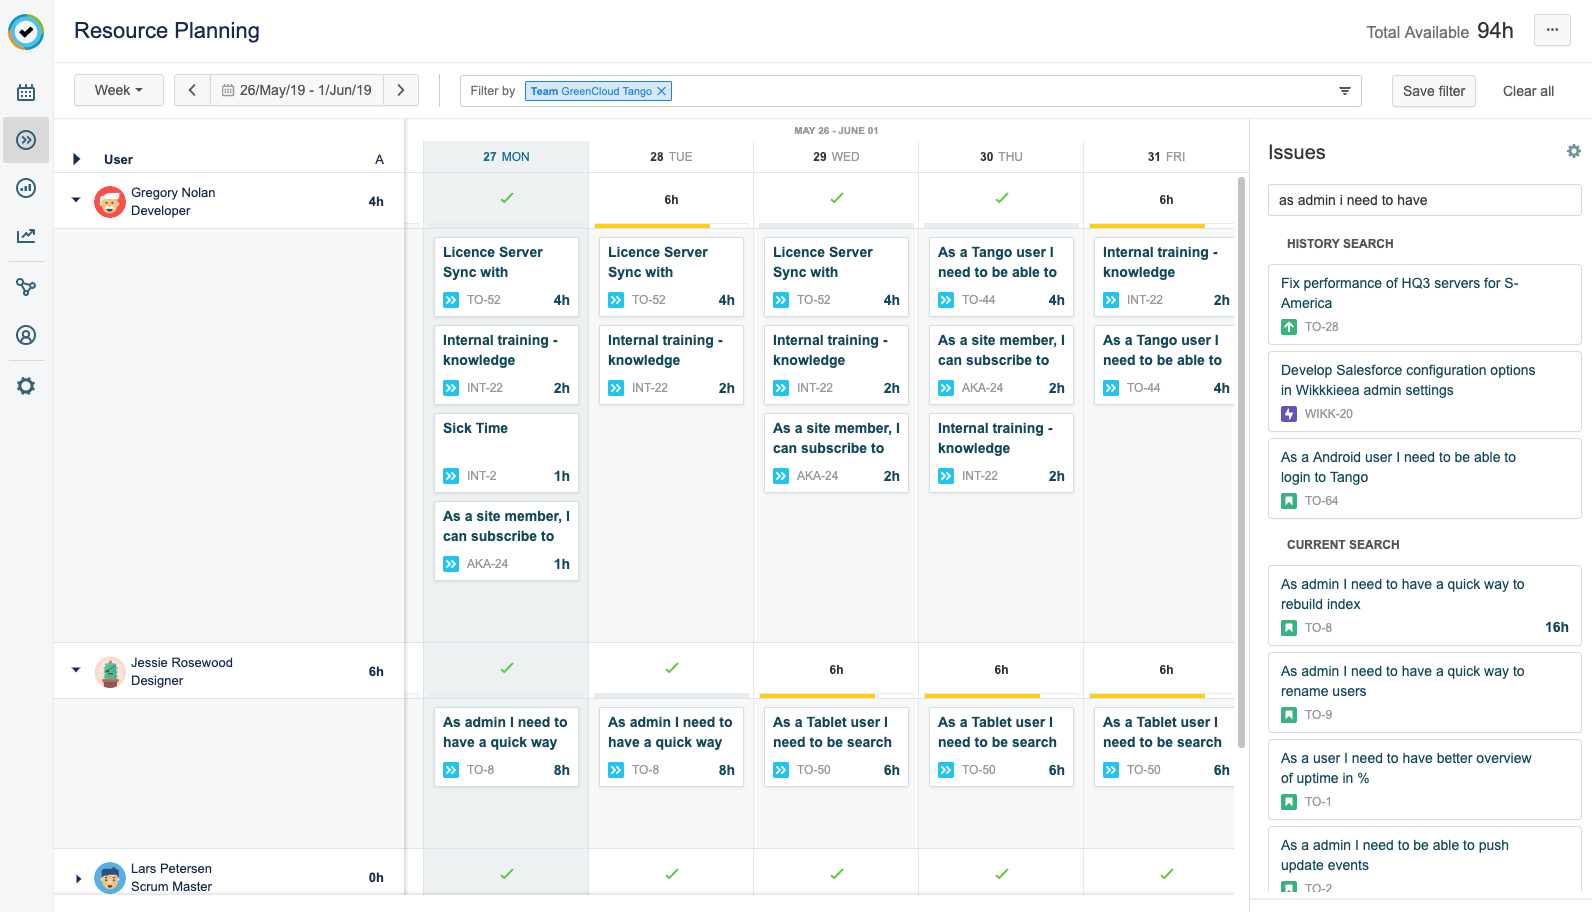
If you've linked your team projects and issues as described in the section above, you can drag and drop issues from those projects directly from the sidebar into your Team Planning Timeline – just click … and then Team in the upper-right of the Resource Planning view to open it.
Viewing your Team's Timesheets
As Team Lead, you can view your whole team's timesheet from the Timesheet view in Teams. This is a handy way to see all team members' work at a glance, and you can filter the data by User, Project, Issue, etc.
See: Viewing the Team Timesheet
Submitting and Approving Timesheets for Team Members
After team members have logged time, they must submit their timesheet for approval at the end of the current period. If they select you as the Reviewer, you'll get a notification of the submission. You can then approve or reject their timesheets from the Approval view in Teams.
See: Approving and Rejecting Your Team's Timesheets
As Team Lead, you can also submit timesheets for your team members. You may want to do this if they can't submit it themselves before the end of the approval period, such as if they're sick or on vacation.
See: Submitting Timesheets for Approval
If a team member needs more time to finish up their timesheet after an approval period is closed, you can grant them a grace period to edit their timesheet.
See: Granting a Grace Period to Team Members
Reporting on Teams
Using Tempo Reports, you can get an overview of what is planned for a team, what work has been completed, and the team’s capacity for work. For example, you can see the number of hours logged for the issues for each team member, or the number of hour planned for an upcoming project.
To create a report that shows how a team's time has been spent, click Logged Time in the Reports overview and select TEAMS in the Filter by field, then select the teams you want to see, as well as other criteria.
If you have Tempo Planner installed, you can also run a Planned Time report to view the time that has been planned on projects for your team.

A powerful thing about reports is that you can save them. This lets you create your own templates using all the filters and data that you set up. Then the next time you want to run that report, it's just one click in the Saved Reports section in the Reports overview.