Skip table of contents

Managing shared resources using Tempo for Server

This tutorial is created using Timesheets Version 9.

In this tutorial, you will create two teams, link projects to them, plan time for members of both teams, and finally monitor the capacity of the shared resources. You need Timesheets by Tempo and Planner by Tempo to complete these tasks.


In this tutorial:

Step 1: Creating a new team


The first step is to create your team. Create a new team and name it Redflare. Assign Taylor as the Team Lead.
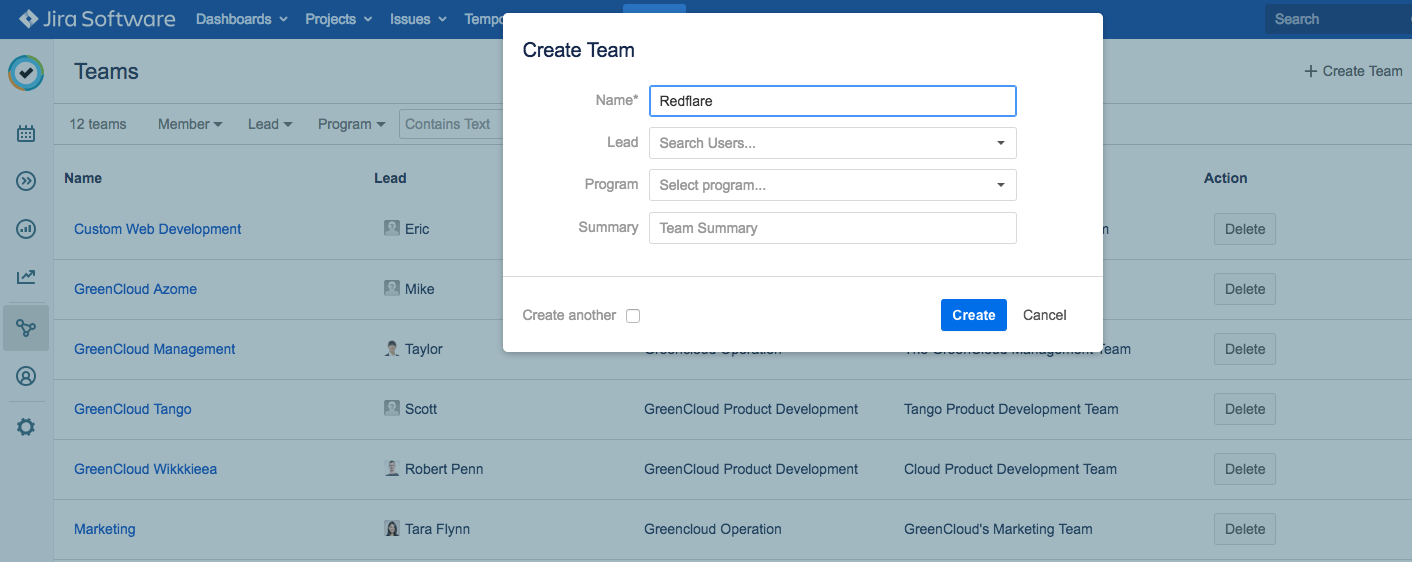
To create a team...

Creating and deleting teams requires the Tempo Team Administrator permission.

A team is a group of Jira users who work on projects together in some way. A team might consist of, for example, the people in one department of your company, or it might be a scrum team if you work in an agile software development environment. 

  1. Select Teams :teams_dc: in the Tempo sidebar.

  2. Click the Create Team link at the top-right.

  3. Fill in the Create Team dialog box:

    1. Name - Enter a name for the team.

    2. Lead - Assign a team lead. The team lead will have the permissions to manage and plan work for this team. Note that the team lead must also be added as a member of the team for their worklogs to show up in the team timesheet and team report.

    3. Program - Optional. Add the team to a program. A program is a group of teams that are associated with the same Jira project or agile board.

    4. Summary - Optional. Enter a descriptive summary for the team.

  4. If you want to leave the dialog box open to create another team after you create this team, select the Create another check-box.

  5. Click Create. Your team is added to the list of teams and you can start adding members to it.


Deleting Teams

You can delete a team as long as it is not linked to any projects, boards, and issues.

  1. Go to the Teams page.

  2. Click Delete for the team you want to delete.

  3. Click Delete to confirm.

Note

Deleting a team or removing a member from a team will not affect their worklogs or plans, but the visibility of this information might be affected as Team permissions are changing in the process.


Related Topics

Step 2: Adding members to your team


Having created a team, you now need to add team members to it. Add three team members, Robert, Tanya, and Beverly. Allocate the designer role to Robert and as he will be dedicated to this team, set his availability to 100%. Set Robert's joining date to August 6th, 2018.

Add Tanya as a developer and Beverly as a business analyst to the team. As Tanya and Beverly will only work on Redflare part-time, set their availability to 50% with August 1st, 2018 as their joining date.

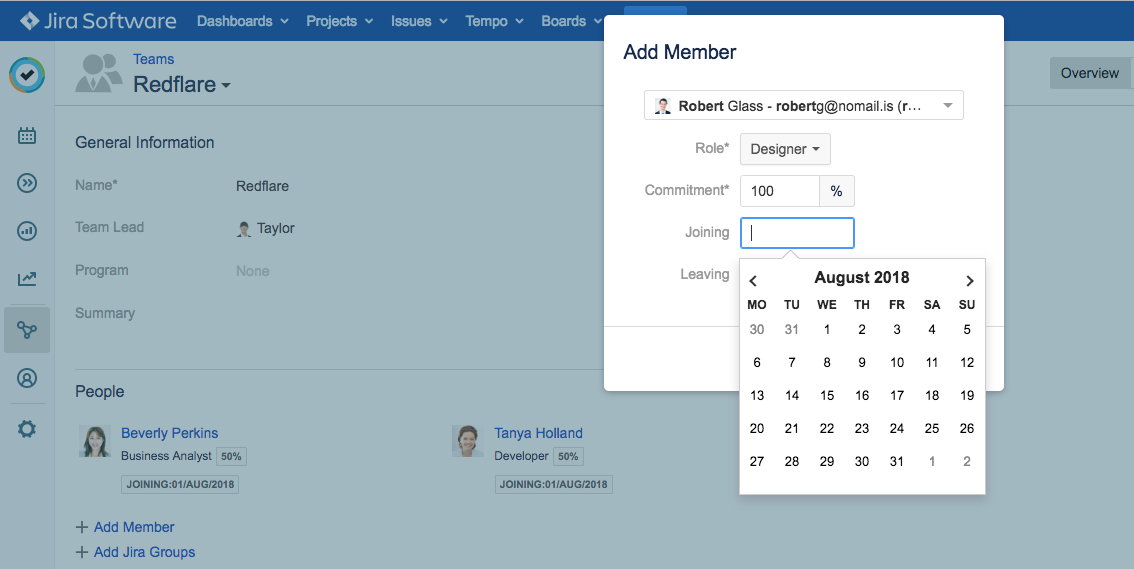
The system notifies you that the users are participating in other teams 100%. It is nevertheless possible to add them to a new team.

Step 3: Assigning team permissions to team members


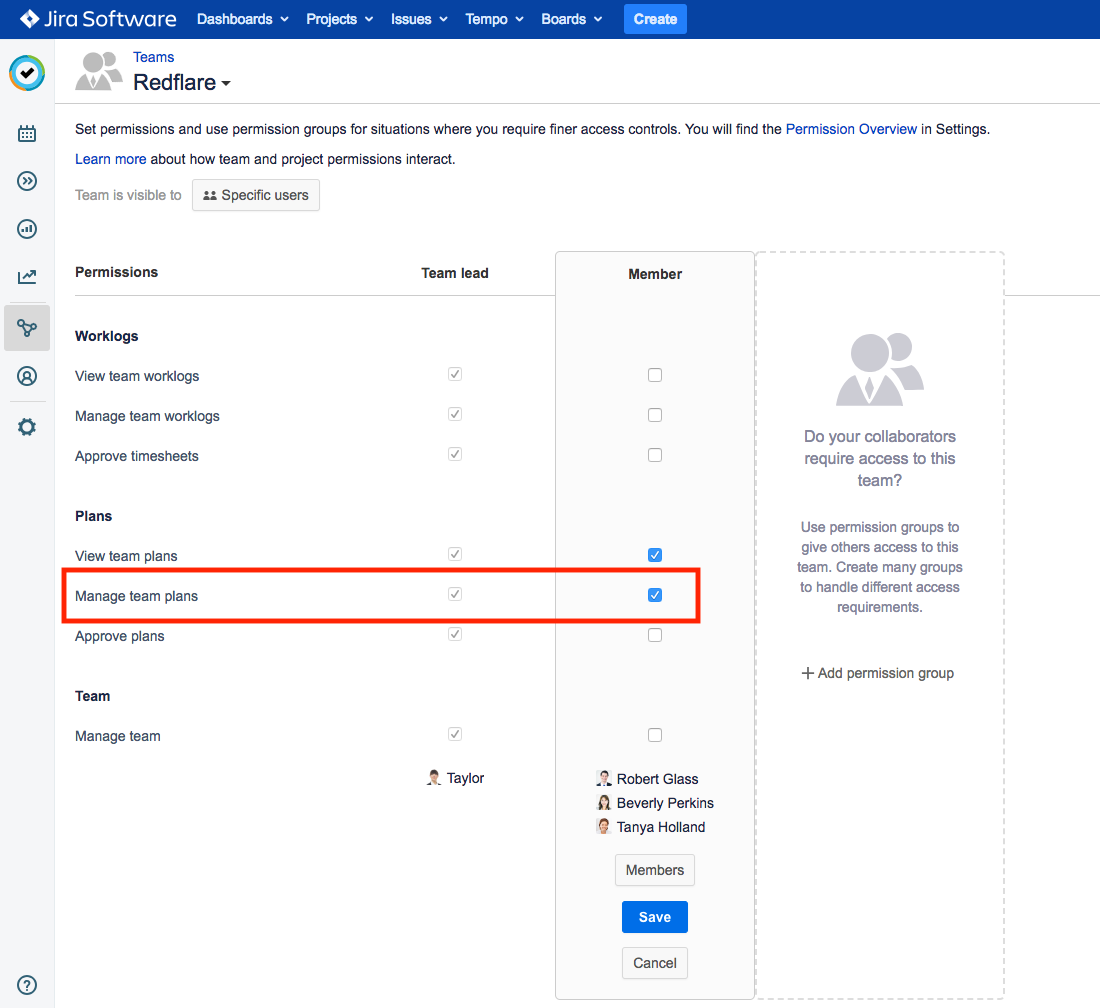
Next, you need to grant permissions to team members. By default, the Team Lead - Taylor - has all team permissions and all team members have the permission to view team information. Grant Robert, Tanya, and Beverly the permission to manage team plans.

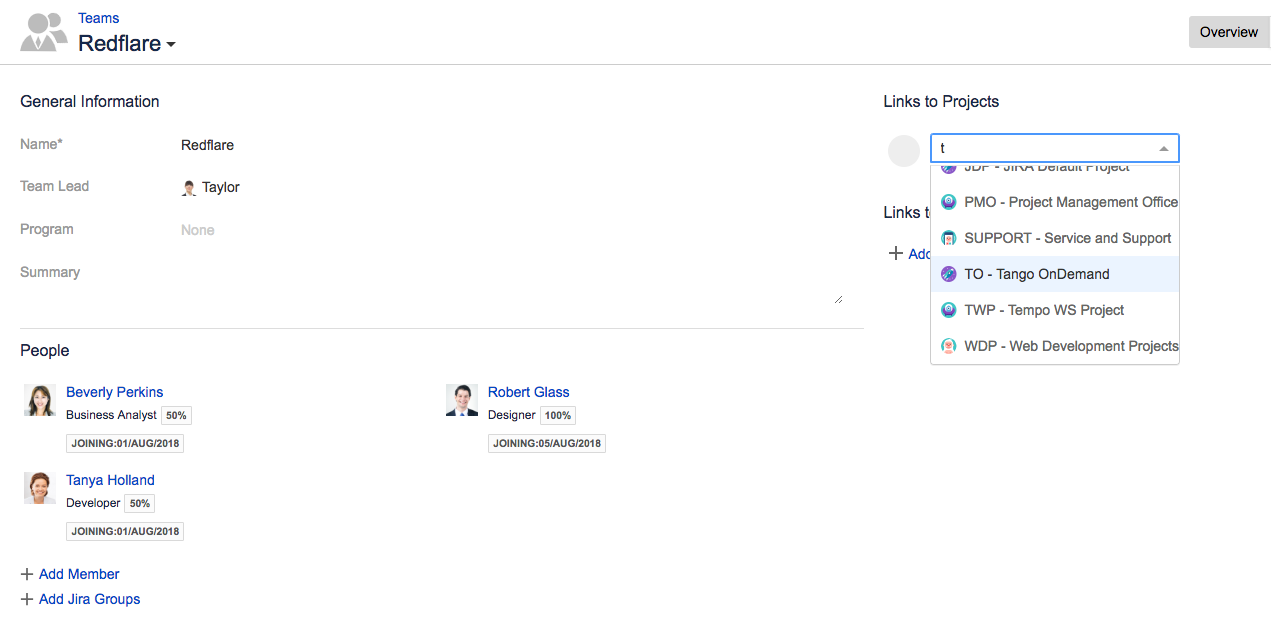
Step 4: Linking projects to your team


The first step in planning your team's time is to link one or more Jira projects to the team so that you can plan time on issues in those projects. When you have linked projects to the team, you can drag and drop issues directly from these projects onto your Team Planning Timeline.

Link the Tango OnDemand project to the Redflare team.

To link a team to projects...

  • Program Board is a Classic Team Planning feature that was made "Legacy" Feature in Tempo Planner 7.13.0. Classic Team Planning features are disabled by default for version 7.13.0 and later.

  • Enabling the Classic Team Planning features requires the Tempo Administrator permission.

  • Linking Jira projects and boards to a team requires the Tempo Team Administrator permission or the Manage Team permission for the team.

You can link Jira projects or Jira boards to your teams so that you have easy access to project-related or sprint-related issues when planning work for the team. Linking one or more Jira projects to a team allows you to be able to plan time for team members to work on issues, versions, or components. Linking a Jira Agile board to the team allows you to be able to plan time for the team to work in Jira Agile sprints.

  1. Select Teams :teams_dc:  in the sidebar.

  2. In the Teams overview, select the team to which you want to link a Jira project and board.

  3. Click + Add Project Link or + Add Board Link at right.

  4. Type the name of the project/board to which you want to link your team, and select it from the drop-down list. 

Tip

You can link a team to multiple projects and boards. You can also link different teams to the same projects or boards.

  • To unlink a project from a team, click the x that appears in the top-right corner of each linked project.


Related Topics

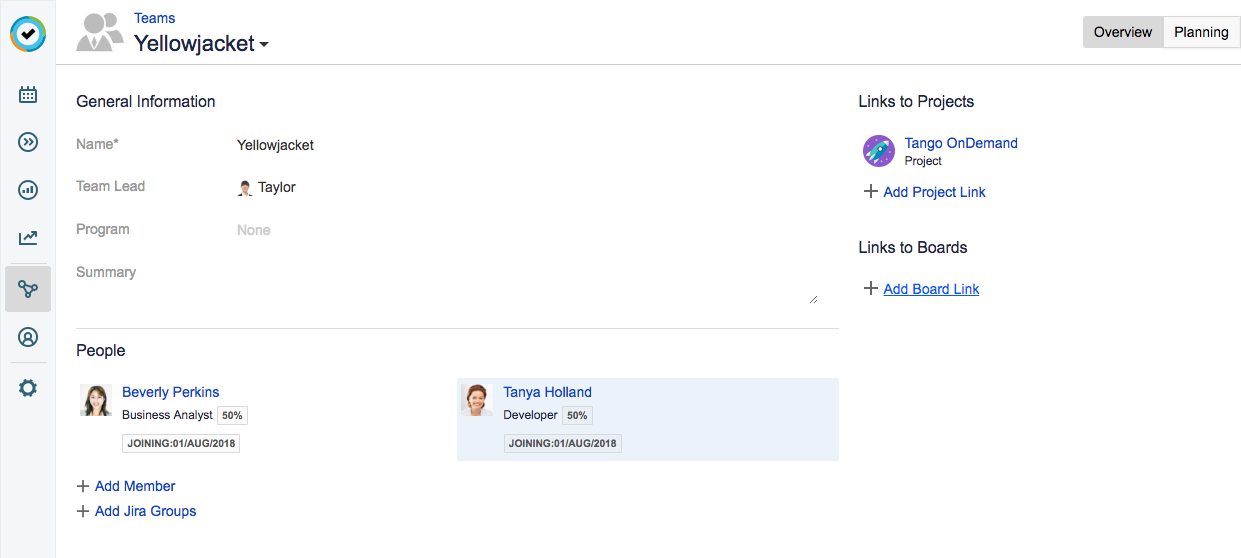
Step 5: Creating another team


Team Redflare is now ready to go – you have populated it with team members, set their roles, availability, and permissions, and linked the team to the relevant project.

Now do the same for team Yellowjacket. Again, Taylor will be the team lead. Add Tanya and Beverly as team members, set their availability to 50% and their joining date to August 1st, 2018. As for team Redflare, link team Yellowjacket to the Tango OnDemand project.

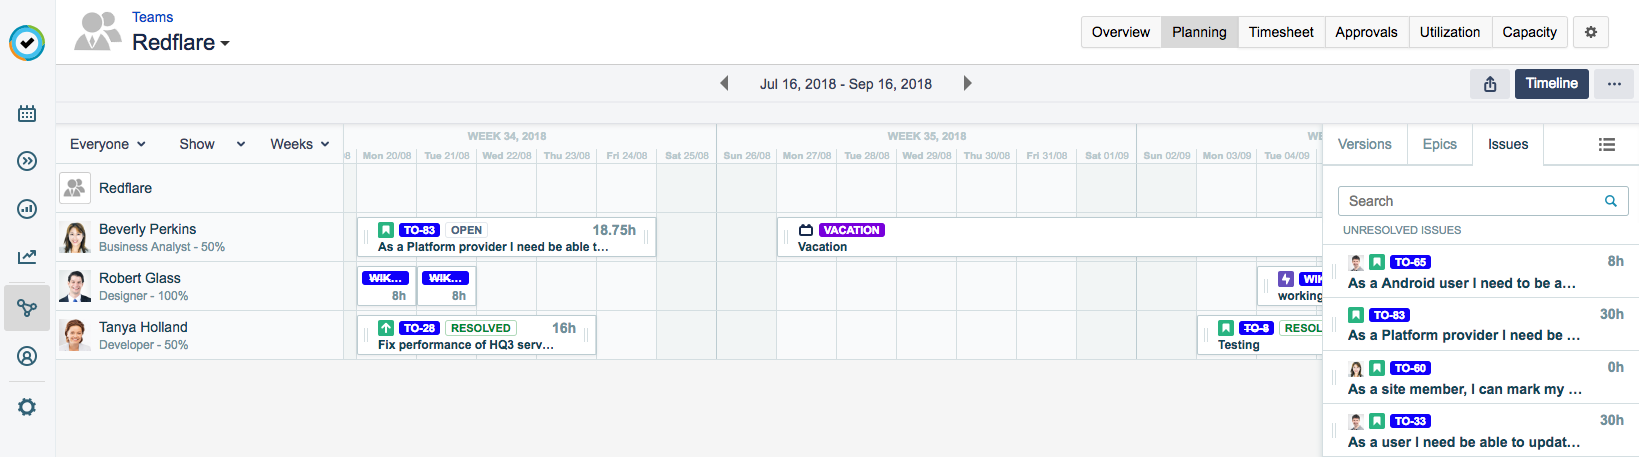
Step 6: Planning time for team Redflare


With both your teams ready, it's time to start planning. In the following steps you will plan time for team Redflare using the Team view. From the suggestions sidebar you can see all of the issues from the project you have linked to this team. Drag issues and drop them on Beverly's timeline in Week 34, 2018. 

To create plans using the issue suggestions sidebar...

  • Team Timeline is a Classic Team Planning feature that was made "Legacy" Feature in Tempo Planner 7.13.0. Classic Team Planning features are disabled by default for version 7.13.0 and later.

  • Enabling the Classic Team Planning features requires the Tempo Administrator permission.

  • Creating and editing plans in the Team Planning Timeline requires the View Team Plans and the Manage Team Plans permissions for the team for which you are planning. 

In the Team Timeline you can create a plan for a team member or for the whole team to work on an issue, project, version, or component.

To access the Team Planning Timeline:

  • Select Planning :planner_dc:  in the Tempo sidebar. Click  at the top-right, and then select Timeline.

Creating Plans

  1. To create a plan for a single day, point to the date box for the relevant team member, and click the plus that appears. You can click and drag the pointer across days to plan for longer periods. The Create Plan side panel opens to the right of the timeline.

    Tip

    • You can create a plan for the whole team by clicking and dragging the pointer on the top row of the timeline.
    • If you create a team plan while the timeline is filtered by role, the team plan is still applied to the whole team.
    • Note that it is recommended to plan at the member level in Team Timeline. Plans at the team level in Team Timeline are not visible in the Resource Planning View.
  2. Fill in the requested information in the Create Plan side panel. 

    • The Planned for field is automatically filled with the name of the team member whose row you clicked, or the name of the team if you clicked the top row. Planning time for a team member to work on an issue is not the same as assigning the issue to the team member. Only one person can be assigned to an issue at any time whereas you can plan time for more than one team member to work on the same issue simultaneously.

    • Plan item type. You can plan time on an issue, project, version, or component. 

    • Planned item. To search for a plan item, start typing in the field. The available items are those of the type that you selected in the Plan item type field.

    • Start and end dates. These fields define the period that the plan covers and are automatically filled with the dates that you selected on the timeline. 

      Tip

      Planning time for weekends and public holidays

      Weekend days and public holidays that are covered by a plan do not normally contribute to the number of planned hours. You can make weekend days and public days count as work days by both starting and ending a plan on a weekend day or public holiday. In that case the number of working hours for all weekend days and public holidays that are covered by the plan is defined by the Jira Time Tracking setting Number of working hours per day.

      If a plan starts on a weekend day or public holiday but does not end on a weekend day or public holiday, or the other way around, only normal work days contribute to the number of planned hours.


    • Planned time. Even if the availability of team members to work on the team is less than 100% of their time, planned time can still be for 100%.
      Example: Erica works 8 hours a day. She is in two teams, with 50% availability for each team. You see that no work is planned for Erica in her other team so you create a plan for 100% availability instead of 50%. All of Erica's 8 hours go into the plan.

  3. When you are finished, click Save. The plane is created on the timeline, and the Plan details side panel is displayed. The Plan details side panel shows information about the plan and the associated plan item.

Creating Plans by Dragging Issues to the Timeline

Alternatively, you can create a plan for work on an issue by dragging Jira issues from the Issue Suggestions side panel onto the Team Timeline.

  1. If not already displayed, do one of the following to access the Issue Suggestions side panel:

    1. If the Create plan or Plan details side panel is displayed, close that panel.
      -OR-

    2. If no side panel is displayed, click :side_panel:  on the right

  2. The lists of unresolved issues are displayed in a side panel. Click the various tabs to view the different groups of issues. You can click  to see more categories. You can also view issues tied to a specific Jira filter.

  3. Compare the remaining time that is estimated for resolving an issue with the remaining time that is already planned for work on the issue. 

  4. Drag an issue from the side panel and drop it onto a team member's row or to the team row on the timeline. The amount of time in the Remaining estimate is used to calculate the amount of time scheduled for the plan.

  5. To edit the amount of time scheduled, click on the issue in the timeline. The Plan details sidebar will show all of the information from the planned task. Scroll down to Planned time and click the estimate to change it.

Repeated Plans

You can select to repeat plans. The repeat frequency can be:

  • NEVER

  • WEEKLY

  • "EVERY TWO WEEKS"

  • MONTHLY

You can set how often you want the plan to repeat in the Create Plan side panel when you create the plan, or when editing a plan in the Plan details side panel.

Please note that if a plan's repetition occurs on a weekend, it will not be visible in the timeline. For example, if a plan is created on the 1st of January 2020 and is set to repeat monthly ending on the 31st of March 2020, the plans will not be visible because the 1st of both February and March occur on a weekend.

Also, if a plan is for a period of 31 days and is set to repeat monthly, the planning parameter is set to 31 days. This means that if the original full 31-day plan is for January, February's plan will start as scheduled on the 1st of February. The next recurrence will not start until the 3rd of March, as that is the 31st day since the 1st of February. 


Related Topics

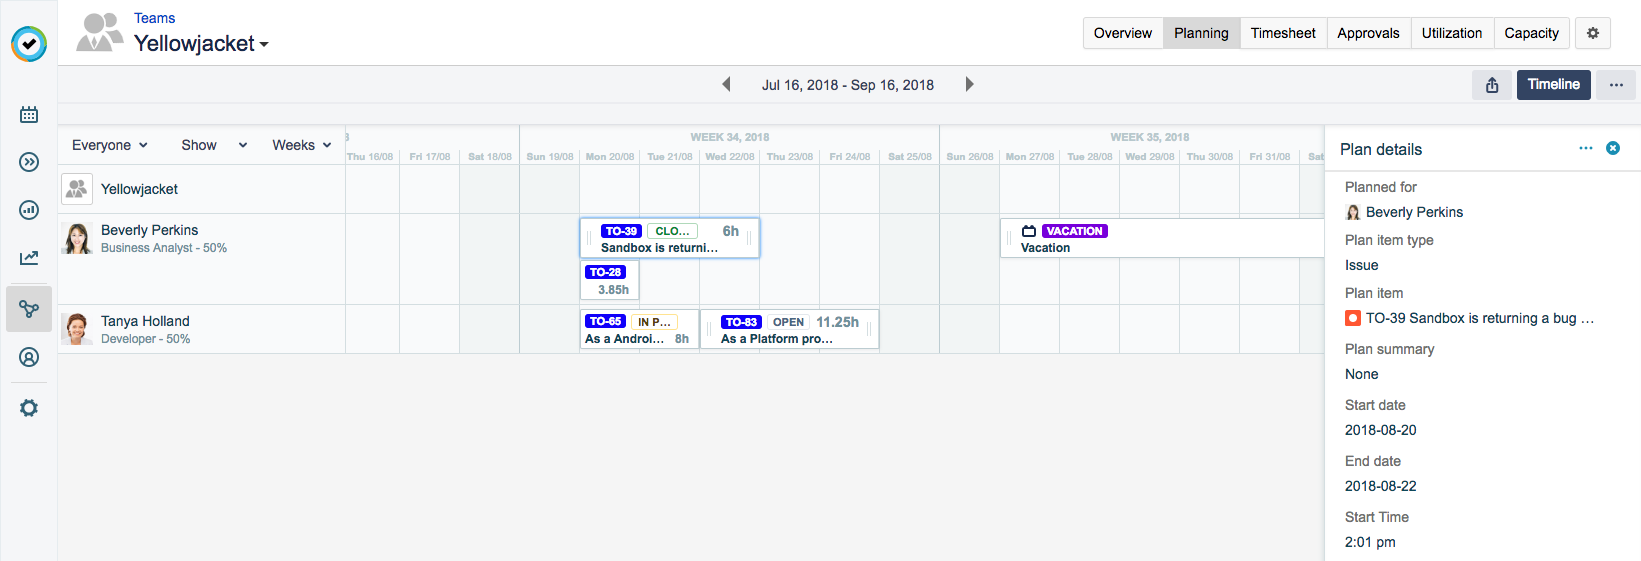
Step 7: Planning time for team Yellowjacket


Now switch teams to team Yellowjacket and plan Beverly's time in week 34, 2018.

Step 8: Viewing plans from other teams


Now that you have planned time for both your teams, it's a good idea to view the upcoming schedule. If members of your team are also working with other teams, it can be useful to include their plans from those other teams in the Team Planning Timeline.

Step 9: Viewing team's capacity


Having planned time for members in your team you may want to see the team's capacity. Capacity is a measure of how much time is planned, and how much time is available for each member in your team. In this step you will view the capacity of Redflare team using the Team Capacity Report

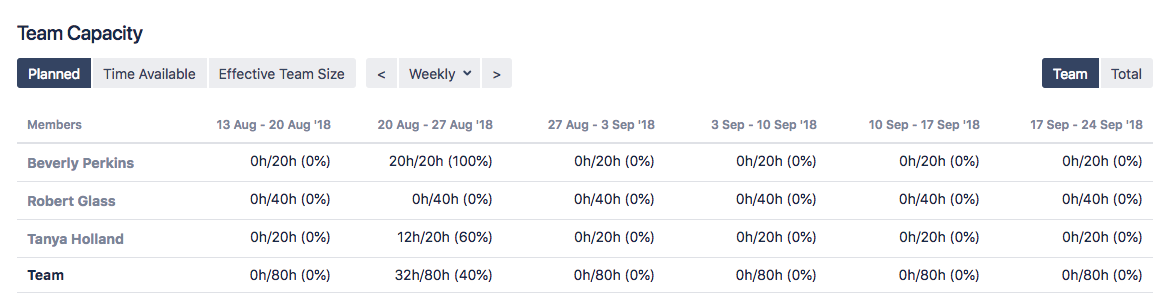
You can see that Beverly is fully committed for week 34 (20 Aug - 27 Aug '18), but Tanya is only at 60%. Nothing has been planned for Robert yet. If you click Time Available you will see that Tanya has 8 hours available for planning whereas Beverly has 0 hours available.

So far you've been viewing the capacity of the team members in the Redflare team, but you can also view the total capacity of the team members. The total capacity includes their planned work for other teams.

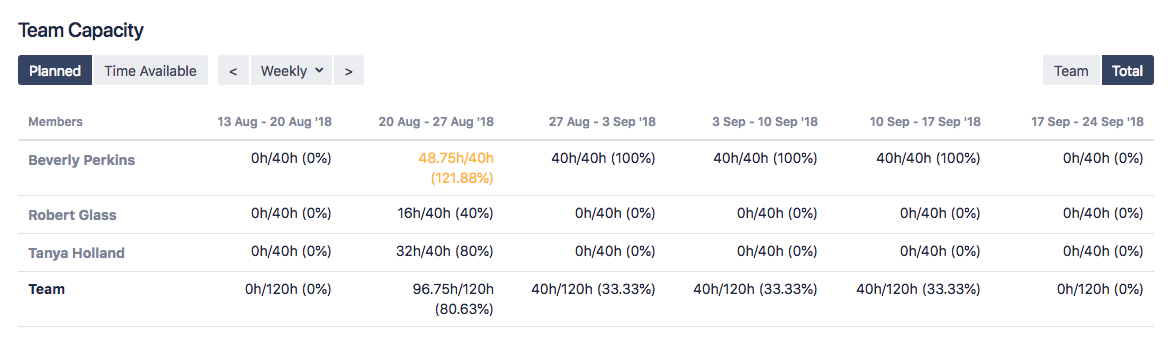
Now you can see that Beverly is actually over-committed for Week 34 because she's also working for team Yellowjacket. The time for over-committed team members shows up in yellow.

Step 10: Viewing capacity and plans using resource planning


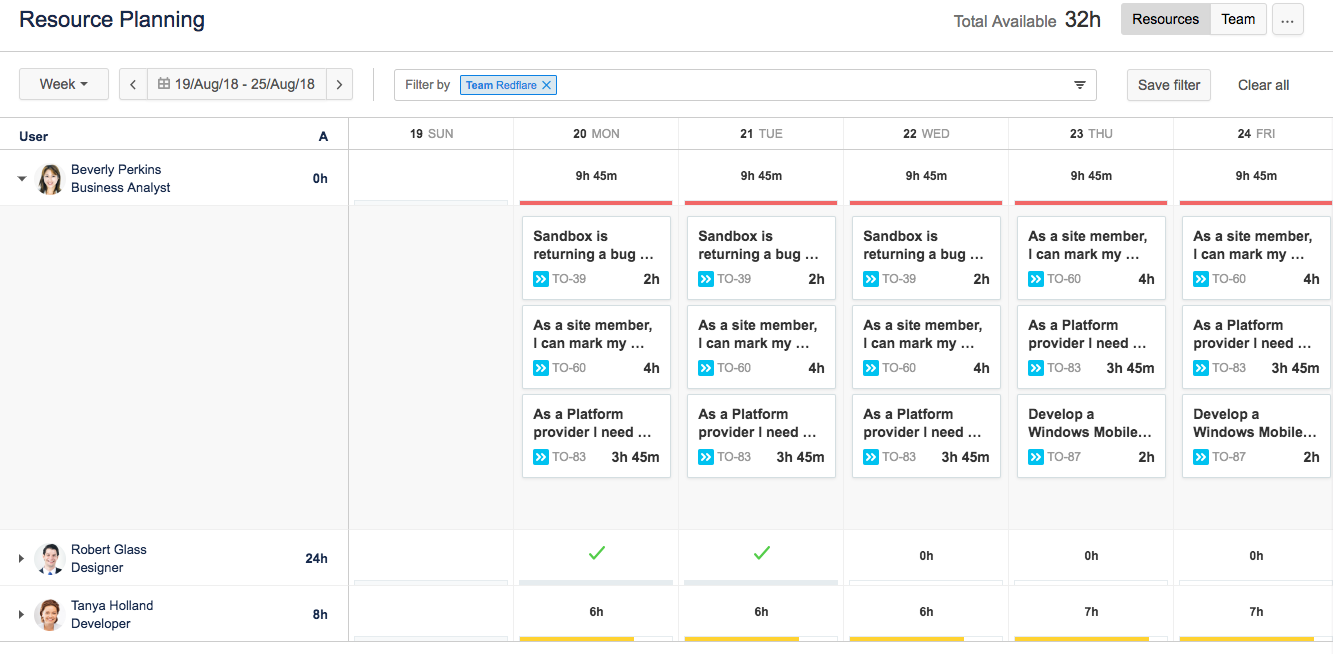
You can also view the capacity and commitment of your teams using the Resource Planning view. The Resource Planning view provides an overview of your resources so that you can see at a glance who’s available and who’s overbooked. 

To see an overview of your resources in Tempo for Server...


Viewing resources in the Resource Planning view requires the View Team Plans permission for the teams to which the resources belong.

In Resource Planning you get a high-level view of all your resources and how they are allocated. You can see how much time is available in total for the selected period as well as time available for each resource. You can sort the resource list and expand it to view plan details for each resource. You also have other view options, such as selecting to focus on the daily details in the Days view or viewing a longer-term overview of availability in the Weeks view.  

To access Resource Planning, select Planning :planner_dc: in the Tempo sidebar.

Resource Planning - Days view

Resources are displayed on the left-hand side, followed by their remaining available hours for the selected period. When you hover over the available hours, a tooltip shows the number of hours required, planned, and overbooked.

On the right-hand side you see a schedule with the total number of hours that each individual is scheduled to work on each day. At the top-right of the view you see how many hours are available in total for all resources displayed in the view.

  • A green check mark indicates that a resource is fully allocated.

  • A yellow "progress" bar shows you the relative amount of available hours allocated.

  • A red bar indicates that a resource is fully-allocated, or over-allocated.

Switching Between the Days and Weeks View

You can select between a Days view focusing on daily plans and a Weeks view focusing on long-term planning. Use the buttons at the top of the view to switch between the views.

Use the navigation arrows to jump forward or backward one week or month at a time.

You can also click the period selector and modify the date range for which data is displayed in the view.

Days View

The Days view displays information by week and is optimized for managing single-day plans. Planned tasks are displayed as cards ordered by start time. By default, the Days view displays the current week from the start of the week.

Weeks View

The Weeks view provides a longer-term overview of availability and is optimized for managing longer-running plans (a few days up to a few weeks). The Weeks view displays 5 weeks from the start of the current week. The view gives a high-level daily overview of resource allocation and displays fewer details on each day than the Days view. Planned time is displayed as a timeline and plans with a start or end date extending out of the displayed scope are indicated with an arrowed edge. Hover over a timeline to see how many hours are planned for the task. You can easily navigate from the Weeks view to the Days view by clicking the week you want to focus on in the schedule's header.

Sorting the Resource List

By default, the resource list is sorted by user name in alphabetical order. You can also sort your resources by availability.

  • Click User to sort the resource list in alphabetical order. Clicking User when the list is ordered in alphabetical order will reverse the order.

  • Click to sort by availability. Click again to sort in descending order.

Viewing Plans

Clicking the triangle to the left of a team member allows you to view all of their planned tasks and make changes to their schedule. You can also expand all resources at once by clicking the triangle next to User at the top of the resource list.

Plans are ordered by their start time, show the hours planned, and approval status:

  • a white background indicates that a plan is approved.

  • a grey background indicates a plan that is in review.

  • a shaded plan with gray text indicates a plan that has been rejected.

You can click the plans to view more details and https://tempo-io.atlassian.net/wiki/spaces/THC/pages/379945736.

Expanding and Collapsing the Issues Side Panel

The Issues side panel is displayed on the right-hand side of view showing Jira issues from predefined JQL searches. You can drag issues from the side panel directly onto the view. The Plan Time dialog box opens where you can enter plan details. To expand the side panel, click :side_panel:  at the right. You can also access the side panel on the View menu at the top right.

Selecting View Options

At the top-right of the view, the View menu allows you to show or hide weekends and rejected plans in the view. In the Days view you can also select to display the planned tasks as Large Cards.


Related Topics


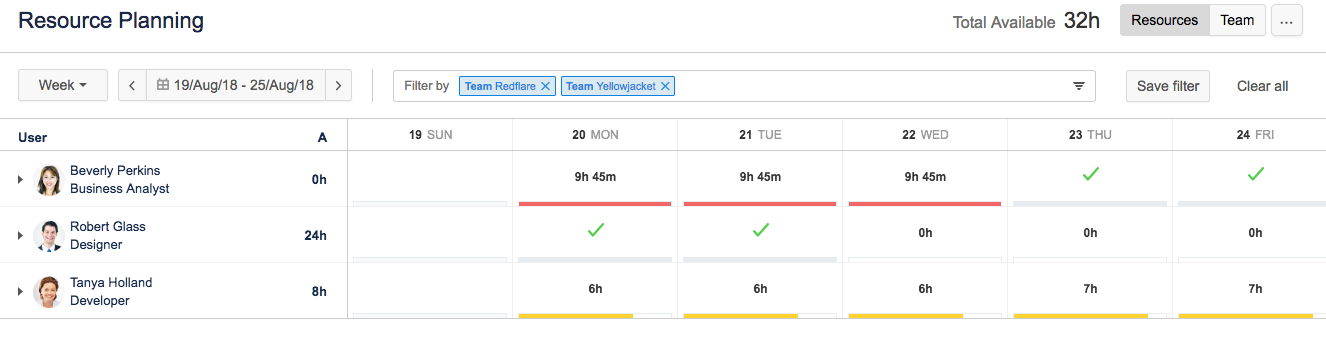
Use the Filter by dropdown to select your teams, Redflare and Yellowjacket, and browse to the of August 20 - 27  (Week 34). You can immediately see that Beverly is over-committed for this week as indicated by a red bar. Tanya is only committed for 6 or 7 hours per day that week so the yellow progress bar indicates the relative amount of planned hours. Robert is fully committed on Monday and Tuesday of this week so he has a green check-mark for those days.

Click the little arrow to the left of Beverly's name to view her plans in more detail. Now you can see exactly which plans Beverly has scheduled and how she is over-committed.

JavaScript errors detected

Please note, these errors can depend on your browser setup.

If this problem persists, please contact our support.