-
Team members can plan time for themselves, either vacation or time off or to work on work items.
-
Planning time for other team members using the Planned Time form requires the View Plans and Manage Plans permissions for that team.
The Plan Time form opens for you to create a plan when you do any of the following:
-
Select the Plan Time icon in the Resource Planning view.
-
Select the + on a day in the calendar in the Resource Planning view.
-
Drag across multiple days in the calendar in the Resource Planning view.
-
Drag a work item from the Work Items side panel to a day in the calendar in the Resource Planning view.
-
Select an existing plan card.
-
Select Plan Time in the My Work Calendar in Tempo Timesheets.
-
Select Plan Time from the Tempo panel in a Jira Work Item view.
View Planning Time for Resources for more information about creating plans in these ways.
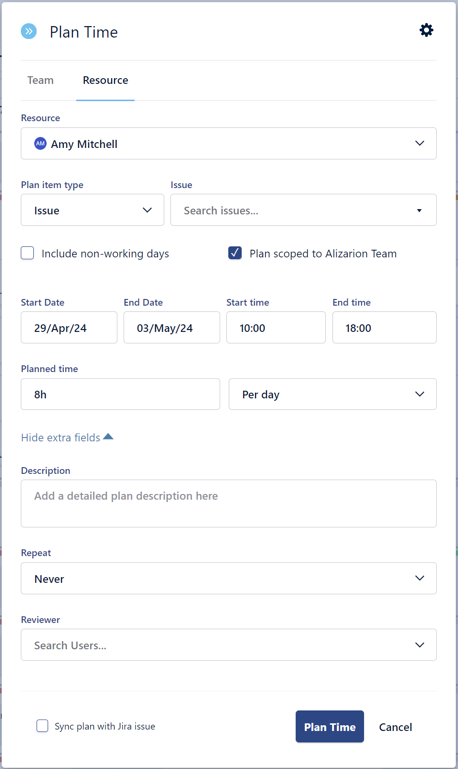
Completing the Planned Time Form
The values you need to enter to plan time will depend on whether or not this is a synced plan.
For synced plans:
-
Select the work item to sync the plan with.
-
Enter any missing data from the required sync fields.
For non-synced plans:
-
In Resource type, select either User or Generic User, and then choose the team member you want to assign the plan to.
-
In Plan item type, select either Work Item or Space, and then select Jira work item or space.
-
We recommend planning time in a Space for high-level planning.
-
If you're searching by Work Item, select in the Search field and use the three tabs, which are the same as in the Work Items side panel - see Finding Work Items with the Work Item Picker.
-
-
You can Include non-working days in your plan, such as weekends or holidays.
-
Enter the Start and End dates.
If your plan spans more than one year, we recommend dividing it into two plans. Tempo Capacity Planner supports a maximum of one year span per plan. -
Enter the number of hours for the plan using either of these methods:
-
Enter the number of hours of Planned Time per day if it doesn't matter when the planned hours are in a day. Then select whether these hours are Per day or the Total number of hours. When you choose Total number of hours, the total is divided equally by the number of days planned. See Planned Time for 0-Hour Days and Days with Different Available Hours below for additional details.
-
If your Tempo Admin has enabled the Start and End time fields, you can specify when you plan to work on the item. This is useful for time-sensitive tasks or simply to plan out your day in detail.
-
-
If you want to add a description, set a repeating plan, or set a reviewer, show the extra fields.
-
If you need to have your plan approved, such as when requesting vacation or other time off, Tempo sends an email notification to the reviewer. The Status of your plan will be Pending until it is either Approved or Rejected. See Approving Plans for more information.
If you have only one reviewer, the reviewer name is pre-selected.
-
-
Select Plan Time and the plan is displayed for you or the resource on those dates in the Resource Planning view.
Planned Time for 0-Hour Days and Days with Different Available Hours
In the Plan Time dialog, when the planned hours are set to Total number of hours, the system includes all days with available hours (greater than zero) in the distribution and divides the total hours evenly among them. Days with zero available hours (such as full-day holidays or days with 0-hour workload schemes) are excluded unless the Include non-working days checkbox is enabled. Refer to the table below for examples of planned time distribution based on 0-hour days vs days with different available hours.
All included days receive the same planned hours, regardless of their available capacity. For example, a day with 4h available and a day with 8h available will both receive the same planned hours, which may result in over-allocation.
|
Days Excluded (0h available) |
Days Included (>0 hours available) |
|---|---|
|
Example: Plan 32h across Mon-Fri, where Monday is a full holiday Total planned hours allocated per day = 8 (32h ÷ 4 days)
|
Example: Plan 36h across Mon-Fri, where Friday has a 4h workload (Mon-Thu have 8h) Total planned hours allocated per day = 7.2 (36h ÷ 5 days) Monday: 7.2h Tuesday: 7.2h Wednesday: 7.2h Thursday: 7.2h Friday: 7.2h Friday gets over-allocated by 3.2h, as 36h is distributed evenly across the planned period. |
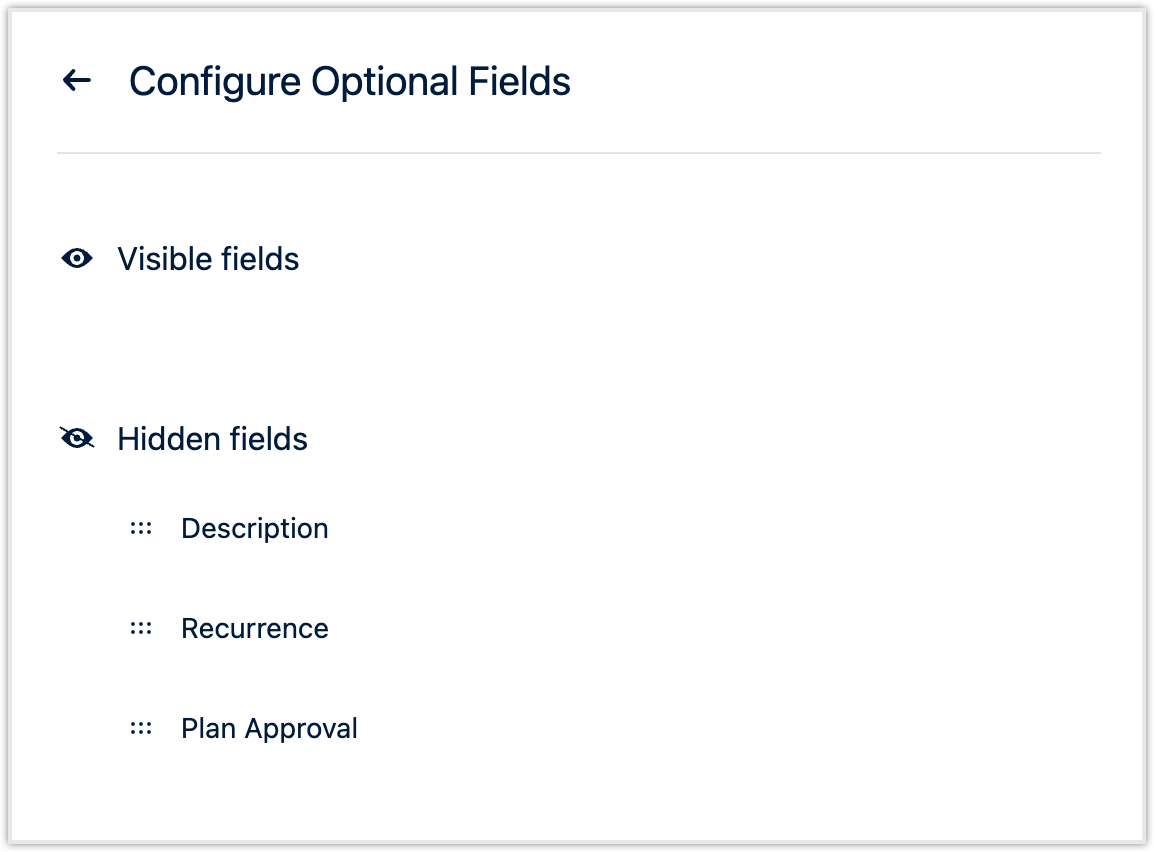
Hidden Fields
The Plan Time form also includes hidden fields. You can view and configure the hidden fields by selecting the cogwheel icon.