Please note, that this instruction assumes turned on 2-Step-Verification in your Google account.
-
Navigate to your Google Admin console.
-
Select Security.

-
Under the Signing in to Google section, select App Passwords.
-
If you don’t see this option:
-
2-Step Verification is not set up for your account.
-
2-Step Verification is set up for security keys only.
-
Your account is through work, school, or other organization.
-
You’ve turned on Advanced Protection for your account.
-
-
Select the application and device you want to access.
-
You can select ‘’other’’ and name it ‘’Mail Me’’
-
Copy the password, go back to the SMTP server configurations, and enter it in the ‘’Password field’’.
-
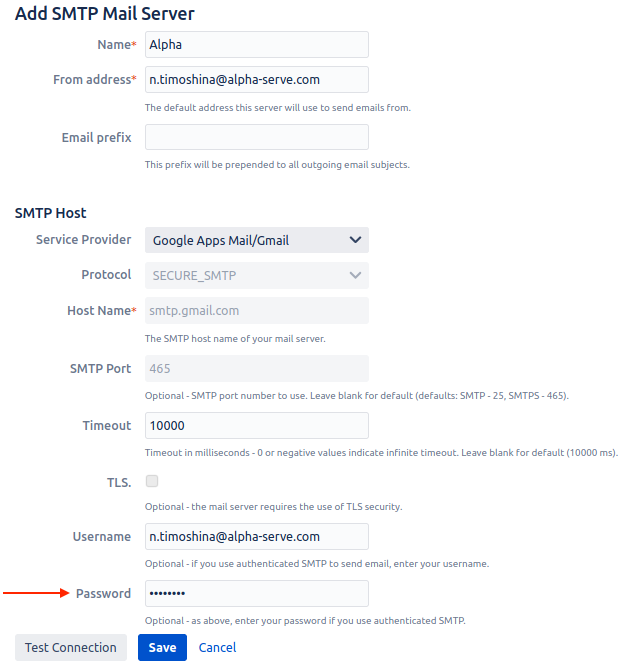
Fill the other fields as described:
-
Name - a required field, name of the SMTP server.
-
From address - a required field, the default address which will be used for outbound mail.
-
Email prefix - a required field, this prefix will be prepended to all outgoing email subjects.
-
Service Provider - select Gmail server provider from the list
-
Username - username of your email account (example name@gmail.com).
-
Password - password to your email account.
-
Test Connection - allows you to check the connection to the SMTP server. In case of an unsuccessful connection, an error message appears.
-
Save - saves all data and creates Gmail server as configured.
-
Cancel - allows you to return to the “Custom SMTP server” page without saving data.
-
🔎 Basic GMAIL configurations can be found on this page: Gmail configuration option .
🔎 To check your limits, please follow this page: Gmail email sending limits .