Skip table of contents

Syncing Roadmaps to Calendars

Available on the following plans:

  • Business

  • Professional

  • Enterprise

Terms to Know

  • ICS File - An iCalendar (shorthand for Internet Calendaring and Scheduling) file type which is used by web-based calendars for the purpose of sharing calendar data across multiple users with minimal friction.

  • Calendar Subscription - A function of most modern calendars which allows you to provide a custom calendar link or ICS file and have the contents of your calendar automatically update.

In order to provide better visibility into roadmap items across your entire team, Roadmunk provides the option to synchronize your roadmap items into your calendar. This allows your team to get a glimpse into ongoing projects and other work that you and your teammates may have in-flight. 

image-20240514-164623.png

Setting Up Calendar Sync
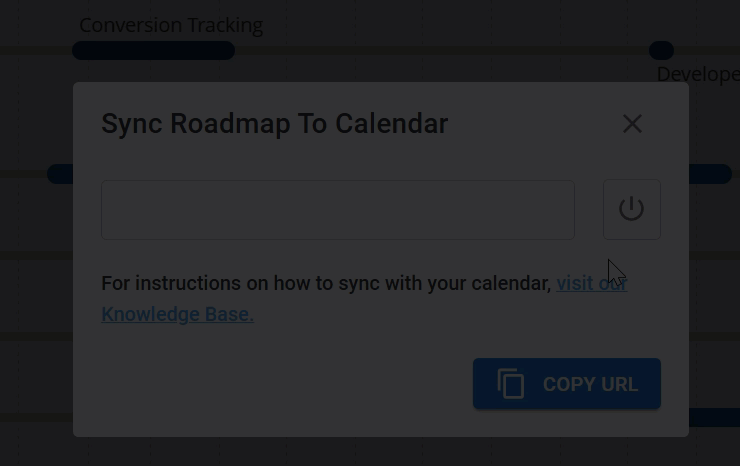
From inside the roadmap view that you are looking to sync to a calendar, navigate to the Export tool on your Customization Toolbar in the top-right corner. Inside this tool's drop-down, you'll find the option to Sync to Calendar.

Do note that item visibility for calendar syncs, as with our other export types, is view-specific. Certain items may not appear in the synced roadmap if they are not available or have been filtered out on the view you're generating the link from.

image-20240514-164648.png

After clicking Sync to Calendar, users will be able to access the control menu for generating a Calendar Subscription link. This functionality is toggled Off by default for all views in a user's roadmap, but will populate a fresh subscription link when toggled to On.

Turning calendar subscriptions on and off

Once the link is visible, users can easily copy the provided link by clicking the Copy Button (as shown in the image above) or by manually copying the URL from the provided text box.

Toggling the Calendar Subscription Link off once it's been created will clear the old URL and generate a new one once it's turned on again. This can cause users to lose access to any future updates on the roadmap itself and will leave them with only the items provided at the time of last sync. 

Adding Subscription Links to Off-App Calendars

Google Calendar

 From inside your Google Calendar:

  1. In the Calendar Summary panel on the left-hand side, navigate down to Other Calendars.

  2. Click the + (Add Other Calendars) button beside this section and select From URL in the menu that appears.

  3. Enter the Calendar Subscription Link into the URL of calendar field.

  4. If you wish to share this calendar with your team, make sure Make the calendar publicly accessible is checked.

  5. Click Add calendar to finish adding the roadmap items to your Google Calendar.

Microsoft Outlook/Sharepoint Calendar

 From inside your Microsoft Outlook Calendar:

  1. In the Calendar Summary panel on the left-hand side, select Add calendar.

    • If this option is unavailable, you may need to contact your O365 workspace admin.

  2. In the Add Calendar screen that appears, click into the Subscribe from Web option.

  3. Enter your Calendar Subscription Link into the provided field.

  4. Once the URL is entered, you should automatically see the following customization options:

    • Calendar Name: Outlook does not automatically pull the roadmap name, so you will need to enter a custom name for this calendar.

    • Color: The color of the events that appear on your calendar.

    • Charm: The symbol associated with the roadmap items on your calendar.

    • Add To: Limit visibility of the camera to a specific audience.

  5. Once you've setup your customizations, select Import to finish pulling in the calendar items.

Calendar for MacOS

 From inside your Calendar for MacOS:

  1. In the top menu bar, click into File and select the New Calendar Subscription... option

    • Alternatively, enter the following keyboard shortcut: Option+Command+S (⌥⌘S)

  2. In the modal window, paste your Calendar Subscription Link into the Calendar URL field and click Subscribe.

  3. On the Calendar Info screen, you can customize the following:

    • Name - The name of the roadmap-sourced calendar

    • Location - Where the calendar is store (iCloud or On Your Mac)

    • Remove - Hides certain event customizations. We recommended unchecking Alerts.

    • Auto-Refresh - How often the calendar refreshes. We recommend Daily or Weekly.

  4. Once you have completed the Calendar Info customizations, press OK to continue.

  5. The synced roadmap will now appear as a calendar option in the far-left panel of your Calendar app. If set the Location as iCloud during the customization phase, it will also automatically propagate to other devices where you've setup your iCloud calendars.

JavaScript errors detected

Please note, these errors can depend on your browser setup.

If this problem persists, please contact our support.