Creating & Navigating Fields in Roadmunk
This feature is only available to Collaborators and Account Administrators.
Terms to Know
Field - Categories or attributes that you can use to organize, group, filter, and pivot roadmap data in different ways. Simply put, Fields contain Item data.
Field Values - The individual components that make up a Field. For example, you have a Field called Status, and its Field values are Future, Soon, Up Next, In Progress, and Complete.
Roadmap Field - A Field that is unique to a specific roadmap and can't be included or accessed through any other roadmaps.
Account Field - A Field that belongs to the entire account and can be used across all roadmaps.
Promote - An action to convert an existing Roadmap Field into an Account Field. This action is permanent and can't be reversed.
Creating and Populating Fields in Roadmunk
Create a Field from the Inline Menu
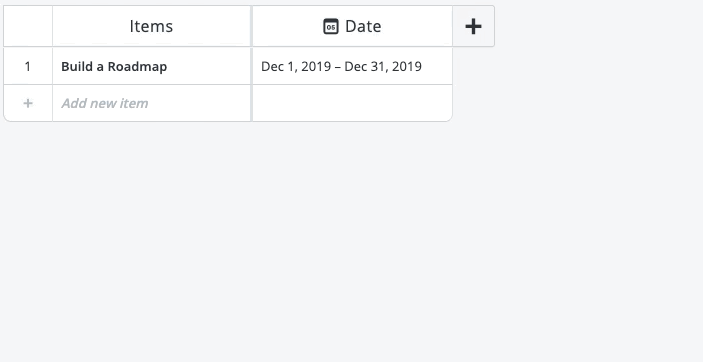
Fields can quickly be created inline while working in the Items Table view:
Locate the Add Field (+) button your Items Table
Start typing the name of the Field you want to create
If the field doesn't already exist, click on the on the + New “______” Field option in the drop-down
Select the Field Type you want to create
Once completed, the Field will populate on the roadmap and will allow you to enter values into the cells in that column. One thing to note is that when choosing to create a List or Multi-Select list Field Type, a modal will appear allowing you to input both Field Values and the Field Description prior to using the Field on your roadmap.
Create a Field from the New Field Modal
Fields can also be easily created from your Items Table view through the New Field window:
Locate the Add Field (+) button your Items Table
Click on the + New Field option in the dropdown to open the New Field window
Enter the Name & Type of the Field you want to create at the top of the field
If necessary, populate the Field Description and Field Values into the Field
To complete the setup, click the Create Field button in the bottom-right corner
Once created, the Field will automatically populate in the last column of your roadmap. Please note that all new Fields on your roadmap will be created as Roadmap Fields, meaning that they’re tied to that specific roadmap, and will need to be promoted if you’re looking to use them across multiple roadmaps on our account. For more information on Promoting Fields, click here.
Roadmunk has a handful of application-specific reserved terms that cannot be used when naming new Fields. These terms include: Error, Internal ID, External ID, Child Of, Source, Item, Milestone Type, Milestone, Description, Start Date, End Date, and Date.
Navigating Fields in Roadmunk
Exploring Fields
The Fields section on the Roadmaps homepage allows you and your team to easily view, sort, and organize your Fields; providing a centralized hub with which you can quickly navigate, locate, and manage all Fields on your account.
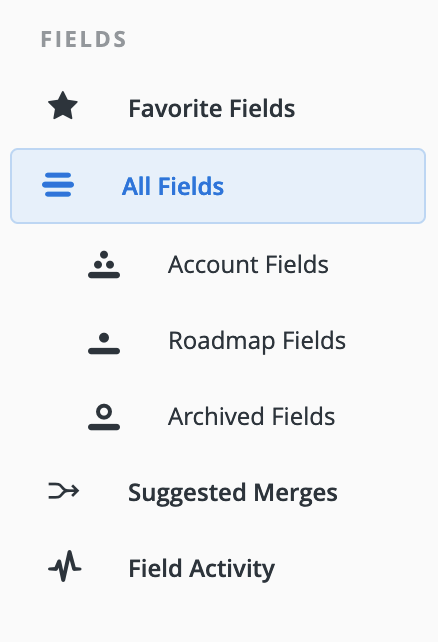
Favorite Fields - In this folder, you can find all the Fields that you have made a favorite. Favorite Fields are associated with the user and will need to be selected by each team member.
Account Fields - In this folder, you can find all of the Fields that are shared across multiple roadmaps on your account. Team members can be added to these Fields by clicking the Members button in the toolbar that appears when you select a Field, and unused Fields can be archived by clicking the Archive button in your toolbar.
Roadmap Fields - In this folder, you can see all of the Fields that are exclusive to your roadmaps. These Fields are unique to the roadmap they live on and can be easily promoted using the Promote button on the toolbar. Additionally, account admins are able to navigate between the roadmap Fields they own and those belonging to their team members using the drop down menu that appears at the top of the screen.
Archived Fields - When an account Field is no longer necessary, it can be archived into this folder. Archived Fields will continue to display in roadmaps that already use them but they can no longer be edited or added to other roadmaps. Additionally, archived Fields can be restored or removed by clicking the respective Restore or Delete buttons.
Create an Account Field from the All Fields Homepage
Account Administrators can create new Account Fields from the All Fields homepage and the Account Fields menu.
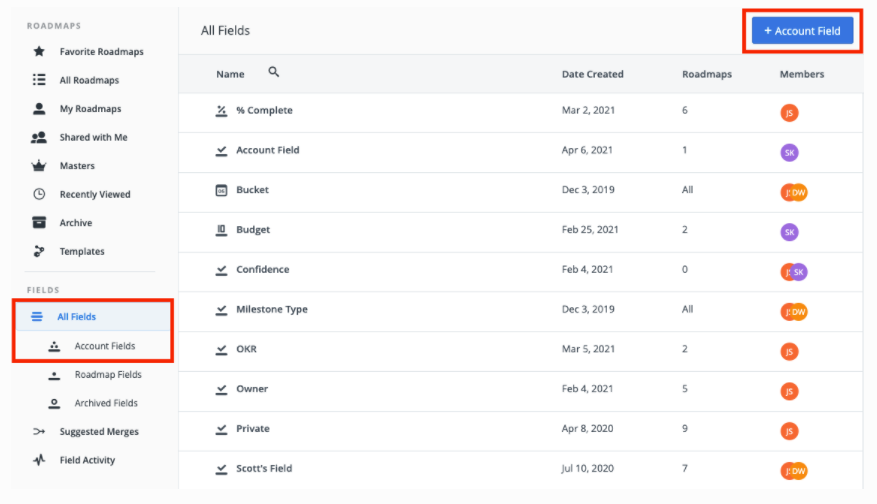
Locate and click on the + Account Field button on the All Fields or Account Fields Homepage
Enter the Name & Type of the Field you want to create at the top of the field
If necessary, populate the Field Description and Field Values into the Field
To complete the setup, click the Create Field button in the bottom-right corner
Navigating Field Activity
The Field Activity in the All Fields menu allows you to easily monitor and track Account Field activity in your account. This ensures that administrators are able to view any changes that have been made to Account Fields whether those are:
Fields being created or removed
Fields being promoted or archived
Team members being added or removed from Fields
You can also click into the Field Card and select the Activity tab in order to view all activity on a Field-by-Field basis.

More information on what's included can be found in our article on In-App Notifications & Updates. Do note that the Field Activity panel and the Activity tab on the Field Card can't be used to track the activity of items on your roadmap - for more information on the Activity tab in the Item Card, make sure to check out our article on Exploring the Item Card.