Creating Groups to Organize Tasks in Your Project
You can organize the issues, tasks, or epics included in your project scope into groups. This lets you see your project in a higher-level structure that reflects your needs and preferences. This is especially useful when you wish to see total costs for a group of related issues, such as per department, per job role, or per milestone.
Groups are an organizational tool into which you can move items. You can also drag groups and items dynamically to reorder them and move items from one group to another. When you manually change the order of tasks and groups, that order is preserved moving forward.
Each group header shows you the total number of items in the group, the total cost, and time spent. You can expand and collapse groups to show or hide details.
When you export your project data to a CSV file, the group information is included.
When items are added to the issue list via a scope sync, they are added to the bottom of the list in the order provided by the filter.
Jira issues that are completed appear in Done status and with a strikethrough across the number. You can still select the number to open the issue in Jira - the strikethrough only appears in Financial Manager.
Before You Begin
Navigate to your project’s Scope tab to organize items.
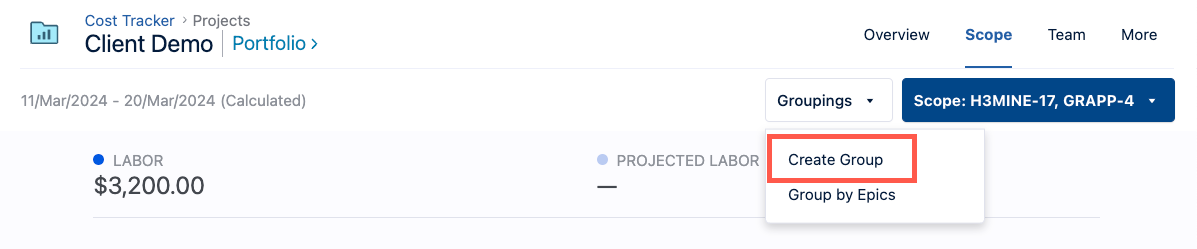
Create a Group
Click Groupings in the top-right, then select Create Group and enter a name for the group. You can edit the group name inline.
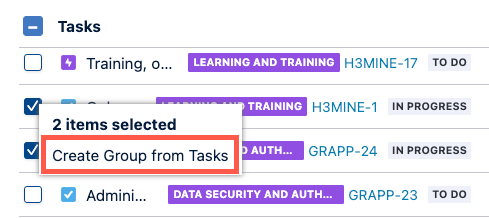
You can also select items you want to group together, open the Groupings menu or right-click, and then select Create Group from Tasks.
Add Items to a Group
You have multiple options to add items to a group.
Drag tasks into a Group
Select individual tasks using the checkboxes, and then drag them to the group’s folder icon.
If your table is sorted, then you can’t drag and drop any tasks. Make sure to remove the sort mode from the table columns before dragging tasks across the table.
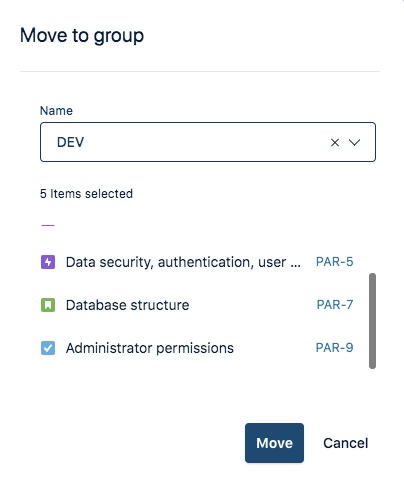
Move multiple tasks into a group
Select multiple tasks using the checkboxes.
Open the Groupings menu and select Move Tasks to Group.
- OR -
Right-click and select Move Tasks to Group.In the Move Tasks to Group form, choose the group you want to move the items into.
The selected tasks are moved into that group.
Remove tasks from a group
Select tasks using the checkboxes.
Open the Groupings menu and select Remove Tasks from Group.
- OR -
Right-click and select Remove Tasks from Group.Confirm that you want to remove the tasks.
The tasks are no longer included in the group and are returned to the Tasks list.
Delete Groups
In the Tasks list, check the boxes of the groups you want to delete.
Right-click and select Delete Groups
- OR -
Click the Groupings menu and select Delete Groups.Click Yes in the confirmation message to delete the selected groups.
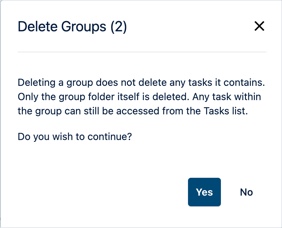
Only the selected group folders are deleted. The tasks that are in the deleted groups are simply returned to the list.
Grouping by Epics
When you have a long list of tasks from different epics, it can be useful to group them into folders that are separated by their Epic so that you can get a summary of the cost by epic.
Groups created by using Group by Epics behave the same way as regular groups that you create. This means that you can later add or remove tasks or reorder the tasks of any of these groups. However, if you choose Group by Epics again, all tasks belonging to epics that have been moved out of their epic group will be placed back into them. Similarly, changes made in Jira affecting the epic of a project’s tasks are not automatically reflected in the project’s scope structure.
To group tasks by their epic:
Click Groupings in the top-right and select Group by Epics.
The tasks are categorized and moved into folders that are automatically created for each epic in the project scope.
The new folders are named after the Epic. For example, tasks with the UI improvements epic link are grouped into a new folder named UI improvements. Tasks with no epic link aren't moved.

The ordering of tasks is preserved within the epic folder.
Sub-tasks are included when grouping by epic.
New groups created using Group by Epics are located at the top of the scope list in alphabetical order.
Group by Epics is available only for Jira Classic Projects.
If you’ve already created your own groups containing tasks with epic links, then grouping by epic will create a separate group for those issues under the same epic name. Also, groups already named after the epics will not be recreated.
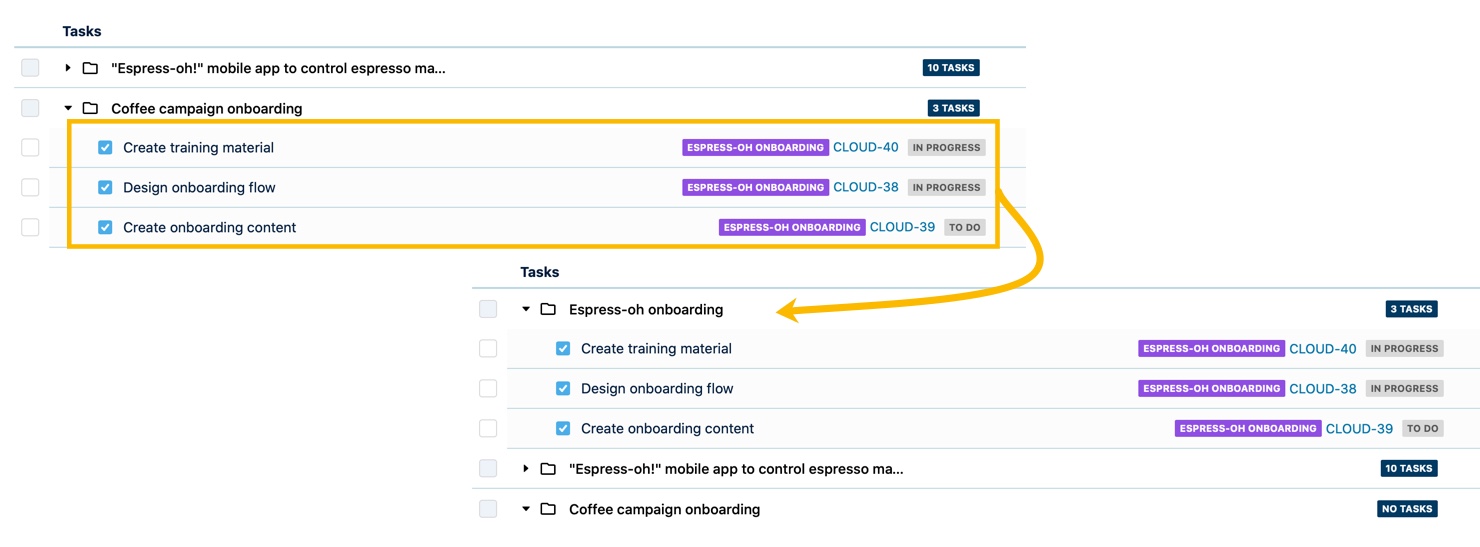
For example, if you’ve already created a folder called Coffee campaign onboarding with tasks that have the Espress-oh Onboarding epic link, then grouping by epic will move those tasks into a new folder named after the epic, Espress-oh onboarding.
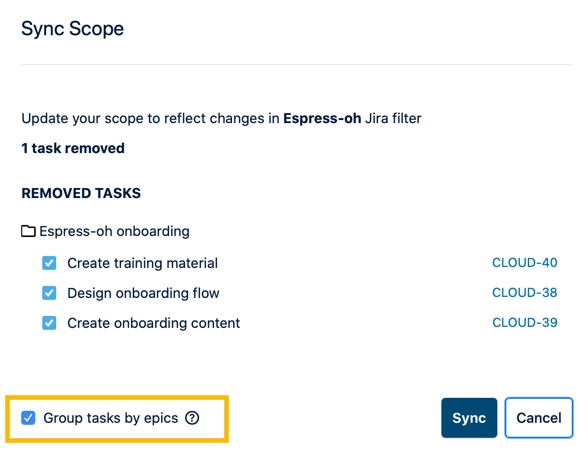
Adding Tasks from a Sync Scope
When you Sync Scope to update a project's scope, any new items that are found are added to the bottom of the issue list - they aren't added to groups.
However, once you’ve grouped a project’s tasks by epics, Financial Manager automatically adds new tasks to their epic groups on every subsequent Scope sync for that project.
To stop grouping new items by epic on future Scope syncs, simply uncheck Group tasks by epics in the Sync scope preview dialog. Your preference is preserved for subsequent scope syncs on that project for you and all collaborators.
Changing the scope of a project turns off Group by Epics for that project.